Hey there! You are a developer or even not, and you want to create a desktop application using Python and Tkinter? You are in the right place.
Introduction
As we know Python is the most popular programming language now. Everyone uses it for a lot of fields because it is free, easy, and there is a huge community of it, so there are no problems if you want to learn it.
Now I will talk about the main subject of this blog, how to create a desktop application using Python and another library? Because we know that only Python is not enough to do all the stuff. For that, there are tons of libraries that help us to do the different stuff (Data visualization, machine learning, creating desktop and android application, …) So in this blog, I will show you how you can create your very first application so that you will have an idea about it and how it is very easy.
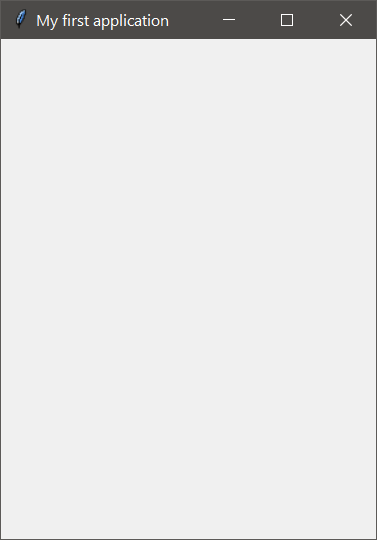
The very first application will be like this: ![]()
The first steps to creating a desktop application
To create a Tkinter application there some steps that are very important and we should start with. And there are other parameters that will optimize the application. So after my experience, the most first steps that I do when I create an application are these:
- Importing the library
- Declaration of the variable that will take the role of the application
- Putting this application as the main loop
- Changing the title
- Fixing the width and the height of the application
- Putting a global variable that has the value of the background-color
- Changing the icon if needed
Importing Tkinter library
So for Python, there are some libraries that we should install before using it but their others that come integrated with Python so we don’t need to install them. Tkinter library is one of the libraries that we don’t need to install (but for Ubunto you need to install it). To do that you can use only one line to import it to the project, this is the line needed:
from tkinter import *That was the line that we need to import all the functions of Tkinter (there some that we need to call them separately). But if you don’t want to call all the functions at one time so you can call each function only when you need it. Because the symbol ‘ * ‘ means that you will call all the functions.
Variable declaration
So as we know in Python or in any programming language we need always to use variables because it minimizes the work and the memory space. Instead of using 10 operations with the same value, we declare a variable with that value and we use only the variable when we need that value. The same thing here, we will need to call the application in each step which means when we want to create any item for the same app so we need to call the app first. To create the empty application there is a function that does that, called ‘ Tk( ) ‘. But if we want to create an app then put stuff on it so we need to call this function by putting the result in a variable so that we can use it after. So here is the line that we should run to create the application:
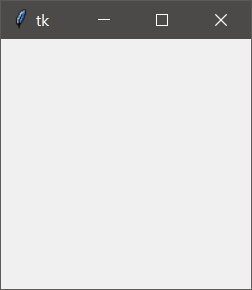
root = Tk()After that we run that line, the application will be created and stored in the variable called ‘ root ‘. But we can’t see the application because we didn’t put it as the main loop so for this case it will be run and closed very fast and we can’t see it. To fixe that only what we need is to put it as the main loop using this command:
root.mainloop()So after runing the code with that last line now we can see the first empty application. Here is:
Change the title in Tkinter
As I told you, for me there some steps that I start with every time I create an application in Tkinter. So now I will show you how you can do that.
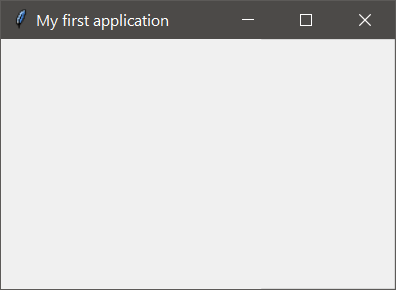
To do that there is a function in Tkinter called ‘ title ‘. If we call it using the root object from the class, we can put the title directly. Here is the line of code that does that:
root.title('My first application')Now after adding this line to the previous code, you will have this window:
Fixing the width and the height
I think that you could see that Tkinter by default, gives some values to the width and the height of the window. That if the window is empty, but if you pack something on the window here the size of the window with change with the size of the items that you put. And I don’t think that this way is professional.
For that, you need to fix a constant width and height so that it won’t be changed even if you put stuff on it. So to do that, you can use another function in Tkinter called ‘ geometry ‘. So that you will fix the size of the window from the beginning.
Here is the code for that, there is only one line that should be added:
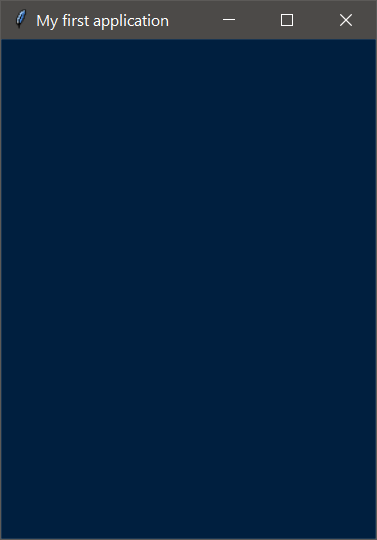
root.geometry('300x400')Here we can see that I put 300 x 400. So the 300 is for the width, 400 is for the height, and between them, we have ‘ x ‘ is the alphabetic letter and not the mathematical symbol. Here is the window with the new size:
Changing the background
For me, the color of the background is not very important to start with. But I will show you how you can change it in case you want to.
So to do that, you can use another function in Tkinter called ‘ configure ‘. Actually, this function does more than one work but in our case, we use it only to change the color of the background.
But the way that I like to change the background color, is to declare a variable that will take the value of the color (it is a hexadecimal value and we declare it as a string). Why I am doing this because if you will add an item after (for example a Label) in this case the background color will be by default which means the white one. So in each time, you declare an item and you want it to have the same background color as the root. Here you need to give the code of the color each time. But if the color code is a global variable so here you will use only the name of the variable (this is my way you don’t have to do it, but if you want a clean program so I recommend you to do it).
Here is the code to do that:
 background_color = '#001f3f'
 root.configure(bg=background_color)
So as you can see, I declared a variable that contains the code of the color and I put it in the configure function to change the background color of the root. Another advantage of this method is if you want to change the background color for all the applications in this case you will change it only in the variable and it will be changed in the whole program (Labels, button …). So here is the application after changing the background color:
Changing the icon
Now for the icon of your application, you can change it or leave it as it is. It is not necessary to change it, but if you want to put your logo for example in the app so I will show you how to do that.
So to do that, you can use a function in Tkinter called ‘ iconbitmap ‘. But in this case, you have to be careful, because you can’t put any image you want but you need to convert it into an icon which means that you have to turn it into the ICO extension.
Don’t worry about that, you can do this conversion online and for free. You can use this link if you want.
Here is the line of code that do that:
root.iconbitmap('logo.ico')So here is the little logo in the top that I added:
Packing some item in the application
As you saw, creating the application wasn’t very hard. Now we can pack some stuff on the application, like images, Labels, buttons … . So I will show you how to add these stuff one by one. For that we will pass by these steps:
- Adding a Label and doing some editing on it.
- Creating a Button and customizing it.
- Packing an Entry and getting the info from it.
- Displaying an Image in the app.
So will do these steps one by one until you will be able to create a great application for your business.
Create a Label in Tkinter
A label is like a zone of text that we use in Microsoft Office for example. So we will create a text that could be a title or sentence or anything you want then we put it in the application.
You need to know that to put anything in the app, there are two-part to do that. The first one is to create the item that you want to put then the second part is to pack it in the app.
Now to create a Label, it is very easy and you need to use always a Tkinter function called ‘ Label ‘ (Python is helping us which is great to learn anything very fast).
So create the Label you can use this line of code:
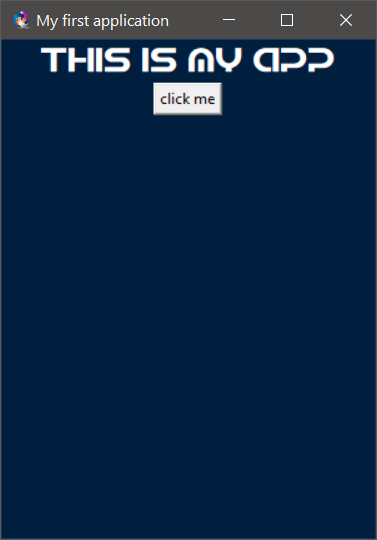
title = Label(root, text="This is my app") Here you can see that there are only two parameters in this function and that only for the beginning. I put the first parameter root which is the name of my application for the moment it doesn’t matter if I put it or not because I have only one application in the program and I don’t have frames… Then the second parameter of course is the text that I want to put in this text zone.
And I put the whole function in a variable so that if we need to change something in this text zone (title in this case) then I work only with the variable called title.
But for the moment if I run the code as it is we won’t see the label in the application, because as I told you there two steps to do that. The first one is to create the label and the second one is to pack it. We did the creation part now we have to do the packing one.
To do that you can use this line of code:
title.pack()If we run this as it is, here we will see the label in the application. But by default, it will be packed in the middle of the application which means we can’t control in which column or row we want to put the label (we will see after how to do that). Here is the application with the text on it:
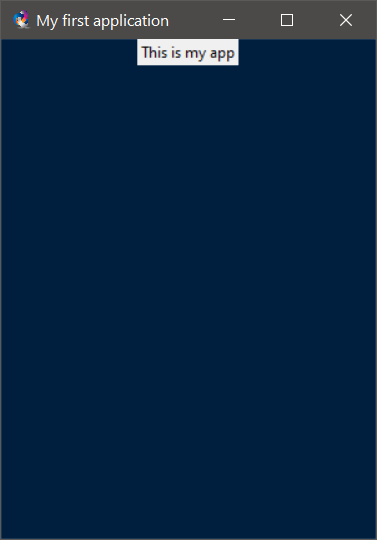
So like that will be the packing by default. Let’s leave it now and we talk about the label. As you can see the label is in the app as we wanted but it is a little bit ugly. We need to change the background maybe the font also and why not even the size.
So to do all this stuff, we use another parameter in the same function. Here are some other parameters and what they do:
- bg: it is a shortcut of background which help us to change the background color
- fg: it is a shortcut of foreground
- font: which controls all the settings for the font which means the type, size, bold, or light.
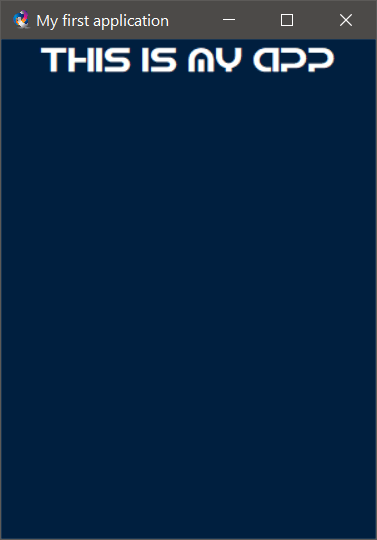
So will change all this stuff in the same line of code. Starting with the background color, I think that you remember when we talked about the background color for the application we put the color code in a variable and I said that we will need it in a stage, so now you will see its use.
 title = Label(root, text="This is my app",
               bg=background_color,
               fg='#ffffff',
               font='android 20 bold')
As you can see, I put the background color of the text at the same color of the app so that we won’t see that white color in its background. Then for the foreground, I put it white ( #ffffff = white ) so that it will be clear, and finally the font I put it android it is just a choice for this example and the size I put it 20 bold.
Note: for the font family, you can use any font you like but before that, you need to check that it is already installed in your system then go ahead and use it. If you don’t know how to install it so I will tell, you need to search for your font in google then you download it and it will be like a txt file if you open it so you will find an install button. By clicking on it the font will be installed and you can use it for Tkinter and more other stuff.
After running this line of code, here is the application that we will get:
Create a button in Tkinter
After that we put a label in the application, I will show you how you can create and put a button in the application. After that, I will show you some stuff that may help you in your projects.
The same thing that we did in the label, we will do with the button. We will create the button using a function called ‘ Button ‘ then we pack the button. Very easy doesn’t it!
Here is the two lines of code that do that:
my_button = Button(root, text='click me')
my_button.pack()
I started with the basic button which contains only a text on it and with the white color by default. So here is the application that we get after running the program:
As you can see we have created that little tiny button, it is the basic one and now we can edit it and make it better. So if you want to change the background color, foreground color, font family, or font size then you can use the same parameters that we used for the labels. And if you want to change the width and height size then here you can use the two parameters width and height like this.
I will do a trial so that you can see that it is very easy if you understood the label part.
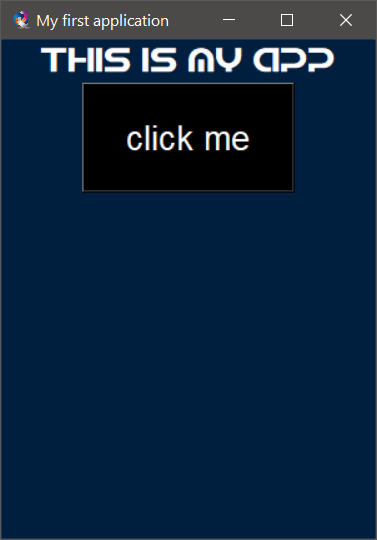
my_button = Button(root, text='click me',
                   width=10,
                   height=2,
                   bg='#000000',
                   fg='white',
                   font='arial 20')
So I applied the parameters that I talked about, but there is something strange here I guess you can see it, for the foreground color I put the white color with the word white and you will see that it works because for the fundamental colors you can use their names directly.
Here is the button after editing:
Create an Entry in Tkinter
After that we saw how to use labels and buttons so now I will show you how you can create an entry and how you can get information from it.
To do that we will use always a Tkinter function called ‘ Entry ‘. So we will do the same thing, we create it then we pack it and at the end, we get the text from it.
For those who don’t know what is an entry, the entry is just a text box where the user can put some text and you use it after. For example, if you are logging in to your Facebook account and need to enter your username and password so that boxes, where you will put these coordinates, are the entries.
To add it into our application, you need to add these two lines to the program:
my_entry = Entry(root)
my_entry.pack()
Here you can see that creating an entry is very easy (I am talking about the basic one). We need only to say that this entry is for the root then we pack it and that’s it. Here how does it look like:
You can see that it is working and I could put some text on it, but this is the basic one. Now we can customize it. Like changing the background and foreground color, changing the font family, changing the width …
Let’s try to do some changes on it.
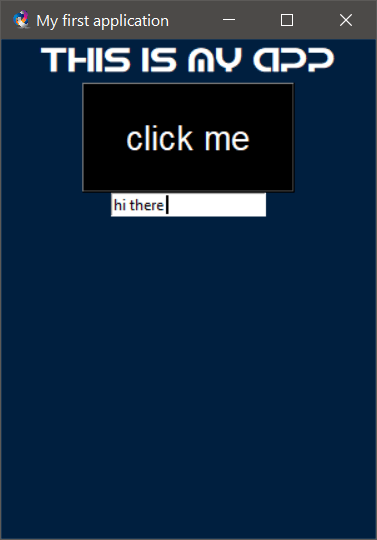
my_entry = Entry(root, width=30, font='none 12', fg='red')So for example I changed the width, and you can see the I used the same ‘ font ‘ function that we used in the labels and buttons, and finally, I changed the foreground color to red which means the text color. Here is the application that we got:
Now after knowing how to create an entry and customize it, I will show you how to get the text from it and use it in another function for example.
To do that, there is a function called ‘ get ‘ which is a member of the entry class, you have only to call it and it will return the text that you have in the entry. Here is the code for that:
text = my_entry.get()So you can see that it will be done in one line, but the problem here is that we didn’t create a function or an action that will apply this line of code. Because to get this text we need to call this line from a function or button or something like that.
To make it easy, we will get the text from the entry after clicking in the button that we created before and we print that text in a label.
Note: when we talked about buttons, I didn’t tell you how to add a function to the button or we can call it, a command the will be run after clicking on the button. Now I will show you how to do that.
Actually, to do it you have only to add another parameter called ‘ command ‘ to the function that we used to create the button then we put the name of the function that we want to call. Because the idea here is to create a Python function that does something and to call this function we will use the button. So here is the code to do that:
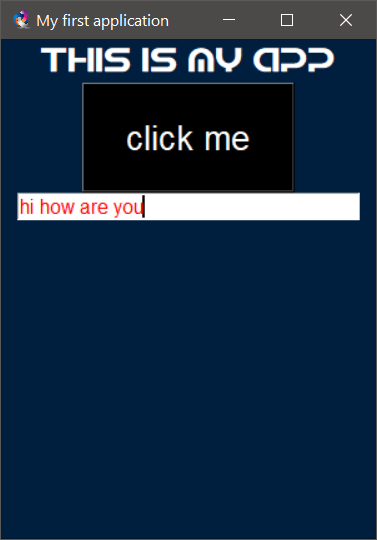
def print_text():
    if my_entry.get():
        text = my_entry.get()
        text_label = Label(root, text=text,
                           bg=background_color,
                           fg='#ffffff',

                           font='none 20 bold')
        text_label.pack()

my_button = Button(root, text='click me',
                   width=10,
                   height=2,
                   bg='#000000',
                   fg='white',
                   font='arial 20',
                   command=print_text)
So I declared the function print_text that will have the role of getting the text from the entry and put it in the label. You can see that I put a condition at the beginning of the function so that I will verify that the entry is not empty after that I have created a normal Label as we did before and this label will contain the text that we put in the entry.
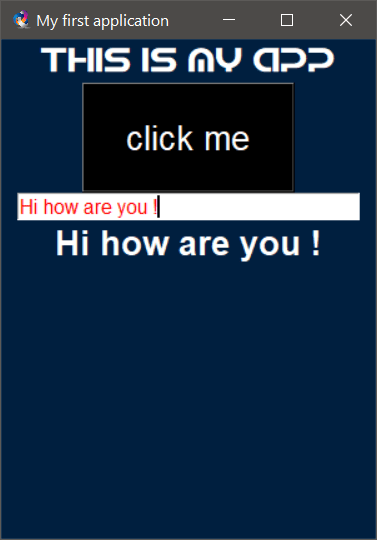
And for the button, I took the same button that we created before and I added the command parameter so that I can call the function that will print the text from the entry. So here is the result after running the program, putting a text in the entry, and clicking on the button:
How to put an image in the Tkinter app
For this final item that we will see in this blog, I will show you how you can upload an image and put in your application. Actually, there are a lot of ways to do that but I will show you the easiest one.
So to do that, you can use a function which is included in Tkinter called ‘ PhotoImage ‘. Its use is very easy but you have to be careful because this function uses GIF images only. So if you have an image and you want to put it using this function then you need to convert it into GIF. Don’t worry there are a lot of websites that help you to do that and for free, you can use this link for example.
And after converting the image and uploading it using the PhotoImage function you need to create a label then put that image in the label.
Here is the code for that:
image = PhotoImage(file='insta.gif')
image_lab = Label(root, image=image)
image_lab.pack()
Note: if you use this function you won’t have the access to all the processes that you want, for example resizing the image … For that, you can use the library pillow to control the size and more stuff and for the packing, you use that function ‘ PhotoImage ‘ to make the image friendly with Tkinter.
So that was all what I wanted to say in this blog, I hope that it was helpful for you and I see you in the next blogs.
So if you are interested and you want to learn more about Tkinter, so you can visit my course where I put some specific tools that you need, and you will find a lot of projects so that will have an idea about how to use Tkinter.