Before you can really dig into an STL file, you have to know what you're looking at. Think of the STL as the universal translator for the 3D world, especially for 3D printing and computer-aided design (CAD). It’s the format that turns a complex digital model into a language a machine can actually build.
At its heart, an STL file is just a collection of interconnected triangles that map out the surface of a 3D object. This process is called tessellation, and it's a trade-off.
- More Triangles: The more triangles you have, the smoother and more detailed the surface looks. The downside? The file gets big, fast.
- Fewer Triangles: Using fewer triangles keeps the file size down but can leave you with a model that looks blocky, especially on curved surfaces.
This is also why STL files are all about shape. They don't carry any information about color, texture, or what material the object is made of—just the raw geometry.
ASCII vs. Binary Files
You'll run into two types of STL files: ASCII and binary. They both describe the same triangular mesh, but in very different ways. ASCII files are written in plain text, so you could technically open one in a text editor and see the coordinates for every single triangle. That’s great for debugging, but it makes for massive files.
Binary files, on the other hand, pack that same data into a much more compact, machine-readable format. For this reason, binary is the go-to format for pretty much everything. The smaller files are quicker to load, process, and share.
The STL format actually dates back to 1987, when it was created by 3D Systems to get their CAD models to talk to the very first 3D printers. The name stands for stereolithography (though some call it "standard triangle language"), and it was the original bridge between digital design and a physical object. You can dive deeper into the evolution of the STL file format to see how it all started.
Knowing this little bit of history helps you pick the right tool for the job. If you just need a quick peek at a model, any basic viewer will do. But if you need to analyze, repair, or prep that mesh for a high-stakes medical print or a complex simulation, you’ll need the power of something like MeshLab or software that integrates with libraries like PYCAD.
Opening STL Files in 3D Slicer for Medical Imaging

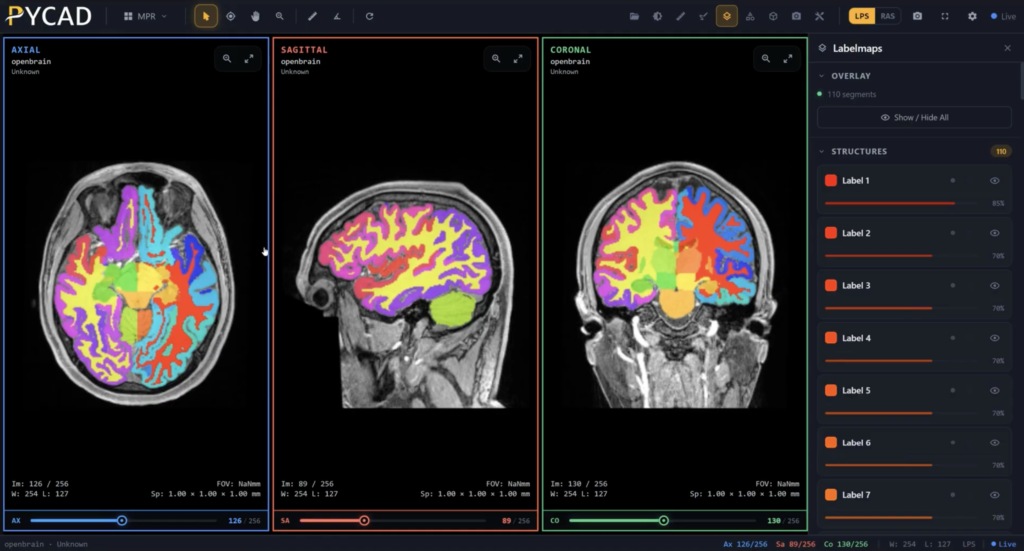
When you're dealing with anatomical models from medical scans, 3D Slicer is the go-to platform. It’s an open-source powerhouse built specifically for medical image analysis, which makes it the perfect environment for working with STL files of bones, organs, and other biological structures. In this context, opening an STL file isn't just about looking at a pretty picture; it's the first step in preparing a model for serious research or clinical work.
Getting started is pretty simple. You can load your model by heading to the Data module and clicking on “Choose File(s) to Add.” From there, just find your STL file and open it. Once loaded, you'll see it pop up in the Data module’s list, and it will appear in the main 3D view, ready for you to work with.
This is where the real work begins. Let's say you've just loaded an STL of a femur that was segmented from a CT scan. Your first job is to give it a thorough visual inspection to make sure the model is sound.
Navigating and Inspecting the Model
Now that your model is loaded, you need to get comfortable moving around the 3D space. The navigation in 3D Slicer is a bit different from your standard CAD software, but it's built for detailed examination.
- Left-click and drag lets you rotate the model to see it from every possible angle.
- Right-click and drag is your zoom. Use it to get a closer look at small details.
- Middle-click and drag (or Shift + Left-click) will pan the model around the screen.
These are your fundamental tools for checking the model's quality. I always make it a point to rotate the model completely, looking for any obvious problems like holes, stray triangles, or other geometric artifacts. These kinds of flaws can wreck a simulation or a 3D print down the line.
One of the most critical checks, especially in the medical field, is verifying the model's scale. STL files are unitless, meaning a model can import at any size—millimeters, meters, or inches. Before you do anything else, use 3D Slicer's measurement tools to check the dimensions against the original scan data. You have to be sure it's correct.
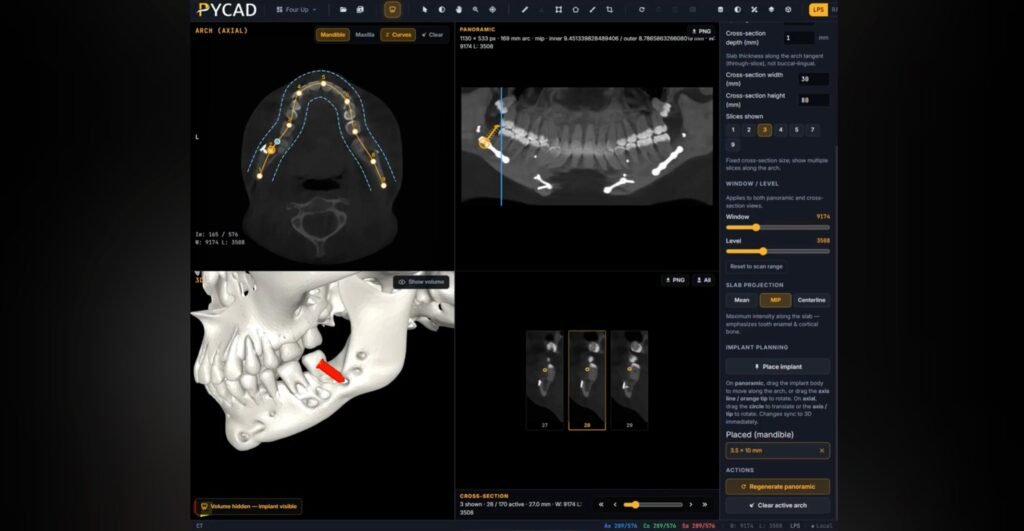
If you’re building a more automated workflow, you can bring in Python libraries like PYCAD to handle the loading and initial validation steps. This is incredibly useful for batch processing, where you might be analyzing dozens of anatomical models for a research study and need absolute consistency. Combining 3D Slicer's visualization with PYCAD's automation creates a really solid system for managing complex medical STL files.
Using MeshLab for Advanced STL Inspection and Repair
While lots of programs can simply show you an STL file, MeshLab is the open-source tool you pull out when you need to get your hands dirty. Think of it less as a modeling studio and more as a digital mechanic's garage for your 3D models. It’s built for analyzing, cleaning, and repairing meshes, which makes it indispensable for anyone serious about 3D printing.
Let's say you've downloaded a detailed model from a sharing site, but the creator mentioned it might have some issues. This is a classic case for MeshLab. Instead of just sending it to your slicer and hoping for the best, you can give it a full diagnostic check first.
This visual gives you a quick rundown of the basic workflow for getting a model loaded up and ready for inspection.
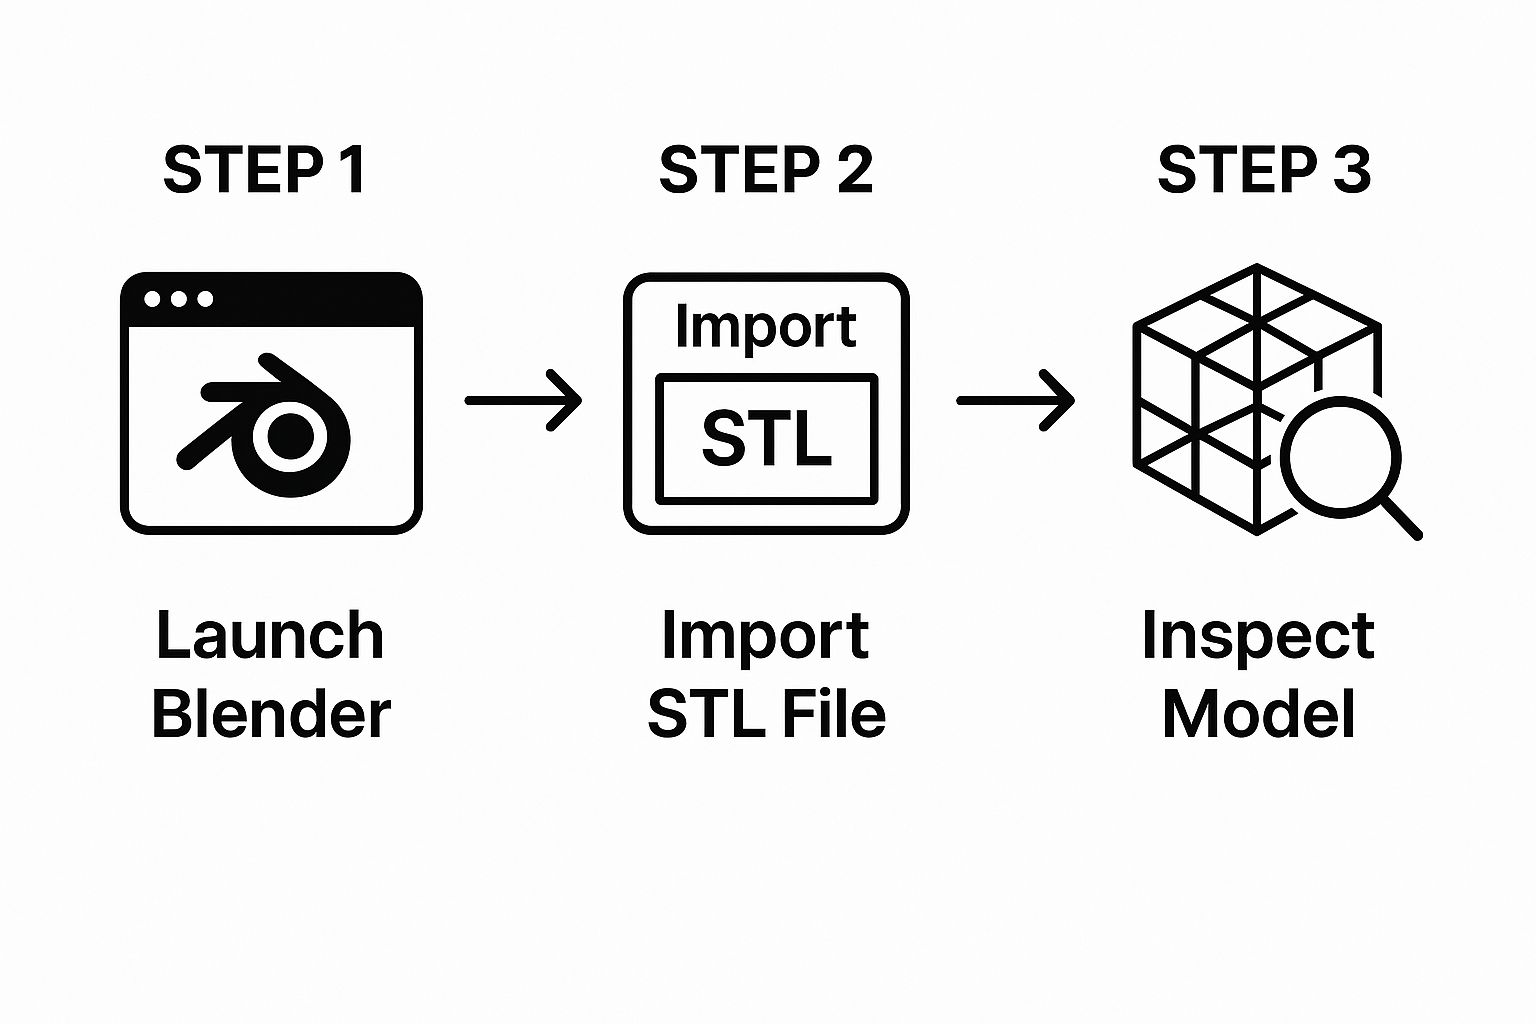
Think of these initial steps as the gateway to the more powerful analysis you can perform in any dedicated 3D tool.
Diagnosing and Fixing Common Mesh Flaws
Once your STL is loaded into MeshLab, you have a whole suite of analysis tools at your fingertips. The first thing I almost always do is run a check for the common errors that are notorious for ruining a 3D print.
- Non-Manifold Edges: These are basically impossible shapes where more than two faces are sharing a single edge.
- Holes in the Mesh: Any gaps in the model's surface mean it isn't "watertight," which can completely confuse slicing software.
- Inverted Faces (or Normals): This is when a triangle is flipped the wrong way, creating a section of the model that's effectively inside-out.
MeshLab is great because its rendering modes can visually flag these problems, often by color-coding the bad geometry. After you've spotted the flaws, you can dive into its filters to apply automated fixes, like the "Fill Hole" or "Remove Non-Manifold Edges" functions.
MeshLab's real strength is the granular control it offers. You're not just hitting a generic 'fix' button; you're applying specific, targeted algorithms to solve problems you've actually identified. This leads to a much cleaner, more reliable model for printing.
The reason so many different programs can open an STL file is a testament to the format's universal design. By using a simple triangular mesh to define a model's surface, it ensures broad compatibility. This standardization is precisely why software from Autodesk Fusion 360 to Blender and MeshLab can all import STLs, letting you analyze or tweak a model before it ever sees a slicer. If you're curious about the history, you can find more details on how STL files became a standard) and their critical role in the 3D printing ecosystem. This cross-platform support is the backbone of a functional workflow.
Viewing and Modifying STL Files in Blender
While other tools are great for specialized tasks, Blender is the free, open-source giant that does it all. It’s a complete 3D creation suite, but it’s also fantastic for a seemingly simple task like opening and modifying an STL file. Its power lies in giving you full control over the model's underlying geometry, turning a static file into something you can truly make your own.
Getting your model into Blender is straightforward. Just head to File > Import > Stl (.stl). A file browser will pop up, and you can navigate to your STL. Blender’s importer is pretty solid, but I always make a habit of double-checking the scale and orientation once the model loads. It's not uncommon for a model designed in millimeters to suddenly appear gigantic in Blender’s default meter-based scene.
Making Simple Yet Powerful Edits
Once your STL is in the viewport, you'll be in Object Mode. This is your go-to for basic transformations—moving, rotating, and scaling the entire thing. The real magic, though, begins in Edit Mode. Just select your model and hit the Tab key to toggle over. Instantly, you'll see the raw triangular mesh that forms your object’s surface.
This is where you can get your hands dirty by directly manipulating the individual vertices, edges, and faces. This is incredibly useful for making targeted adjustments. Say you're working with a mechanical part that has a rough, faceted surface; you could apply a smoothing algorithm or a subdivision surface modifier to clean it up beautifully.
Here are a few things you can do right away:
- Select vertices and nudge them to fine-tune a specific feature.
- Dissolve edges to simplify parts of the mesh without leaving gaping holes.
- Apply modifiers like "Remesh" to completely rebuild the geometry for a much cleaner topology.
This granular control is exactly what sets Blender apart from a simple viewer. It’s less of a gallery and more of a workshop.
A common task I perform is cleaning up scanned data. After importing an STL from a 3D scan, I'll often use the Sculpt Mode's "Smooth" brush to gently soften jagged areas, creating a much more polished final model without fundamentally altering its shape. This is far more intuitive than manually moving hundreds of vertices.
This hands-on approach means you're doing more than just looking at an STL file; you're preparing it for whatever comes next. Whether you're smoothing a rough prototype, repairing a small flaw, or even combining multiple STLs into one cohesive part, Blender has the tools to get it done right.
When your modifications are complete, just export the refined model back out as a new STL by going to File > Export > Stl (.stl).
Common STL File Problems and How to Fix Them
Sooner or later, you're going to hit a snag trying to open an STL file. It happens to everyone. The good news is that most of these headaches are pretty common and, once you know what to look for, surprisingly easy to fix.
Let's start with a classic: the unit mismatch. You finally get a model open, and it's either the size of a dust mote or a skyscraper. This happens because STL files are, by design, unitless. They know the dimensions are "10," but they have no idea if that's 10 millimeters, 10 inches, or 10 miles.
When a model designed in inches gets dropped into software expecting millimeters, it's going to look 25.4 times smaller than it should. The fix is usually just a matter of scaling the model by the correct factor right inside your software, whether that's Blender or 3D Slicer.
Then there's the dreaded corrupted file. You double-click, and your software either crashes instantly or throws up an error message. This often points to a file that got scrambled during a download or transfer. Before you give up, try opening it in a different program. I've found that MeshLab can often muscle through files that other viewers can't handle. If even MeshLab fails, your only real option is to go back to the source and re-download it.
Tackling Complex Geometry
Sometimes, the file isn't broken, it's just… a beast. An extremely high-polygon mesh can bring even a powerful workstation to its knees, causing your software to lag, stutter, or freeze entirely. It's not a flaw in the file, but it makes your job a lot harder.
When you're dealing with a massive mesh, you have a couple of options:
- Decimation: This is your best friend. Fire up a tool like MeshLab or Blender and use a "decimate" or "remesh" filter. These tools are brilliant at intelligently reducing the number of triangles in the model without destroying its essential shape.
- System Resources: It's a simple trick, but it works. Before you even try to open a known-to-be-huge STL, shut down other resource-hungry applications. Freeing up that extra RAM can make all the difference.
Believe it or not, an estimated 85% of 3D printing professionals still use the STL format day in and day out. Learning to navigate these little quirks is just part of the job. Its simplicity is its greatest strength and also the source of these common troubleshooting steps. You can read more on the enduring importance of the STL format if you're curious.
Frequently Asked Questions About Opening STL Files
When you're working with STL files, especially for the first time, a few questions always pop up. Here are some quick, practical answers to the most common ones I hear.
What Is the Best Free Software to Open STL Files?
The "best" tool really depends on what you're trying to accomplish. If all you need is a quick look, almost any 3D viewer will get the job done. But for more specialized work, you need to be a bit more selective.
From my experience, here's how the top free options stack up:
- 3D Slicer: This is my go-to for medical models. It's packed with powerful tools for visualization and analysis that you just won't find in general-purpose viewers.
- MeshLab: If you're prepping a model for 3D printing, MeshLab is fantastic. It excels at finding and fixing common mesh problems like holes or non-manifold edges.
- Blender: Think of Blender as the Swiss Army knife. It's an incredibly powerful, all-in-one package for viewing, editing, and even creating models from scratch.
Can I Edit an STL File After Opening It?
Absolutely, but you'll need the right software. Most basic viewers are exactly that—viewers. They let you look but not touch.
To actually change the model, you'll need a program like Blender or MeshLab. These tools give you direct access to the file's underlying triangular mesh, letting you perform repairs, smooth out rough surfaces, or make significant geometric modifications. So, think about your end goal before you pick a tool.
At PYCAD, we spend our days working with complex medical imaging data, including STL files, and integrating AI to make sense of it all. If you're looking to bring that kind of power to your own projects, see how we can help at pycad.co.