Understanding What You're Actually Converting
So, before we get down to the nitty-gritty of how to convert DICOM to STL, let's talk about what we're actually dealing with. Think of DICOM files like super-organized digital containers holding all the precious data from your medical images – CT scans, MRIs, the whole shebang. An STL file, on the other hand, is the language of 3D printers.
Basically, converting DICOM to STL is like translating complex medical scans into a language a 3D printer can understand. The printer needs a simple format, and STL provides that by representing the 3D object as a mesh of triangles. It's kind of like turning a detailed blueprint into a simpler, more practical model.
This screenshot from the Wikipedia page for STL file format) perfectly illustrates that triangular mesh structure:
You can see how the surface of a 3D object gets broken down into all these interconnected triangles. This simplification is crucial for 3D printing because it lets the printer build the object layer by layer.
This whole conversion process opens up a world of possibilities in medicine. Imagine a surgeon holding a 3D printed model of a patient's heart before a complicated surgery. They can visualize the procedure, plan their approach, and anticipate potential challenges with incredible precision. Or think about a radiologist explaining a diagnosis using a tangible 3D model. It makes the information way more accessible and understandable for the patient.
This kind of thing has become standard practice in the medical field. I've seen firsthand how much it's taken off, especially since around 2010. The medical 3D printing market, which relies heavily on DICOM to STL conversion, has exploded. It grew from $1.25 billion in 2020 to over $3.7 billion globally by 2024. That's a growth rate of over 196% in just four years! For more details on this crazy growth, check out this article: Converting DICOM to STL: A Comprehensive Guide.
Trust me, understanding these fundamentals is important. It'll save you headaches down the road and help you pick the right conversion method for your specific needs. Different projects require different levels of detail and accuracy. Knowing the basics lets you tailor your approach so your 3D printed models are exactly what you need.
Your Software Arsenal: Free Powerhouses vs Premium Solutions
Picking the right software for DICOM to STL conversion is crucial. It's like choosing the right tool for a job—you wouldn't use a hammer to tighten a screw! In my experience working with medical imaging, I've learned that different software excels in different scenarios. Let's explore the options: professional tools, powerful open-source alternatives, and innovative cloud-based solutions.
Open-Source Champions: Cost-Effective and Capable
If you're just starting out or working with a tight budget, open-source software like 3D Slicer and InVesalius are fantastic options. 3D Slicer, especially, offers a robust platform for DICOM processing and visualization.
This screenshot shows 3D Slicer's versatile interface, with modules for image analysis, visualization, and 3D model manipulation. This open-source platform is a great starting point for exploring DICOM to STL conversion. It provides comprehensive tools without the high cost of commercial software. Understanding the software behind different file formats is always helpful; you might find this list of the best 3D Animation Software useful.
Premium Powerhouses: Advanced Features for Demanding Tasks
When you need high precision and advanced features, commercial software like Materialise Mimics really shines. Mimics boasts powerful segmentation tools and integrates seamlessly with other CAD software, which is ideal for complex medical modeling. However, the licensing fees can be substantial. I've personally seen how Mimics can drastically reduce processing time for intricate cases, but that efficiency comes at a price.
Cloud-Based Game Changers: Accessibility and Scalability
Cloud-based solutions are transforming the field by making powerful conversion tools more accessible. They eliminate the need for expensive hardware and offer scalable processing power. This is especially helpful for smaller practices or individual researchers. My recent experiments with these platforms have highlighted just how impressive their accessibility is.
To help you choose the best software for your needs, I've put together a comparison table:
DICOM to STL Software Comparison
This table compares key features, pricing, and capabilities of popular conversion tools to assist in selecting the most appropriate option.
| Software | Price | Learning Curve | Output Quality | Best For |
|---|---|---|---|---|
| 3D Slicer | Free | Moderate | Good | Beginners, budget-conscious users |
| InVesalius | Free | Moderate | Good | Beginners, educational purposes |
| Materialise Mimics | Commercial | Steep | Excellent | Professionals, complex medical modeling |
| Cloud-based solutions (various) | Varies | Easy – Moderate | Excellent | Scalability, accessibility, varying budgets |
As you can see, the options cater to different skill levels and budgets. Open-source tools are great for getting started, while commercial and cloud-based solutions offer advanced features and scalability for demanding projects.
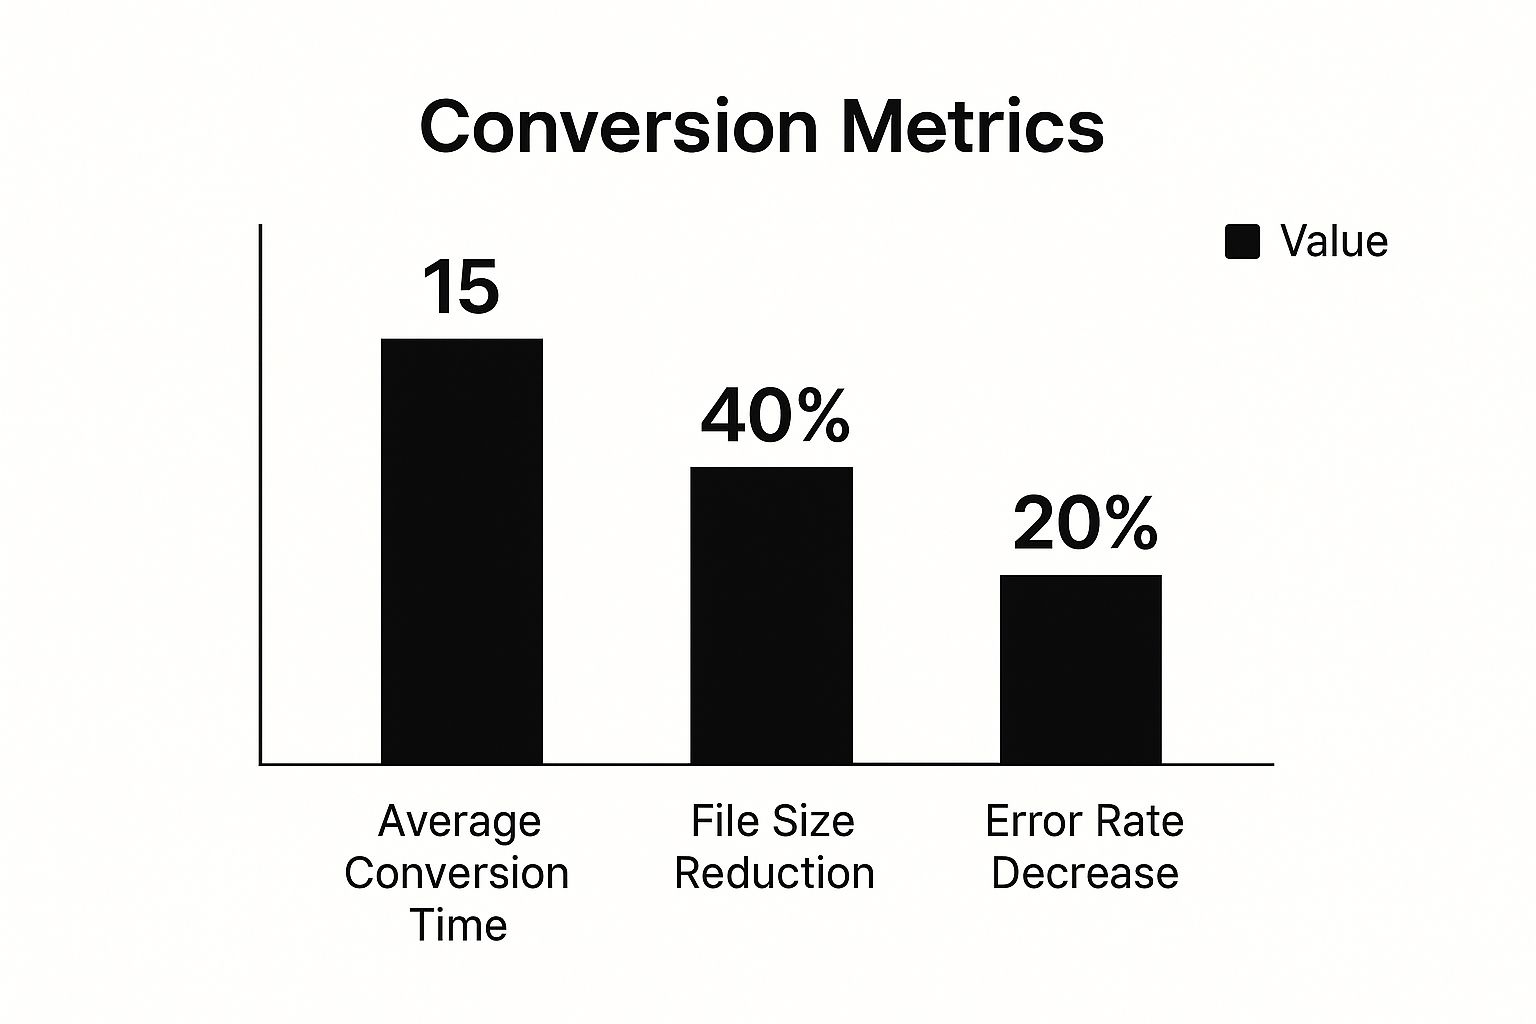
The infographic below visualizes performance differences between a popular open-source tool, a commercial package, and a cloud-based solution:
The cloud-based solution achieved a 40% reduction in file size and a 20% decrease in error rate compared to the open-source tool, while being significantly faster than the commercial package. This demonstrates the potential of cloud-based tools to optimize both efficiency and accuracy. Ultimately, the best software depends on your budget, project needs, and technical skills.
Building Your Conversion Environment That Actually Works
Let's talk practicalities. Setting up your environment for DICOM to STL conversion can be a real headache. I've personally battled through countless installations, so let me share what's worked best for me.
Whether you're using Python libraries like SimpleITK and VTK, or going with dedicated software, a solid setup is essential. One thing that often gets overlooked is RAM. 8GB is the absolute minimum you should consider, and honestly, 16GB or more is ideal, especially when dealing with larger datasets. It's like having a spacious workbench – the more room you have, the more you can do without things falling apart.
This screenshot from the SimpleITK website gives you a glimpse of its Python-based approach to medical image analysis. SimpleITK provides a user-friendly interface to the powerful ITK library, making complex image processing much more approachable. The documentation is clear, and the community is active, which is great if you're just starting out with medical image processing in Python.
Dependencies are another important factor. If you're using Python, make sure you have the right versions of libraries like NumPy, Scikit-image, and Nibabel. These are fundamental for handling image data and crunching numbers. A simple pip install often works, but always double-check compatibility with your Python version. I once spent hours debugging a conversion problem, only to find a simple library conflict was to blame.
Setting Up Your Python Environment the Right Way
Using a dedicated virtual environment is crucial. This keeps your project dependencies separate and prevents conflicts with other Python projects. Seriously, this will save you so much trouble later on. Think of it like having separate toolboxes for different projects – no more mixing up your tools!
After setting up your environment, test it with a small DICOM file before you throw your entire dataset at it. This helps you catch any remaining issues early. I always test my setup with a sample CT scan of a phantom. This lets me quickly check if the libraries are playing nicely together and the conversion is working as expected. It's a quick check that prevents major frustration later. By taking care of these details upfront, you’re building a conversion environment you can rely on. A good foundation means smoother conversions and more accurate STL models, letting you focus on what really matters – using this powerful technology to improve patient care.
The Conversion Process: From Raw Data to Print-Ready Models
So, you've got your DICOM files and you're ready to turn them into something tangible – a 3D printable STL model. This journey involves two main stages: segmentation and mesh generation. Segmentation is like meticulously tracing the area of interest within your image data. Imagine isolating a fractured bone from the surrounding tissue – that’s segmentation. Mesh generation then builds the 3D surface, constructing a mesh of triangles from the segmented data. Think of it as connecting the dots to create a tangible form.
Practical Conversion with GUI and Python
There are a couple of ways to approach this conversion: using graphical user interface (GUI) tools or crafting Python scripts. GUI tools like 3D Slicer provide a visual, interactive experience, perfect for those starting out. Personally, I find 3D Slicer invaluable for quick conversions when I need immediate visual feedback. However, for more intricate projects or when I need to process a large batch of files, Python libraries like SimpleITK and VTK offer unmatched flexibility. A well-crafted Python script can automate the entire process, saving you countless hours of manual work.
Speaking of managing large datasets, have you thought about migrating your data to the cloud? During this transition, a solid cloud migration strategy can be a game-changer.
Tackling Common Challenges and Optimizing Your Workflow
One frequent hurdle is dealing with noisy data. Imagine static on a TV screen obscuring the picture – that’s what noisy data does to your images. Applying filtering techniques can help clean things up. Just as crucial is adjusting threshold values. These values dictate which parts of the image get included in the segmentation. It's similar to adjusting the contrast on a photo to highlight the essential details without losing important information.
Another key consideration is mesh density. A denser mesh results in a more detailed model but also leads to larger file sizes and longer print times. For a simple model, a lower density might be sufficient, but for something complex, like the delicate structures of the inner ear, you'll need a higher density. Take a look at the structure of a typical DICOM file:
This screenshot of a DICOM header demonstrates the rich metadata packed into each file. This information provides crucial context for accurate segmentation and conversion. Recent research (2023) indicates that top hospitals globally produce between 600 and 1,200 3D-printed medical models (derived from DICOM-to-STL conversion) annually. These models primarily serve craniomaxillofacial, orthopedic, and cardiovascular applications. The conversion process typically takes 10 to 45 minutes per case, depending on the software and complexity. Discover more insights.
Advanced Techniques and Quality Control
Beyond the fundamentals, we can explore advanced techniques like multi-material conversions, which allow assigning different materials to different tissues within the STL file. This is incredibly powerful for creating realistic models for surgical planning. Creating hollow models is another useful trick to reduce printing time and material costs, particularly for larger models.
Finally, quality control is non-negotiable. Before sending anything to the printer, always inspect your output. Check for holes in the mesh, surface inconsistencies, and any other anomalies that might affect printability. Identifying these issues early can save you time, material, and a lot of frustration.
VR and Cloud Solutions: A New Dimension for DICOM to STL Conversion
The DICOM to STL conversion world is always changing, and lately, I've been really impressed with the advancements in virtual reality (VR) and cloud-based processing. I’ve had the chance to play around with some VR conversion platforms, and let me tell you, it's a completely different ballgame. Forget wrestling with 2D interfaces to manipulate those complex 3D structures. Now, you can actually “walk through” your medical data. Imagine sculpting and refining a 3D model with your hands, like working with digital clay.
This move to immersive VR isn’t just a cool trick; it’s fundamentally changing how medical professionals interact with 3D models. We're seeing significant improvements in processing speed and accuracy, stuff we wouldn’t have thought possible a few years ago. Cloud-based solutions are just as impactful. They're taking away the need for pricey local hardware, giving smaller practices and individual researchers access to advanced conversion capabilities they couldn’t previously afford.
This screenshot from Medical Holodeck gives you a glimpse into a VR interface for interacting with medical data. The user gets to visualize and manipulate 3D models in a truly immersive environment. The intuitive nature of VR simplifies segmentation, making model creation more precise and efficient. Innovations like this are accelerating the adoption of digital workflows in medical 3D printing. In 2023-2024, Medical Holodeck and other companies launched these VR environments for DICOM-to-STL conversion. Radiologists and surgeons can now interact with and edit 3D meshes in real time. User reports indicate these VR tools have cut down the average time for segmentation and file export from 30-40 minutes down to 4-7 minutes per case. That's a whopping reduction of up to 85% in processing time! For more details on this VR and 3D printing development, check out this article.
Cloud-Based Conversion: Expanding Access
Cloud platforms are also making big waves by democratizing access to powerful DICOM to STL conversion tools. By shifting processing to the cloud, the requirement for expensive, high-powered computers vanishes. This opens a ton of opportunities for smaller medical practices, research labs, and even individual practitioners. Now they can tap into the same advanced tools that were once exclusive to large institutions with huge IT budgets.
The scalability of cloud computing is another major plus. Say you need to process a huge batch of DICOM files quickly. Cloud platforms effortlessly scale their resources to handle the load without you having to invest in more hardware. This on-demand processing power is a real game-changer, particularly for time-sensitive projects. These cloud-based solutions aren’t just about saving money; they're about empowering medical professionals with the tools they need to provide better patient care.
The Future of Conversion Has Arrived
These VR and cloud solutions are more than just fancy new features. They are completely reshaping how we think about medical 3D modeling workflows. The ability to visualize, manipulate, and convert DICOM data in a more intuitive and efficient manner leads to faster turnaround times, greater accuracy, and, most importantly, better patient outcomes. The future of DICOM to STL conversion is already here, and it’s exciting to see how these innovations are transforming the medical field.
Solving Common Conversion Nightmares That Drive You Crazy
Let's face it, converting DICOM to STL can sometimes feel like navigating a minefield. I've been there, trust me. From meshes that resemble abstract art to memory errors that bring your system to a screeching halt, I've wrestled with it all. So, consider this section your personal troubleshooting companion, filled with practical advice gleaned from my own experiences.
Incomplete Segmentation Woes
One of the most common frustrations is incomplete segmentation. You know, when parts of your model vanish, leaving you with a Swiss cheese effect. This often boils down to incorrect threshold values. For example, if you're segmenting bone, a threshold that's too high might miss those delicate, thinner structures. My advice? Experiment. Tweak those threshold values until you find the perfect balance – capturing all the crucial details while keeping unwanted noise at bay.
Artifact Annoyances
Another culprit is image artifacts lurking within the original DICOM data. These can manifest as streaks, blobs, or other distortions, throwing off the accuracy of your final mesh. Think of it like blemishes on a photograph. Luckily, preprocessing techniques like median filtering can help. It's like using a digital smoothing tool to clean things up before you even begin the conversion.
Massive File Mayhem
Now, let's talk about large datasets. Huge DICOM files can be a real resource hog, slowing down the conversion process or even causing system crashes. In this scenario, RAM is your best friend. If you're dealing with large files, 16GB of RAM is the absolute minimum I'd recommend. Ideally, aim for 32GB or more. Cloud-based conversion platforms can also be a game-changer. They offload the heavy lifting to powerful remote servers, freeing up your local machine. Looking ahead, exploring VR and cloud solutions, and understanding the future of cloud hosting could unlock even more potential for medical 3D modeling. Check out Future Trends In Cloud Hosting for a glimpse into what's coming.
Inconsistent DICOM Data Dilemmas
Here's another wrinkle: DICOM data isn't always uniform. Files from different manufacturers can vary significantly, throwing a wrench into the conversion process. This is where data validation becomes essential. Before diving into conversion, inspect your DICOM files for inconsistencies in metadata or image formatting. Some software packages offer built-in tools to standardize DICOM data, which can save you a lot of headaches down the line.
Troubleshooting Table: Your Quick Fix Guide
To help you quickly diagnose and resolve these issues, I've put together a handy table:
Common Conversion Problems and Solutions
Quick reference guide for troubleshooting typical DICOM to STL conversion issues
| Problem | Symptoms | Solution | Prevention |
|---|---|---|---|
| Incomplete Segmentation | Gaps or missing parts in the model | Adjust threshold values, refine segmentation | Carefully choose segmentation parameters |
| Image Artifacts | Distortions or irregularities in the mesh | Preprocessing techniques (e.g., filtering) | Optimize image acquisition protocols |
| Large File Size | Slow processing, system crashes | Increase RAM, use cloud-based platforms | Compress DICOM data if possible |
| Inconsistent Data | Unexpected conversion results | Validate and standardize DICOM data | Use consistent imaging equipment |
Armed with this knowledge, you can transform those conversion nightmares into smooth sailing. Remember, a little troubleshooting goes a long way in ensuring your STL models are accurate, reliable, and ready for whatever you have in store for them.
Your Next Adventures in Medical 3D Modeling
Converting DICOM to STL is like stepping through a portal into the fascinating world of medical 3D modeling. Now that you've got a handle on the fundamentals, let's explore the exciting territory that lies ahead. Whether your interests lie in advanced mesh manipulation, designing personalized surgical guides, or automating those tedious conversion tasks, there's a whole universe of possibilities waiting for you.
Expanding Your 3D Modeling Skills
Think of the DICOM to STL conversion as just the launchpad. Once you have that STL model in your hands, a whole new dimension of possibilities opens up. You can refine the mesh, smoothing out any imperfections or adding intricate details. Meshmixer, for example, is a fantastic tool packed with powerful features for sculpting and refining 3D models. This is especially valuable when you're aiming for highly precise anatomical models for surgical planning or educating patients.
Imagine working with a model of a fractured bone. With mesh editing tools, you can actually simulate the reduction of the fracture and map out the optimal surgical approach. This granular level of detail can significantly impact surgical outcomes.
Exploring Specialized Applications
The applications of DICOM to STL conversion in healthcare are vast and varied. Custom surgical guides, patient-specific implants, and tangible educational models are just a few examples. If you're drawn to exploring any of these specific areas, seek out online communities and resources tailored to those fields. Connecting with other professionals who share your passion can be an invaluable source of insights and practical tips.
I've personally witnessed the transformative power of these specialized applications in patient care. 3D-printed surgical guides, for instance, empower surgeons to perform procedures with greater precision and accuracy, minimizing invasiveness and leading to faster recovery times. It's truly remarkable.
Automating Your Workflows
As you become more seasoned in this process, you might want to consider streamlining your conversion workflow with automation. Python scripting is a particularly effective tool for batch processing files and automating those repetitive tasks. This is a game-changer when you're dealing with extensive datasets or need to perform the same conversion steps consistently. Think about having to convert hundreds of DICOM files manually. A Python script automating this process could save you hours, if not days, of tedious work.
Staying current with the latest tools and techniques is absolutely essential in this rapidly evolving field. Resources like online forums, industry publications, and continuing education courses are your allies in staying ahead of the curve. This commitment to continuous learning will enable you to fully capitalize on the latest advancements in medical 3D printing and personalized medicine. This journey isn't just about mastering a single conversion process; it's about positioning yourself at the forefront of this exciting technology's future. Ready to take your medical 3D modeling to the next level? Check out the AI-powered solutions offered by PYCAD to optimize your workflows and boost precision.