The Science Behind Converting DICOM to STL
Medical imaging has evolved dramatically. We've moved beyond simply viewing images to actually creating tangible 3D models. This advancement relies on converting DICOM (Digital Imaging and Communications in Medicine) files, the standard for medical scans like CT and MRI, into STL (Stereolithography) files, the language of 3D printing. This conversion bridges the gap between digital information and physical objects, impacting many medical applications.
From 2D Images to 3D Models
This conversion process centers around extracting anatomical data from a series of 2D DICOM images and reconstructing it into a 3D mesh. Imagine stacking slices of bread to create a loaf. Each DICOM slice represents a cross-section of the body. The conversion process essentially "stacks" these slices to build a 3D representation. This 3D model, in the STL format, consists of interconnected triangles forming the surface of the anatomical structure, enabling the creation of a tangible, manipulable model.
The Importance of Precision and Accuracy
High precision is crucial during this conversion. Inaccuracies can result in flawed 3D models, with significant consequences, especially in surgical planning. For instance, a slightly misaligned jaw model could affect the accuracy of a surgical guide, potentially leading to complications. Ensuring anatomical accuracy from the original DICOM data is therefore paramount. This requires careful attention during the segmentation process, where different tissues and structures are identified and isolated within the DICOM images.
This process is increasingly vital, particularly in medical 3D printing. A 2020 study analyzed nine software packages for DICOM to STL conversion, finding a mean shape error of only 0.11 mm across different tools. This demonstrates the reliability and accuracy of current methods, despite variations in file size and triangle count. Read the full research here
Challenges and Considerations
Converting DICOM to STL has its challenges. Tissue density variations can make it difficult to accurately differentiate between structures. Also, image noise and artifacts in the original DICOM data can be magnified during conversion, further complicating segmentation. Skilled professionals prioritize tissue differentiation and use techniques to reduce the impact of these artifacts, ensuring the final STL model accurately reflects the patient's anatomy. This meticulous approach is the foundation for the successful use of converted STL models in various medical fields, from surgical planning to custom prosthetics. This precision is essential for effective patient care and positive outcomes.
Converting DICOM to STL: A Practical Walkthrough
This section provides a step-by-step guide to converting DICOM files to STL files, transforming medical scans into 3D printable models. This process is essential for applications like surgical planning and medical device customization. We'll cover each stage, from preparing your DICOM data to exporting the final STL file.
Preparing Your DICOM Data
The initial step involves selecting the relevant DICOM slices encompassing the anatomical region of interest. For instance, if creating a skull model, you'll isolate the slices containing the head. This selection ensures the final STL model accurately represents the necessary anatomy.
Protecting patient privacy is also paramount. Anonymizing the data before proceeding with further processing might be required.
Segmentation: Isolating Key Structures
After data preparation, the next crucial step is segmentation. This process involves identifying and isolating specific tissues or structures within the DICOM images. It’s akin to meticulously tracing the outline of a bone on each slice of a CT scan.
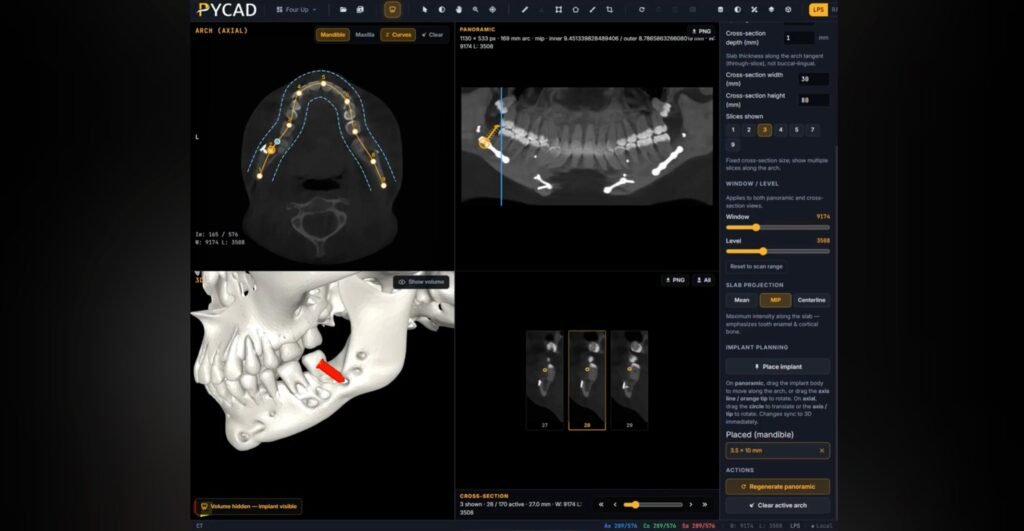
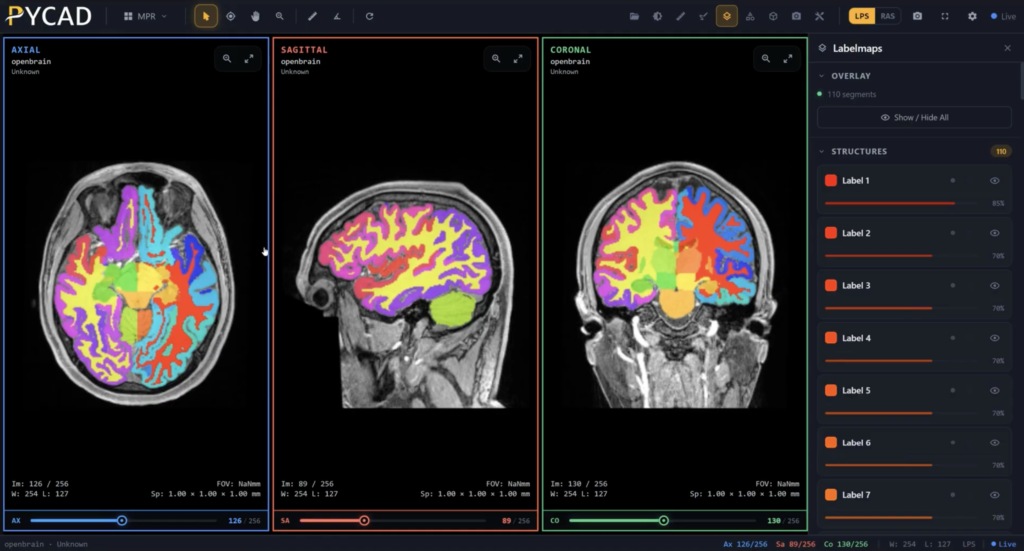
Accurate segmentation is paramount for creating a usable STL model. Various software tools like 3D Slicer offer different segmentation methods, including manual tracing, thresholding, and region growing. Choosing the right method depends on the anatomical complexity and the DICOM image quality.
Thresholding and Region Growing Techniques
Thresholding distinguishes between tissue types based on their density values. Bone appears brighter than soft tissue in CT scans, enabling you to set a threshold to separate them.
Region growing is another valuable technique, particularly effective for complex structures. It involves selecting a starting point within the region of interest and automatically expanding that selection based on similar density and image characteristics. Both techniques benefit from careful parameter adjustments for optimal results.
Mesh Generation and Refinement
After segmentation, the software generates a 3D mesh from the segmented data. This mesh represents the anatomical structure’s surface as interconnected triangles.
Mesh refinement further optimizes this mesh for 3D printing. This can involve smoothing rough surfaces, simplifying the model by reducing triangles, or adding detail. The goal is to create a printable mesh accurately representing the anatomy.
Exporting the STL File and Troubleshooting
Finally, export the refined mesh as an STL file, the standard format for most 3D printers. Before printing, inspect the STL file for errors like holes, inverted normals (affecting surface appearance), and non-manifold edges (causing printing problems).
Most software packages offer tools to identify and rectify these issues. Successfully converting DICOM to STL requires careful attention to detail at every stage. By understanding the process and utilizing appropriate tools, you can create high-quality 3D printable models from medical imaging data, opening exciting possibilities for surgical planning, patient education, and medical device customization.
Free Tools That Actually Convert DICOM to STL Well
Converting DICOM data to printable STL files doesn't always require expensive commercial software. Several free and open-source tools offer powerful capabilities, producing professional-grade results for everyone from hobbyists to medical professionals. This opens up opportunities for experimentation, learning, and practical application in various fields.
Open-Source Solutions for DICOM to STL Conversion
Three prominent free tools stand out: 3D Slicer, InVesalius, and ITK-SNAP. Each has its own strengths.
-
3D Slicer: This robust platform, popular with researchers and biomedical engineers, offers advanced segmentation tools ideal for complex anatomical structures. 3D Slicer provides fine-grained control over the conversion process, enabling detailed and precise models.
-
InVesalius: Known for its user-friendly interface, InVesalius simplifies the conversion, making it suitable for beginners. This intuitive design is a great starting point for those new to medical image processing.
-
ITK-SNAP: This tool specializes in segmentation using region-growing algorithms, an automated approach useful for identifying connected regions within image data. ITK-SNAP is particularly helpful for isolating structures like organs or bones.
To help you decide which tool is best for you, we've compiled the following comparison:
Comparison of Free DICOM to STL Conversion Tools
| Tool Name | User Interface | Learning Curve | Segmentation Tools | File Format Support | Batch Processing | Model Quality |
|---|---|---|---|---|---|---|
| 3D Slicer | Advanced | Steep | Extensive, powerful | Wide range | Yes | High |
| InVesalius | Simple | Gentle | Basic | Primarily DICOM and STL | Limited | Medium |
| ITK-SNAP | Specialized | Moderate | Focused on region growing | Primarily DICOM and STL | Limited | Medium |
This table highlights the key differences between the tools. 3D Slicer offers the most comprehensive feature set but requires more technical expertise. InVesalius prioritizes ease of use, while ITK-SNAP excels in automated segmentation.
Choosing the Right Tool for Your Needs
The best free tool depends on your project's requirements. For intricate bone models or detailed soft tissue visualization, 3D Slicer's comprehensive features offer unparalleled control. InVesalius provides a more streamlined workflow for simpler conversions, requiring less technical expertise. ITK-SNAP excels in automating segmentation tasks for clearly defined regions.
Additionally, free online services make DICOM to STL conversion more accessible. democratiz3D, for instance, offers a platform for anonymizing and converting DICOM to STL in under 20 minutes, supporting batch processing and generating high-quality models. This makes it a practical choice for various applications, including CT scans, with future support planned for MRI files. Learn more about DICOM to STL conversion here.
Practical Considerations When Using Free Tools
While free tools offer significant advantages, users should be prepared for a potentially steeper learning curve than with commercial software. Online tutorials and community forums are valuable resources. Understanding each tool's nuances, including its strengths and limitations, is crucial for achieving optimal results.
Combining Free Tools for Enhanced Workflows
Many professionals combine different free tools. For example, someone might use ITK-SNAP for initial segmentation, then import the results into 3D Slicer for refinement and final STL export. This modular approach leverages each tool's specific strengths within a custom workflow. This flexibility is a key benefit of open-source software.
Professional Solutions for Converting DICOM to STL
While free and open-source tools offer a starting point for DICOM to STL conversion, professional solutions provide the advanced features and increased efficiency crucial for more demanding applications. These commercial packages cater to specific needs within medical device manufacturing, surgical planning, and research, often justifying their cost with improved workflows and outcomes.
Commercial Software: Features and Benefits
Professional DICOM to STL converters such as Materialise Mimics, Synopsys Simpleware, and OsiriX MD go beyond basic conversion. They offer tools like automated segmentation, which drastically reduces manual labor, a considerable benefit for complex cases. Imagine segmenting a detailed model of the heart's intricate network of vessels. Manual segmentation might take hours, but automated tools can accomplish this in significantly less time.
These software packages often specialize in certain applications. For example, Materialise Mimics is known for its strength in creating cardiovascular models, while Synopsys Simpleware excels in multi-part modeling. This specialization allows for more efficient and accurate conversions tailored to particular anatomical regions.
Integration With Hospital Workflows
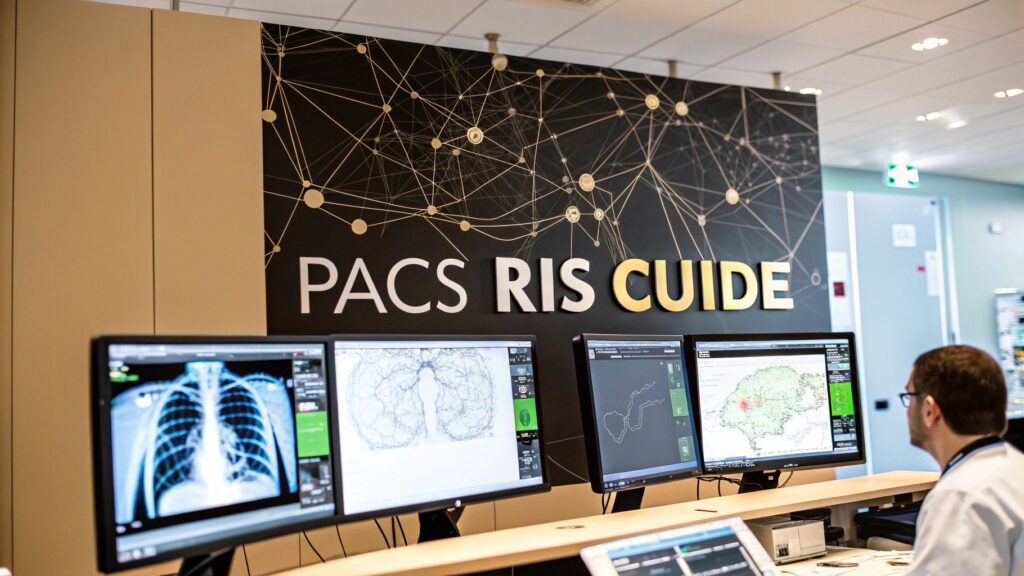
Many professional solutions integrate directly with hospital Picture Archiving and Communication Systems (PACS). This seamless integration streamlines the workflow from medical image acquisition to 3D model creation. The ability to quickly access and convert DICOM data within an existing hospital system significantly improves efficiency.
Additionally, these platforms often provide advanced visualization capabilities, enabling surgeons to plan procedures more precisely and communicate more effectively with patients. Imagine a surgeon using a 3D-printed model of a patient's fractured bone to explain the planned procedure, ultimately enhancing patient understanding and confidence.
Cost-Benefit Analysis and ROI
The cost of professional software can represent a significant investment. However, evaluating the return on investment (ROI) is essential. For high-volume medical 3D printing labs or institutions handling complex cases, the automated segmentation and streamlined workflows offered by commercial software can substantially reduce labor costs and turnaround times. Ultimately, the ROI of professional solutions depends on several factors, including case volume and complexity.
Choosing The Right Professional Solution
Selecting the right software requires careful consideration of individual needs. Some factors to consider include:
- Specific anatomical focus: Some software excels with cardiovascular models, while others are better suited for orthopedic applications.
- Required level of automation: For high-volume workflows, automated segmentation is a necessity.
- Integration needs: Seamless integration with existing hospital PACS can significantly improve overall efficiency.
- Training and support: Adequate training and responsive technical support are vital for successful software implementation.
By carefully evaluating these factors, institutions can select the solution that best fits their requirements, ultimately leading to more efficient workflows and improved patient outcomes.
To help illustrate the differences, the table below provides a simplified comparison of a few popular professional DICOM to STL software solutions. It's crucial to contact vendors directly for the most up-to-date information, as actual pricing and feature sets can vary.
Professional DICOM to STL Software Comparison
This table compares features, capabilities, and pricing of professional-grade DICOM to STL conversion software solutions.
| Software | Specialty Features | Automation Level | Accuracy | Training Required | Price Range | Best For |
|---|---|---|---|---|---|---|
| Materialise Mimics | Cardiovascular modeling, implant design | High | High | Extensive | High | Medical device manufacturers, research institutions |
| Synopsys Simpleware | Multi-part modeling, image processing | High | High | Extensive | High | Engineering, research |
| OsiriX MD | Image visualization, 3D rendering | Moderate | High | Moderate | Moderate | Medical professionals, researchers |
As shown in the table, each software package caters to slightly different needs and budgets. Mimics is a powerful option for high-end applications, while Simpleware provides strong image processing capabilities. OsiriX MD offers a more accessible entry point for medical professionals needing robust visualization and rendering tools. Choosing the right solution depends on your specific workflow and requirements.
Advanced Techniques That Transform DICOM to STL Results
Beyond the basics of DICOM to STL conversion, a range of advanced techniques are significantly improving results. These methods are pushing the boundaries of medical 3D modeling, leading to more precise, functional, and insightful anatomical replicas.
Multi-Material Modeling and Functional Replicas
One exciting development is multi-material modeling. This technique creates STL files representing different tissue types with varying material properties. Imagine a 3D-printed heart model with flexible valves and rigid chambers, accurately mimicking real-world behavior. This adds realism and functionality, particularly beneficial for surgical planning and medical training. Further advancements are producing functional replicas with moving parts, providing even more realistic simulations.
Hybrid Imaging and Soft Tissue Visualization
Another advancement combines data from different imaging modalities, like CT and MRI, known as hybrid imaging. CT excels at visualizing bone, while MRI captures soft tissue details. Combining these datasets creates STL models comprehensively representing both. This is particularly useful for visualizing complex areas where both bone and soft tissue are crucial, such as joint reconstruction or tumor removal, allowing surgeons to better understand the relationship between tissues and plan procedures more effectively.
AI-Assisted Segmentation: Enhancing Speed and Accuracy
Integrating AI-assisted segmentation is transforming DICOM to STL conversion. Machine learning algorithms significantly speed up the segmentation process, automating previously manual tasks. This increased speed comes with improved accuracy. AI algorithms identify subtle differences in tissue density and texture that might be missed by the human eye, resulting in more precise STL models. This benefits applications requiring intricate anatomical details, like patient-specific surgical guides or modeling complex congenital heart defects. Virtual Reality (VR) further advances this process. Medicalholodeck, for example, offers a VR workflow to filter, crop, and prepare DICOM files in real-time, visualizing the 3D mesh alongside the original imaging, streamlining conversion and enhancing precision. Learn more about VR integration in DICOM to STL conversion here.
Microstructure Preservation and Future Applications
Advanced techniques are also focusing on preserving microstructures within bone models. This is vital for accurately representing bone architecture, essential for research in bone regeneration and implant design. Capturing these details helps researchers and engineers understand bone behavior and develop more effective treatments and devices. These advancements are not only improving current medical practices but also opening new possibilities for medical research, education, and patient care.
Preparing Your Converted STL Files for Flawless Printing
Converting DICOM to STL is only half the journey. The final stage that determines a successful 3D print is proper STL file preparation. This section explores essential post-conversion techniques to ensure your anatomical models print correctly on the first try.
Inspecting and Repairing Your Mesh
After conversion, thorough mesh inspection is crucial. This is the quality control step before production. Common issues include holes, inverted normals, and non-manifold edges. Holes compromise structural integrity, while inverted normals impact surface appearance and light interaction. Non-manifold edges, where connections are flawed, are a frequent cause of print failures. Many software packages, such as Meshmixer, offer automated diagnostics to quickly identify these problems. Some will even highlight inverted normals, making them easy to locate and fix.
Repairing these flaws is usually straightforward with built-in software tools. Automatic hole-filling algorithms act like digital "spackle." Likewise, correcting inverted normals and non-manifold edges is often a simple click. This repair process ensures a smooth and successful print.
Optimizing the STL File for Printing
Optimizing the mesh for your 3D printer is the next vital step. This involves decimation, reducing the number of triangles without significantly altering the model's shape. This accelerates processing and printing times. A highly detailed model with millions of triangles can be difficult to manage. Decimation streamlines this, enhancing performance while maintaining accuracy, similar to compressing an image file.
Material Selection and Printing Orientation
Selecting the correct printing material depends on the anatomical structure and intended use. Flexible materials might suit organs, while rigid materials work better for bones. Printing orientation also influences support requirements and print quality. A tall, thin structure printed upright might need extensive supports. Printing it horizontally could eliminate this, resulting in a cleaner print.
Validation Methods for Dimensional Accuracy
Finally, verify your model's dimensional accuracy. Compare the printed model's dimensions with the original DICOM data. Some software and 3D printers offer calibration tools. This step is especially crucial for medical models used in surgical planning or device design, where even minor inaccuracies can be significant. Validating dimensions ensures the final print accurately represents the patient's anatomy.
Preparing converted STL files for 3D printing requires attention to detail. From mesh inspection to material selection, every stage contributes to the final print's quality. By implementing these techniques, you can successfully transform DICOM data into accurate, functional 3D-printed anatomical models.
Ready to improve your DICOM to STL workflow? Visit PYCAD to explore their solutions.