At its core, image registration is all about geometrically aligning two or more images of the same scene. If you're working in Python, you'll likely lean on powerful libraries like OpenCV or SimpleITK to handle the heavy lifting. These tools calculate the transformation needed to map points from one image onto another, making registration a fundamental technique in computer vision.
What Is Image Registration and Why Does It Matter

Before diving into the code, it helps to build a solid mental model of what we're actually doing. Think of it like trying to perfectly stack a set of transparent photographs. If those photos were taken at slightly different times or from different angles, the objects in them just won't line up. Image registration is the digital process of shifting, rotating, or even warping one of those photos until it overlays the other seamlessly.
This alignment is absolutely critical in many fields, but nowhere more so than in medical imaging. Imagine a radiologist needing to compare a patient's current MRI with a scan from six months ago to track a tumor's growth. Without precise alignment, it's incredibly difficult—if not impossible—to make an accurate comparison.
Researchers also depend on it to fuse information from different imaging modalities. For example, they might overlay a functional PET scan onto a high-resolution structural MRI. This allows them to map brain activity directly onto specific anatomical regions, which is a huge leap in understanding how the brain works.
Core Components of Registration
When you start working with image registration python libraries, you'll find that every registration workflow is built on a few key components. Getting a handle on these concepts is the first step to choosing the right strategy for your specific problem.
Here's what you'll be working with:
- Fixed and Moving Images: We always have two main images. The fixed image is your static reference or target; it doesn't change. The moving image is the one you're going to transform to match the fixed one.
- Transformation Model: This is the mathematical equation that defines how the moving image will be adjusted. It could be a simple rigid transformation (just rotation and translation) or something much more complex, like a deformable model that allows for localized, non-linear warping.
- Similarity Metric: How do we measure "good" alignment? That's the job of the similarity metric. It's a function that scores how well the moving image matches the fixed image at any given point. The whole goal is to find a transformation that maximizes this score.
- Optimizer: This is the engine that actually finds the best alignment. The optimizer works iteratively, tweaking the transformation parameters and checking the similarity metric over and over again until it finds the optimal fit.
The Historical Context
The challenge of aligning images isn't a new one. In fact, looking at the history of medical imaging really puts today's tools into perspective. Early algorithms from the 1970s, like chamfer matching from 1977, relied on aligning boundary points and often needed a lot of manual guidance.
The real push for better automated methods came around 1991, when PET imaging became more common. Even then, early automated techniques had success rates hovering between 80-90% in clinical settings because they struggled with image noise and other real-world complications. These limitations are what pushed the field to develop the more robust and reliable algorithms we have access to today. For a deeper dive, you can read more about the history and statistical challenges of these foundational techniques.
Getting Your Python Environment Ready for Image Processing
Before we dive into the fun stuff—the actual algorithms—we need to get our workspace set up. Trust me on this: a clean, dedicated environment is your best friend. It helps you dodge those frustrating dependency conflicts that can stop a project in its tracks before you've even loaded a single image.
The simplest way to do this is with a virtual environment. Think of it as creating a self-contained sandbox for this project. Anything you install here won't mess with other Python projects on your machine, and vice-versa. It’s a small bit of prep that pays off big time later.
Installing the Must-Have Libraries
With your virtual environment up and running, it's time to install the core tools. We're going to lean on three main libraries that are workhorses in the Python image processing world. Each has its own strengths, but they work beautifully together.
We'll use pip, Python's standard package manager, to get them installed.
-
OpenCV (
opencv-python): This is the go-to library for a massive range of computer vision tasks. It's incredibly fast, packed with functions for everything from basic image tweaks to complex feature detection. For many general registration problems, OpenCV is where you'll start. -
SimpleITK (
SimpleITK): When you're dealing with medical data like CT scans or MRIs, SimpleITK is the gold standard. It was built from the ground up to handle the unique challenges of medical imaging, offering powerful algorithms for intensity-based registration where distinct features aren't always available. -
Scikit-image (
scikit-image): As part of the broader scientific Python ecosystem, scikit-image provides a fantastic collection of image processing algorithms. It plays nicely with libraries like NumPy and SciPy, and its implementations are often very clear and easy to follow.
Fire up your terminal and run this command to install them all at once:
pip install opencv-python SimpleITK scikit-image numpy
Here’s a little tip I've learned the hard way: always add NumPy to your install command. Even though the other libraries require it, installing it explicitly helps avoid subtle version mismatch bugs that are a real headache to track down later.
And that’s it! Your environment is now prepped and ready. You've got a powerful toolkit at your disposal, blending general-purpose and specialized libraries to handle just about any image alignment task you can throw at it.
Your First Image Registration Project with OpenCV
Theory is great, but there's no substitute for getting your hands dirty with code. Let's dive into a practical example using OpenCV, the go-to library for computer vision in Python. We'll tackle a common real-world problem: aligning two aerial photos of a city skyline that were snapped from slightly different positions.
The mission is to take a "moving" image and warp it until it lines up perfectly with a "fixed" reference image. To pull this off, we'll find common points of interest—like the corner of a specific building—in both photos and then calculate the exact geometric shift needed to map one to the other.
This process generally follows a three-part workflow: finding features, matching them up, and then calculating the final transformation.
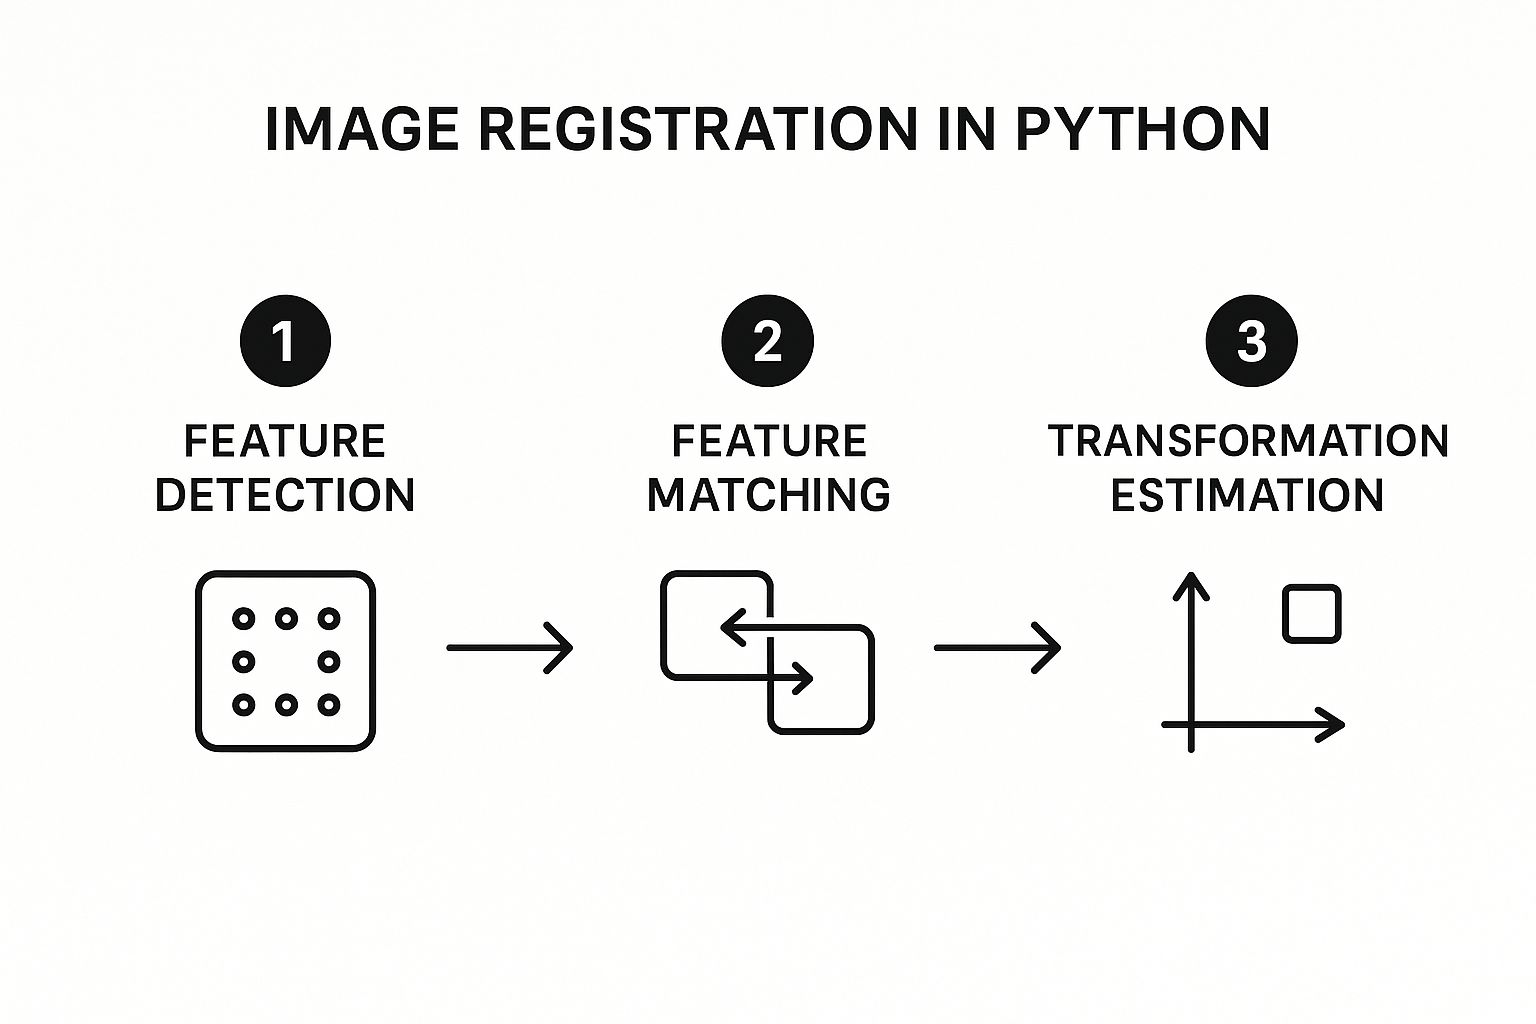
As you can see, it's all about identifying unique points, finding their twins in the other image, and then using those pairs to figure out the alignment.
Finding and Matching Key Features
The first real step in any feature-based approach is detecting distinctive points, or keypoints, in both images. Think of these as unique landmarks—the edge of a rooftop, a particular window, or any other feature that stands out. For this job, we'll use the ORB (Oriented FAST and Rotated BRIEF) algorithm that comes built into OpenCV.
I often recommend ORB because it strikes a great balance between speed and performance, making it a solid choice for many projects. It's clever enough to not only find these keypoints but also create a descriptor for each one. A descriptor is just a numerical signature that represents the feature, which is what we'll use to compare it against features in the second image.
Once we have a set of keypoints and descriptors for both our fixed and moving images, it's time to play matchmaker. A brute-force matcher is the most straightforward way to do this. It literally compares every single descriptor from the first image to every descriptor in the second to find the most similar pairs. It's like a high-speed game of "connect the dots" between our two skyline photos.
OpenCV Feature Detector Comparison
Choosing the right feature detector is a critical first step. While we're using ORB here, OpenCV offers several others, each with its own strengths. This quick table should help you decide which one fits your specific needs.
| Feature Detector | Best For | Speed | Robustness to Scale/Rotation |
|---|---|---|---|
| ORB | Real-time applications where speed is key. | Fast | Good |
| SIFT | High-accuracy tasks, even with big changes. | Slow | Excellent |
| SURF | A faster alternative to SIFT (patented). | Medium | Very Good |
| AKAZE | Non-linear scale spaces, good with blur. | Medium | Excellent |
Ultimately, the "best" detector depends entirely on your project's constraints—balancing the need for speed against the demand for accuracy is the name of the game.
Calculating the Transformation
With a list of good matches in hand, we can finally figure out the geometric relationship between the two images. We'll pull the (x, y) coordinates of the matched keypoints from both photos and feed them into a function that calculates a homography matrix. This is just a 3×3 matrix that mathematically describes the transformation—rotation, scaling, perspective—needed to overlay the moving image onto the fixed one.
To make sure our calculation is solid, we'll lean on an algorithm called RANSAC (Random Sample Consensus). RANSAC is fantastic at filtering out outlier matches that might have been paired incorrectly, which is absolutely crucial for getting a clean, accurate alignment.
The homography matrix is the key that unlocks the final alignment. It contains all the information needed to remap every pixel from the moving image to its correct position in the fixed image's coordinate system.
Once we have this matrix, the final step is surprisingly simple. We just call OpenCV's warpPerspective function, giving it the moving image and our freshly calculated homography matrix. The function handles all the heavy lifting of applying the transformation, pixel by pixel, to create a new, perfectly aligned image.
The output is a warped version of our moving photo that lines up beautifully with the fixed one, almost as if they were taken from the exact same vantage point.
Of course, for more complex tasks, you might need to go beyond feature-based methods. For a deep dive into more advanced techniques, including intensity-based approaches common in medical imaging, check out this excellent guide on how to set up advanced image registration in Python.
Tapping into Specialized Libraries for Advanced Scenarios

While OpenCV is a beast for feature-based alignment, some of the trickiest image registration python problems call for a more specialized set of tools. This is especially true when you venture into scientific and medical imaging. Here, images often lack the sharp, distinct features that algorithms like ORB need to latch onto.
Think about trying to align a 3D MRI scan of a brain with a CT scan. They have completely different intensity profiles and textures. A standard feature detector would be lost, unable to find any reliable points to match. This is where we need to shift our strategy and let the underlying pixel intensity data itself guide the alignment. Intensity-based registration methods were born for these exact scenarios, and some incredible libraries are built to handle them.
Going Deep with SimpleITK for Medical Imaging
When your work involves medical scans, SimpleITK is, without a doubt, the industry-standard toolkit. It’s an open-source library built from the ground up for analyzing and registering biomedical images. Its real power comes from its incredibly robust implementation of intensity-based algorithms.
Instead of hunting for corners and edges, intensity-based methods work by optimizing a similarity metric across the entire image. The algorithm iteratively nudges the moving image, measures how well its intensity values match the fixed image, and repeats until it finds the best possible alignment.
This approach is a game-changer for:
- Multi-modal registration: Aligning images from different machines, like an MRI and a PET scan.
- Longitudinal studies: Tracking how a patient's condition changes over time by aligning scans taken months or even years apart.
- Atlas-based segmentation: Warping a standard anatomical atlas onto a patient's scan to automatically map out different structures.
In the medical field, "close enough" simply doesn't cut it. The stakes are too high. SimpleITK gives you the precision you need by directly comparing the anatomical information embedded in the image intensities. This leads to far more accurate and clinically relevant results than feature detection could ever achieve in this context.
Let's walk through a real-world example. Imagine you have two 3D CT scans of a patient’s torso taken a week apart, and you need to align them to see what has changed. Using SimpleITK, the process involves setting up a registration framework, deciding on a transformation model (like rigid or affine), picking a similarity metric (Mutual Information is a common choice), and then letting an optimizer crunch the numbers to find the perfect fit.
The workflow in SimpleITK is very structured, which gives you incredible control. The key steps generally look like this:
- Load Your Data: First, you read in your fixed and moving 3D image volumes.
- Initialize the Method: You’ll create an
ImageRegistrationMethodinstance to manage the process. - Set Your Components: This is where you configure the similarity metric, optimizer, and the transformation model.
- Execute the Registration: You run the process, which computes the final transformation matrix or field.
- Resample the Image: Finally, you apply that computed transformation to the moving image, aligning it perfectly with the fixed one.
This deliberate, step-by-step approach lets you fine-tune the algorithm to match the specific characteristics of your medical data.
Exploring FFT-Based Techniques with imreg
Another powerful and completely different tool for your image registration python arsenal is the imreg library. This library works in the frequency domain, using the Fast Fourier Transform (FFT) to its advantage. This makes it exceptionally fast and efficient at handling global transformations like translation, rotation, and scaling.
The magic behind it is the Fourier shift theorem, which basically says that shifting an image in space corresponds to a phase shift in its frequency domain. By converting the images into this domain, imreg can calculate these translational and rotational differences with surprising speed and accuracy.
The imreg library is a great example of how the Python ecosystem for image registration keeps evolving, with developers implementing clever techniques to keep tools up-to-date and powerful. You can find more details about the library and its versions over on its PyPI page.
By looking beyond OpenCV and getting comfortable with specialized tools like SimpleITK and imreg, you're setting yourself up to tackle a much broader—and more complex—range of image alignment challenges.
How to Measure and Troubleshoot Your Alignment

Getting your image registration python script to run without errors is just the first step. The real challenge is knowing if the alignment is actually correct. A result that looks plausible at a glance can still be dangerously inaccurate, especially when dealing with medical scans where precision is everything. You need a solid process for validating your results and figuring out what went wrong when things don't line up.
A great first pass is always a simple visual inspection. My go-to technique is creating a checkerboard overlay. This method takes alternating squares from your fixed and moving images and stitches them together. It makes misalignments immediately obvious. If anatomical structures and edges flow smoothly from one square to the next, you're in good shape. If you see jarring, broken lines, it’s a clear sign you need to investigate further.
Quantitative Evaluation Metrics
Visual checks are essential, but they're also subjective. For truly robust validation, you need hard numbers. This is where quantitative metrics come in, giving you a concrete score to judge the quality of the alignment. Often, these are the very same metrics the optimizers use behind the scenes to find the best fit.
- Mutual Information (MI): This is the workhorse metric, particularly when you're aligning images from different modalities, like an MRI and a CT scan. MI measures how much information one image's intensity values tell you about the other's. A higher MI score almost always means a better alignment.
- Mean Squared Error (MSE): A much simpler metric, MSE is perfect for mono-modal registration (e.g., MRI to MRI). It calculates the average squared difference between corresponding pixel values. Here, a lower MSE value indicates a better match.
Don't ever rely on a single metric. A low MSE might seem great, but it can be thrown off by simple changes in overall image brightness. I've found the most reliable approach is to pair a quantitative score with a visual check like the checkerboard. This combination gives you a much more complete and trustworthy picture of your alignment quality.
Common Roadblocks and How to Fix Them
No matter how experienced you are, you'll hit snags. Knowing the common failure points is half the battle when it comes to troubleshooting.
A classic problem I see all the time is trying to use feature-based methods on low-contrast images. If an algorithm like ORB can't find distinct edges or corners to lock onto, the registration is doomed from the start. When this happens, it's time to pivot. An intensity-based method, maybe using a library like SimpleITK, is usually the right call.
Another frequent pitfall is picking the wrong transformation model. You can't expect a simple rigid or affine model to work if your images have significant non-linear distortions. If you suspect localized warping or stretching, you have to use a more flexible model. Experimenting with something like a B-spline transformation is often the key to getting a good result in those tricky cases.
Ultimately, to properly measure complex alignments, you often need a "ground truth" reference. This requires carefully prepared, labeled image data. Deepening your skills by understanding image annotation is incredibly valuable here. That knowledge is what allows you to create the gold-standard datasets necessary for truly validating advanced registration algorithms.
Navigating Common Roadblocks in Python Image Registration
When you first get into image registration, a few questions always seem to pop up. Whether you're just starting out or stuck on a specific problem, getting the right answers can save you a ton of frustration. Let's walk through some of the most common issues I've seen people run into.
Feature-Based vs. Intensity-Based: Which One Do I Need?
This is probably the biggest question people have. It’s not about which method is “better” overall, but which one is right for your specific images.
Think of it this way:
-
Feature-based registration, like you’d typically do with OpenCV, is perfect when your images have clear, well-defined landmarks. If you're aligning aerial photos with sharp building corners or satellite images with distinct coastlines, this is your go-to. It's fast and effective because it just has to match up those unique points.
-
Intensity-based registration is the workhorse for medical imaging, and it’s where a library like SimpleITK really shines. When you're trying to align two MRI scans of a brain, there are no sharp corners to lock onto—just soft, continuous tissue. This method compares the overall patterns of pixel brightness to find the best alignment, making it ideal for the subtle variations you see in medical scans.
Can Python Really Handle 3D Medical Scans?
Yes, and it does it incredibly well. This is a huge advantage of using Python for medical image analysis. SimpleITK, in particular, was built specifically for handling 3D and even 4D data sets.
While a tool like OpenCV is primarily a 2D library, SimpleITK provides everything you need for registering entire 3D volumes. This is absolutely critical for clinical work, where you might need to align a patient's CT scan from last year with one from today. Using Python for image registration gives you the power to handle this kind of complex volumetric data effectively.
What Happens When Lighting or Contrast Doesn't Match?
This is a classic real-world problem. You might have two images taken with slightly different scanner settings or camera exposures, and suddenly your registration fails completely.
The trick is to pick a similarity metric that isn't fooled by simple brightness and contrast changes. A metric like Mean Squared Error is very brittle here—any shift in intensity will throw it off. Instead, you'll want to use something more robust, like Normalized Cross-Correlation for single-modality images or Mutual Information when aligning different types (like a CT to an MRI).
Don't forget about preprocessing, either. Often, a simple step like running histogram equalization on both images before you try to register them can solve the problem entirely. It helps normalize the intensity values, giving the algorithm a much clearer picture of the underlying anatomy.
Ultimately, getting a perfect registration is often an iterative game of trial and error. It's about knowing your images, picking the right tools for the job, and being willing to tweak your parameters until everything clicks into place.
At PYCAD, we turn these complex medical imaging challenges into practical, AI-driven solutions. From data handling to model deployment, we have the expertise to improve diagnostic accuracy and streamline workflows. Find out how we can help your next project at https://pycad.co.