Introduction
3D visualization is a cornerstone in fields like medical imaging, robotics, and computer-aided design. Today, we will focus on how to create an interactive 3D visualization application using Streamlit and vedo. Streamlit offers a simple and quick way to create web applications, and vedo excels at rendering 3D objects, especially useful for medical imaging scenarios.
Setting Up the Environment
First, make sure to install Streamlit and vedo if you haven’t already:
pip install streamlit vedo
Basic Streamlit UI
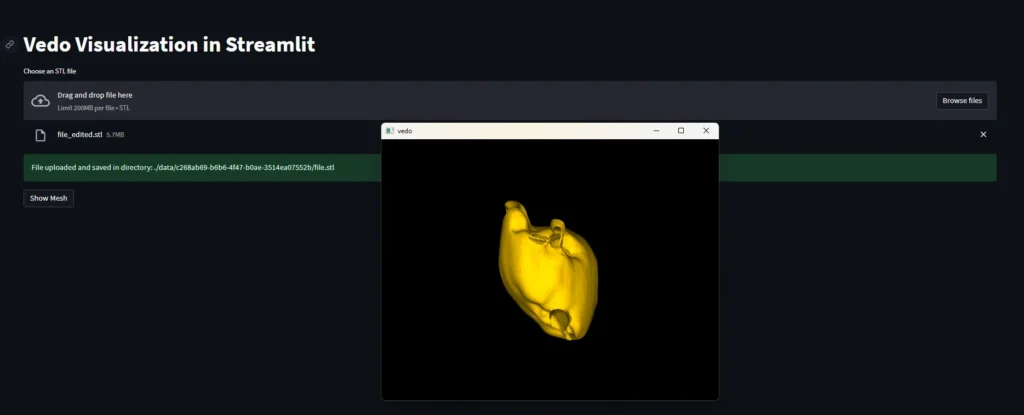
Streamlit makes it incredibly easy to create UI components. For our application, we will start by creating a file uploader that allows the user to upload STL files.
  import streamlit as st

  st.set_page_config(page_title='Vedo Visualization', layout='wide')
  st.title('Vedo Visualization in Streamlit')

  uploaded_file = st.file_uploader("Choose an STL file", type="stl")
Loading and Displaying 3D Objects
vedo makes loading and displaying 3D objects a breeze. We’ll utilize its load() and show() methods to visualize our STL files.
  from vedo import load, show

  def load_show(stl_path: str):
      mesh = load(stl_path).color('#ffc800')
      show(mesh, bg='black')
The color and background settings can make the visualization more meaningful, aiding in the differentiation of various structures or elements.
Parallelizing with Multiprocessing
We’ll leverage Python’s multiprocessing library to handle the vedo rendering separately. This is particularly useful for maintaining the responsiveness of our Streamlit app.
  from multiprocessing import Process, Queue
  import time

  def load_show(stl_path: str, queue: Queue):
      mesh = load(stl_path).color('#ffc800')
      show(mesh, bg='black')
      queue.put('done')
Adding Interactivity
To make our application interactive, we’ll add a button in Streamlit that triggers the visualization.
  import os
  import uuid
  from pathlib import Path

  if uploaded_file is not None:
      unique_id = str(uuid.uuid4())
      os.makedirs(f'./data/{unique_id}', exist_ok=True)
      file_path = f'./data/{unique_id}/file.stl'

      with open(file_path, 'wb') as f:
          f.write(uploaded_file.getbuffer())

      st.success("File uploaded and saved in directory: " + str(file_path))

      if st.button('Show Mesh'):
          queue = Queue()
          p = Process(target=load_show, args=(file_path, queue))
          p.start()

          while True:
              if not queue.empty():
                  break
              time.sleep(0.1)
The use of a unique identifier (UUID) helps manage the uploaded files, ensuring that each upload gets its own directory.
Conclusion
Combining Streamlit and vedo allows us to create powerful, interactive 3D visualization tools, especially valuable in fields like medical imaging. This tutorial walked you through each step to set up such an application. The full source code is also provided for your convenience.
Source Code
Here is the complete code snippet for your reference.
Further Reading
For more information and advanced capabilities, you can refer to the Streamlit documentation and vedo documentation.