In this blog post, I will demonstrate how the PYCAD library was utilized for downloading and preparing a dataset aimed at training the YOLOv8 model for mandible segmentation.
This blog serves two primary purposes: first, it will guide you through the process of utilizing the PYCAD library to prepare a dataset for training, and second, it will showcase the applicability of YOLOv8 in the realm of medical imaging segmentation.
Download the dataset
The dataset for this tutorial was sourced from an open-access website, and then meticulously organized and curated before being integrated into the PYCAD library’s dataset module. You might wonder why we took this step. The reason is simple: we introduced this feature to streamline the process for anyone interested in experimenting with extensive medical imaging datasets or those looking to effortlessly access datasets on a server.
In addition to the dataset used in this tutorial, which can be found here, our PYCAD library’s dataset module boasts a wealth of over 120 open-source datasets, with a majority of them being 3D CT scans. Specifically, the dataset used in this tutorial is referred to as the PanMandibleDataset, and you can easily obtain it by using the following code snippet:
  from pycad.datasets.segmentation.diverse import PanMandibleDataset

  dataset_downloader = PanMandibleDataset()
  dataset_downloader.download('all')
Mask to Polygone
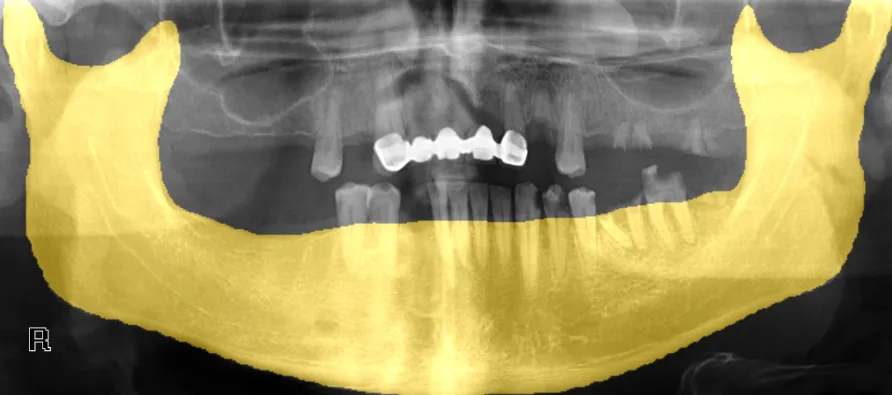
The dataset that will be downloaded consists of images and binary masks. However, to effectively train a YOLO model for image segmentation, we require polygon annotations instead of masks. Fortunately, you can harness the power of the PYCAD library to facilitate this conversion process. Here’s how you can achieve it:
  from pycad.datasets import PngToTxtConverterMC

  input_folder = '/content/datasets/xray_panoramic_mandible/masks'
  output_folder = '/content/datasets/xray_panoramic_mandible/txt'
  converter = PngToTxtConverterMC(input_folder, output_folder, 0.001) # lets use a coeff of .1%
  converter.run()
Train-Valid Splitter
To ensure the training of a robust model, it is advisable to partition your dataset into distinct training and validation sets. PYCAD provides a convenient method for accomplishing this task. Here’s an example of how you can achieve this using the PYCAD library:
  from pycad.datasets import DataSplitter

  img = '/content/datasets/xray_panoramic_mandible/images'
  msk = '/content/datasets/xray_panoramic_mandible/txt'
  output = '/content/datasets/xray_panoramic_mandible/yolo'
  splitter = DataSplitter(img, msk, output, 0.8, 0.2, 0.0, delete_input=False)
  splitter.run()
Dataset.yaml
To train the YOLOv8 model effectively, it’s essential to have a dataset.yaml file that specifies the paths to the “train” and “valid” folders, where the images and labels are stored. PYCAD simplifies this process for you as well. Here’s how you can create the necessary dataset.yaml file using PYCAD:
  from pycad.datasets import YOLODatasetYaml

  path_train = '/content/datasets/xray_panoramic_mandible/yolo/train'
  path_valid = '/content/datasets/xray_panoramic_mandible/yolo/valid'
  config = YOLODatasetYaml(path_train, path_valid, 1, "mandible")
  config.create_yaml("./datasets/xray_panoramic_mandible/yolo/dataset.yaml")
Train the model
Once your dataset is prepared for training, you can utilize the Ultralytics library to configure the YOLOv8 model. In this example, I’ll be using the smaller architecture variant, and I’ll also demonstrate how to apply image transformations.
  import os
  from ultralytics import YOLO

  model = YOLO('yolov8s-seg.yaml').load('yolov8s.pt')   # load a pretrained model (recommended for training)

  # Train the model
  dataset_path = "/content/datasets/xray_panoramic_mandible/yolo/dataset.yaml"
  results = model.train(data=dataset_path, epochs=100, imgsz=640, batch=8, patience=30,
                      lr0=.01, lrf=.002, momentum=.937, weight_decay=.0005, warmup_epochs=3.0,
                      warmup_momentum=0.8, warmup_bias_lr=.1, box=7.5, cls=.5, dfl=1.5, pose= 12.0,
                      kobj=1.0, label_smoothing=0.0, nbs=64, hsv_h=.015, hsv_s=.7, hsv_v=.4, degrees=.0,
                      translate=.1, scale=.0, shear=.0, perspective=.0, flipud=.5, fliplr=.5, mosaic=.0,
                      mixup=.0, copy_paste=.3
                      )
Inference
Are you interested in using a pre-trained model, or would you like to train your own? Both options are available. If you have your own trained model, you can use it for inference. Alternatively, if you prefer to use the model that I’ve trained, you can access it at this link.
To perform inference, you can follow the provided notebook in the tutorial. Here’s an example of the expected output: