Medical device verification and validation are the two pillars that ensure a device is not only built correctly according to its blueprints but also actually meets the needs of the people who will use it. These aren't just boxes to check for regulators; they are non-negotiable disciplines that confirm a medical device is both safe for patients and effective for its intended clinical use.
The Foundation of Medical Device Safety and Success
In the high-stakes world of medical technology, getting a new device into the hands of clinicians is a massive undertaking. Long before a product ever touches a patient, it has to survive a trial by fire. This is where medical device verification and validation (V&V) come in, acting as the bedrock of patient safety and a product's ultimate success.
I find it helps to think of it like building a bridge. Verification is all about answering the question, "Are we building the bridge right?" It’s the process of meticulously checking every single component against the architectural plans. Are the steel beams the specified grade? Do the suspension cables have the required tensile strength? Is every last bolt torqued to the correct setting?
Validation, however, asks a much broader and more fundamental question: "Are we building the right bridge?" This step zooms out to look at the big picture. Does our bridge actually connect the two points it was meant to? Is it strong enough to handle the daily traffic it will face? Is it wide enough for an ambulance to pass through in an emergency? In other words, does it truly solve the transportation problem it was designed for?
Verification vs Validation at a Glance
To make this distinction crystal clear, let's break down how these two concepts differ in the context of medical device development. One is about internal consistency against your own specs, while the other is about external effectiveness in the real world.
| Concept | Verification (Are we building the product right?) | Validation (Are we building the right product?) |
|---|---|---|
| Focus | Internal design outputs vs. design inputs. | The finished device vs. real user needs. |
| Question | Does the device meet its technical specifications? | Does the device meet the user's needs in its intended environment? |
| Evidence | Test results, inspections, analysis, code reviews. | Usability studies, clinical trials, simulated-use testing. |
| Timing | Happens throughout the development lifecycle. | Typically happens on the final (or near-final) product. |
| Example | Testing confirms an infusion pump delivers exactly 50 mL/hr as specified. | A clinical study confirms nurses can set up and use the pump safely and effectively in a busy ICU. |
Both are absolutely essential. You can't have one without the other.
Core Concept: Verification is the objective evidence that you designed the device correctly. Validation is the proof that you designed the correct device.
This dual focus is what separates a great device from a failed one. A product can be perfectly verified—meeting thousands of technical requirements with flying colors—but still be a total failure if it’s too complicated for a nurse to operate in a chaotic emergency room. This critical role is reflected in the market for medical device V&V, which is projected to reach approximately USD 2.70 billion by 2034. You can dig into the drivers behind this growth in the full market research report from Grand View Research.
At the end of the day, a solid V&V strategy does far more than just appease regulators. It actively reduces risk, prevents incredibly expensive recalls, and builds the trust with clinicians and patients that is essential for any device to genuinely improve healthcare.
How Verification and Validation Differ in Practice

While the "building the right bridge" analogy gets us started, the real-world execution of verification and validation involves very different activities, timing, and goals. They aren't interchangeable steps. Think of them as two unique sides of the quality assurance coin, each crucial at different stages of the development journey.
Verification is an internal-facing process. It’s all about the technical specs—a series of objective, evidence-based checks to confirm that what you designed is what you actually built. It’s like meticulously checking every measurement on an architectural blueprint.
Validation, on the other hand, looks outward. It’s a broader assessment focused on the person using the device and the environment where it will live. This process makes sure the final product—not just its individual parts—truly solves the problem it was designed for.
Verification Activities: Checking the Blueprints
Verification is technical, granular, and happens continuously. From the earliest design concepts to final assembly, you're constantly verifying that each piece is built correctly before it gets integrated into the whole.
Some common verification activities include:
- Design Reviews: These are formal meetings where engineering teams pore over design documents, comparing them against the requirements to catch mistakes or oversights early on.
- Code Analysis: This involves both automated tools and manual reviews of software code to make sure it follows standards, is free of bugs, and executes the right logic.
- Unit Testing: Here, you isolate the smallest testable parts of your device—a single software function or a specific hardware component—and confirm they work perfectly on their own.
- Integration Testing: After unit testing, you start combining those individual pieces and test them as a group to ensure they play nicely together.
All these activities generate hard evidence—test reports, inspection records, analysis summaries—that prove the device was built exactly to its specifications.
Key Insight: Verification is all about proving the device was built as specified. It answers questions like, "Does this component meet its required tolerance?" or "Does this software algorithm perform the calculation correctly?"
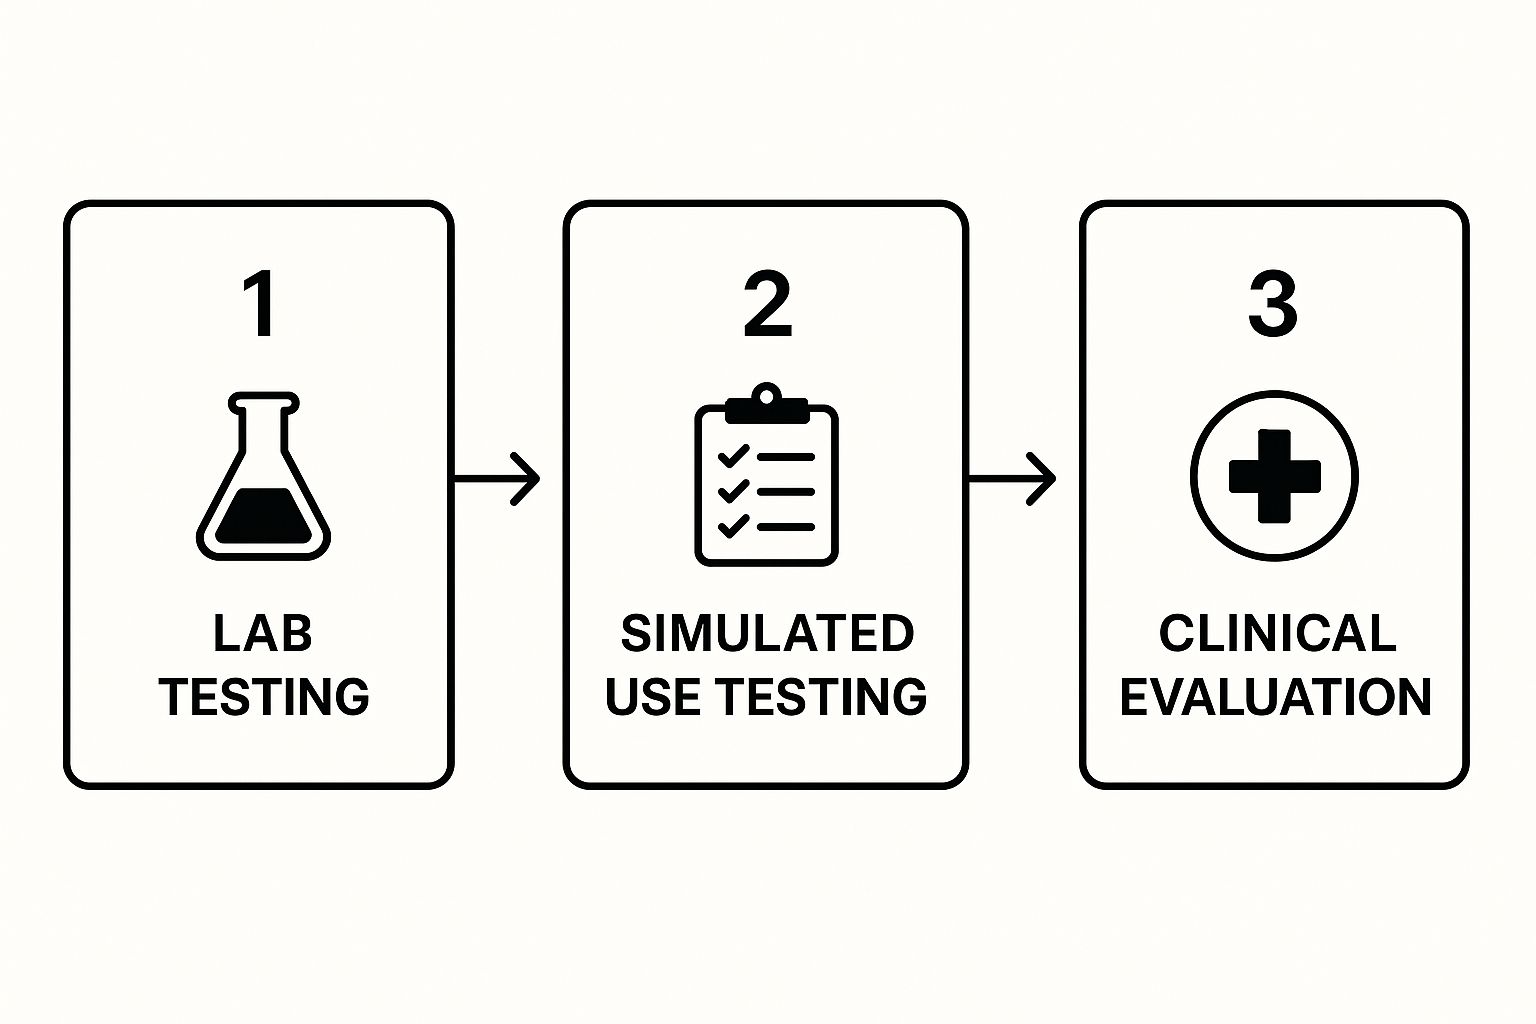
Validation Activities: Testing in the Real World
Validation comes later, usually with a device that's identical to what will be manufactured. The focus shifts entirely from the technical blueprints to the user’s real-world needs and environment. The goal is to prove the device isn’t just technically correct, but that it's also safe, effective, and usable for the people who will depend on it.
Let's take an insulin pump as an example. Verification would confirm the pump’s motor delivers precisely 1.0 units of insulin when instructed. It would check that the battery life meets its 24-hour specification and that the screen's pixel density matches the design document.
Validation asks completely different questions. Can a person with diabetes, who might have impaired vision or limited dexterity, actually read the screen and press the buttons? Can they program a dose correctly while under the stress of a low blood sugar event? This is where putting the device into human hands becomes absolutely critical.
Key validation activities often involve:
- Usability Studies (Human Factors Engineering): This means observing real users interacting with the device in realistic situations to uncover any difficulties or potential for use-related errors.
- Clinical Trials or Evaluations: The device is used in a controlled clinical setting with actual patients to gather concrete data on its safety and effectiveness for its intended medical purpose.
- Simulated Use Testing: The team recreates the device's operational environment in a lab to test its performance under various real-world stresses, like temperature swings or electromagnetic interference.
In the end, the practical difference is massive. A perfectly verified device that passes every technical check can still completely fail validation if it’s too complicated or impractical for a clinician or patient to use. Getting a medical device to market successfully requires both a meticulous eye for technical detail and a deep sense of empathy for the end user's experience.
Navigating the Global Regulatory Landscape

Bringing a medical device to market is more than just an engineering challenge; it’s a journey through a complex web of international regulations. Think of robust verification and validation as your passport—it's what gets you into major markets like the United States and Europe. These aren’t just suggestions; they are mandatory frameworks built to protect patient safety.
You can view regulatory bodies as a series of checkpoints. Each has its own rulebook, but they all share a common goal: to ensure every device is safe, effective, and consistently manufactured to a high standard. Success isn't just about knowing the individual rules, but understanding how they all fit together.
These stringent global requirements have made medical device V&V an indispensable part of the process. In the U.S., for example, the FDA demands exhaustive documentation proving a device meets safety and performance standards before it can hit the market. These rules have dramatically cut down on device failures and patient risks, and the FDA continues to update its guidelines for new technologies like AI diagnostics. This sharp focus on safety is driving serious market growth, with the global medical device V&V market expected to grow at a 11.1% CAGR between 2019 and 2024.
The FDA and Design Controls
In the United States, the Food and Drug Administration (FDA) sets the tone. The key regulation to know is the Quality System Regulation (QSR), which you can find in 21 CFR Part 820. At the heart of the QSR is the mandate for Design Controls.
This isn't just about checking the final product. The FDA requires a formal, documented process that shows you have control over the entire design lifecycle. It’s about creating a traceable story, from the initial user needs all the way to the final, validated device. Verification and validation are explicitly required steps in that process.
Regulatory Mandate: The FDA’s 21 CFR 820.30 is crystal clear: "Each manufacturer of any class III or class II device, and a select few class I devices, shall establish and maintain procedures to control the design of the device in order to ensure that specified design requirements are met."
What this really means is that every decision, every test, and every result has to be meticulously documented in what's called the Design History File (DHF). This file becomes the core evidence you'll use to prove your V&V process was thorough and compliant.
The Interlocking ISO and IEC Standards
While the FDA governs the US market, a family of international standards provides a globally recognized playbook for quality and safety. These standards don't just exist side-by-side; they are deeply interconnected, forming a comprehensive system for managing a device's entire life. The challenges are often shared across highly regulated fields, and you can see parallels in these insights from a pharmaceutical case study.
Here are the key international standards you need to know:
- ISO 13485 (Quality Management Systems): This is the bedrock. It sets up the entire quality management system (QMS) for a medical device manufacturer, providing the structure for everything from documentation and processes to continuous improvement.
- ISO 14971 (Risk Management): This standard works hand-in-glove with V&V. It mandates that you identify, evaluate, and control potential risks associated with your device. Your verification and validation activities are the primary tools you'll use to prove you've mitigated those risks.
- IEC 62304 (Software Lifecycle): If your device has software—and most do these days—this standard is non-negotiable. It lays out the lifecycle requirements for medical device software, establishing a risk-based framework for its design, development, and testing.
These standards are not meant to be used in isolation. For instance, a risk you identify under ISO 14971 might trigger a specific verification test defined by your IEC 62304 process, all of which is managed under the umbrella of your ISO 13485 QMS. Getting the interplay between these standards right is the secret to achieving global compliance.
Using the V-Model for a Structured Workflow
When you're dealing with the tangled web of medical device verification and validation, you need a clear roadmap. Without one, teams can easily get lost. The V-Model gives you that roadmap—a powerful, visual guide that ties every single development phase directly to a corresponding testing phase. Think of it as a logical, traceable path that takes your device from a back-of-the-napkin concept all the way to a market-ready product.
So, what is it exactly? The V-Model is essentially an evolution of the old-school waterfall development method, but with a crucial twist: it forces you to think about testing from day one. Instead of waiting until the end to see if everything works, you establish a parallel track for building the device and checking the device. This structure isn't just a "nice-to-have"; it's a must for the high-stakes world of medical devices, where patient safety and regulatory compliance are non-negotiable.
This image does a great job of showing the V-Model's elegant symmetry. You can see how the design and development work on the left side directly mirrors the testing and validation work on the right.
Notice how the high-level user needs on the far left correspond perfectly with the final user validation on the far right. This integrated approach guarantees that for every design decision you make, you already have a plan in place to verify or validate the outcome.
The Left Side of the V: Design and Specification
The journey starts at the top left of the 'V' and works its way down. You're essentially taking a big idea and breaking it into smaller and smaller, more detailed technical pieces. Each step produces the blueprint for the next.
- User Needs & Requirements: This is square one. What problem are we solving for the clinician or patient? Here, you capture and document all the clinical needs the device must address. This step directly informs the final validation testing you'll do later.
- System Design & Requirements: Now, you translate those user needs into the language of engineers. The team defines the device's overall architecture and how all the major hardware and software components will talk to each other.
- Detailed Design: Things get much more granular here. You break the system down into subsystems and modules, creating highly specific plans for each piece of hardware and software.
- Implementation: At the very bottom of the 'V', the plans become reality. This is where the code gets written and the physical parts get built. It's the turning point where the model pivots from "building" to "testing."
The Right Side of the V: Verification and Validation
Once the device is built, you start climbing up the right side of the 'V'. Each testing phase here is a direct response to a design phase on the left, confirming that what you built is exactly what you planned to build.
- Unit Verification: This is the first and most fundamental testing step. You're looking at the smallest testable parts—like individual software functions or circuits—in isolation. The goal is simple: confirm they meet their detailed design specs.
- Integration Verification: Next, you start putting the pieces together. Those individual units are combined into subsystems and tested as a group. This is where you find out if the components play nicely with each other, uncovering issues at their connection points.
- System Verification: The entire device is now fully assembled and tested against the system-level requirements. This is a holistic check to make sure the complete product works as a single, cohesive unit.
- User Validation: Finally, we come full circle. The finished device is put into the hands of actual end-users in real-world (or simulated) clinical settings. This confirms it truly meets their original needs. It's the ultimate answer to the question, "Did we build the right thing?"
The real magic of the V-Model is traceability. If a test fails on the right side of the 'V', you can instantly trace it back to a specific design requirement on the left. This makes pinpointing and fixing the root cause of a problem incredibly efficient and is exactly the kind of robust documentation regulators want to see.
This structured flow is especially critical for final user validation. You don’t just throw the device into a clinic; you build confidence progressively.
By moving methodically from controlled lab environments to real-world clinical use, you systematically de-risk the product. This ensures that by the time it reaches a patient, it has already passed a gauntlet of tests, maximizing the chances of a successful validation.
Creating Audit-Proof V&V Documentation
When it comes to medical device verification and validation, if you didn't write it down, it didn't happen. Documentation isn't just a bureaucratic hurdle; it's the tangible, defensible proof that tells the story of your device’s journey from an idea to a safe and effective product. For regulators, a well-kept Design History File (DHF) is the ultimate record, showing meticulous quality control and a genuine commitment to patient safety.
Think of it like building a legal case. Every document, from the initial plan to the final report, is a piece of evidence. Your job is to build a case so strong that it leaves no room for doubt. This narrative must be clear, logical, and—most importantly—traceable. An auditor should be able to pick any user need from the beginning and follow its thread directly through design specs, risk controls, and the exact tests that proved it was met.
The demand for this level of detail is only growing. The global market for medical device V&V is expected to reach nearly USD 1.98 billion by 2031, driven by new technologies and a stronger regulatory push for proven device efficacy. You can see a full breakdown of this growth in the detailed report on medical device validation from SkyQuest.
The Essential Components of Your DHF
A solid Design History File is made up of several key documents. Together, they create a complete picture of your V&V process, with each one playing a specific role in your regulatory story.
-
Validation Master Plan (VMP): This is your high-level game plan. The VMP lays out the entire scope of validation work, defining the V&V strategy, what resources you'll need, who is responsible for what, and the overall timeline. It sets the stage for everything else.
-
Requirements Specifications: This is where you translate what users need into concrete, testable engineering requirements. It’s the foundational blueprint that all your verification work will be measured against.
-
Test Protocols and Procedures: Here’s where you get into the "how." A test protocol gives step-by-step instructions for running a specific verification or validation test. Critically, it must define the predefined acceptance criteria—the clear, objective measures that spell out a pass or fail result.
-
Test Summary Reports: After running the tests, you compile the results into a summary report. This document presents the data, analyzes what you found, and gives a final verdict on whether the device passed its acceptance criteria.
An Auditor's Mindset: A regulator doesn’t just want to see a "Pass" on a report. They want to see the protocol that defined the test, the objective criteria for passing, the raw data you collected, and the signature of the person who ran the test and when they ran it. Traceability is everything.
Best Practices for Meticulous Record-Keeping
Creating documentation that can stand up to an audit is all about discipline and consistency. Missing or sloppy records are major red flags for auditors and can cause serious delays in getting your device to market. To make this process smoother and ensure all your documents are consistent, using specialized document generation software can be a huge help.
To keep your records audit-ready at all times, stick to these core principles:
-
Write for Clarity: Stay away from jargon and vague language. Someone who knows nothing about your project should be able to pick up a test report and understand its purpose, methods, and results.
-
Maintain Version Control: Every single document needs a clear version number and revision history. This shows you have a controlled process and that your team is always working from the right document.
-
Record Everything as It Happens: Document your work when you do it, not weeks later. Dated signatures and notes written at the time of the activity add a ton of credibility to your records.
Ultimately, strong V&V documentation is your best insurance policy. It's the proof that you not only built the device right, but you also built the right device, paving the way for a much smoother path to market.
Common Questions on Medical Device V&V
It’s one thing to understand the definitions, but putting medical device verification and validation into practice is where things get tricky. The stakes couldn't be higher, and getting the details right is non-negotiable for regulatory approval and, most importantly, patient safety.
Let's cut through the confusion and tackle some of the most common questions and "what-if" scenarios that development teams wrestle with every day. Answering these will help you build a V&V strategy that's not just compliant, but genuinely robust.
https://www.youtube.com/embed/Mj2WYB-T0ZQ
Can We Combine Verification and Validation?
This question comes up all the time, and the answer isn't a simple yes or no. While verification and validation are fundamentally different activities, their execution can sometimes overlap, especially with modern development methods. But they can never truly be merged into one step because they answer two very different questions.
Think of it this way: you can't validate something until you've first verified it's working as designed. For example, you might run a verification test on a software algorithm to confirm it calculates a drug dosage correctly. Immediately after, you could use that now-verified module in a human factors study—a validation activity—to see if a nurse can use the interface without errors.
The critical distinction is this: The activities must remain separate in your documentation, even if they happen back-to-back. Verification proves you built the thing right. Validation proves you built the right thing. If you try to blur that line, you risk losing the clear evidence trail that regulators demand.
Your Design History File (DHF) must have a clear separation between the evidence showing the device meets its technical specs (verification) and the evidence showing it meets the user's needs in the real world (validation).
What Is the Difference Between the V-Model and Agile?
The V-Model and Agile are two different philosophies for managing a project. One isn’t better than the other; it’s all about picking the right tool for the job.
-
V-Model: This is a classic, sequential approach. It's highly structured and moves from one phase to the next in a linear fashion. This makes it a great fit for projects where requirements are well-defined and unlikely to change, which is why it has traditionally been the go-to for safety-critical medical devices. Its rigid structure is perfect for creating the comprehensive documentation and traceability that regulators love.
-
Agile: This method is all about flexibility and iteration. It’s ideal when requirements might evolve. Work is done in short cycles called "sprints," allowing teams to deliver small, functional pieces of the product and gather feedback along the way.
What we see most often in MedTech today is a hybrid approach. Teams might use Agile for software development to quickly build and refine features, but they operate within the larger, more formal V-Model framework. This gives them the best of both worlds: the speed of Agile and the regulatory rigor of the V-Model.
Key V&V Documentation Overview
Getting lost in the paperwork is easy. This table is designed to be your cheat sheet, breaking down the essential documents you'll need for medical device V&V. It clarifies what each document is for and where it fits into the development timeline.
Key V&V Documentation Overview
| Document | Purpose | Development Stage |
|---|---|---|
| Validation Master Plan (VMP) | This is your high-level game plan. It outlines all V&V activities, defining the scope, who is responsible, and the criteria for success. | Planning (Before V&V starts) |
| User Requirements Specification (URS) | This document captures what the end-user actually needs the device to do. It’s the source of truth for all design and validation efforts. | Planning & Requirements |
| Design Specification | This translates the user's needs into concrete technical specs, like hardware dimensions or software logic, that engineers will build to. | Design & Development |
| Test Protocols | These are the detailed, step-by-step recipes for conducting each V&V test, complete with the specific pass/fail criteria. | Test Planning |
| Test Reports | This document summarizes what happened during a test. It presents the results, explains any deviations, and provides the final verdict: pass or fail. | Testing & Execution |
| Traceability Matrix | A crucial document linking user needs to design specs, risk controls, and the very tests that prove they work. It connects all the dots. | Throughout the Lifecycle |
Creating this structured documentation isn't just busywork; it's how you build a clear, auditable story that shows regulatory bodies like the FDA that your device is ready for the market.
How Much Testing Is Enough?
There's no magic number here. The answer is a core principle from ISO 14971 (the standard for Risk Management): your testing effort must be proportional to the level of risk.
A simple, low-risk device like a tongue depressor requires far less V&V work than a high-risk, life-sustaining device like an implantable defibrillator. It just makes sense.
So, how do you figure out what’s "enough"? It comes down to a risk-based approach:
- Start with a thorough risk analysis. Identify every potential hazard your device could create. For each one, evaluate how severe the harm could be and how likely it is to happen.
- Implement risk controls. For every risk you find, design a feature or process to mitigate it. This could be anything from a physical guard to a software alarm.
- Verify and validate your controls. Your V&V plan must include specific tests that prove your risk controls actually work. A high-risk failure mode demands far more rigorous testing than a low-risk one.
Ultimately, "enough" testing is the amount required to provide objective evidence that all your identified risks are controlled and that the device is safe and effective for its intended purpose. This approach shifts the focus from, "Did we check all the boxes?" to the much more important question, "Did we prove the device is safe?"
At PYCAD, we live and breathe the complexities of verification and validation, especially for AI in medical imaging. We help you build a solid, evidence-based case for your device that satisfies both regulatory standards and real-world clinical demands. Learn how our expertise can support your next project.