Using Python and Monai to augment your dataset for tumor or organ segmentation.
Introduction
We discussed how to preprocess 3D volumes for tumor segmentation in the previous article, so in this article we will discuss another important step when working on a deep learning project. This is the data augmentation step.
What is Data Augmentation?
We are all aware that in order to train a neural network, a significant amount of data is required in order to obtain an accurate model as well as a robust model that can work with the majority of cases in that specific task. However, it is not always possible to obtain a large amount of natural data in any task, particularly in healthcare projects. Because one input in medical imaging is a single patient with multiple slices, and we all know how difficult it is to assemble a dataset of this type of data (a lot of patients).
For this reason, we must assist ourselves by creating synthetic data in order to improve our results slightly.
The generation of these synthetic data is referred to as data augmentation, which means that we start with our dataset and then perform some transformation to generate new data.
Tools and Operations
If you have previously done data augmentation for a project with a normal task and in 2D images, you will understand what I am trying to say; otherwise, don’t worry, we will take it one step at a time until we get the results.
To generate these synthetic data, we must first apply some affine transforms to the original data. These transformations can include rotations, zooming, translations (shifting), noises, flipping, and so on.
But be careful, because while working with normal images, we can use any of these transforms; however, when working with medical images, we cannot use all transforms because it may create a shape that has no relation to the human body, which is not the point.
And since we’ll be working with 3D volumes, the transformations will be even worse if we’re not careful.
We will always use the same monai that we used for processing for this operation. For those who are unfamiliar with monai, it is an open source framework based on Pytorch that can be used to segment or classify medical images.
What are the Transforms That Can Be Used?
In my experience, there are only a few transforms that can be mixed together at random to produce synthetic patients. Here are the best transformations that I found to be effective:
- Flip
- Rotation
- Shifting (translation)
- Gaussian noise
So I’ll show you how to use monai to easily apply these transformations.
There is something you should know about how to apply these transforms. As I previously stated, monai is based on Python, so there is no specific function like tensorflow that can generate a specific number of data based on the number you provide in the parameter. Instead, there are three methods for augmenting data with monai.
1- The first is to use the transformations while training. This means that in each epoch of training, you apply a different transformation than the one before it, so if you do 100 epochs, you will get 100 different representations of your data.
PS: The amount of data will be the same as before, but the transforms will change with each epoch.
2- The second method is to apply the transformations prior to training and save the new synthetic data before launching the training with the increased amount of data (your data plus the generated patients).
3- And the third is nearly identical to the second, except that instead of generating the data separately, you will apply the transforms and save the generated data in a tensor, which means only in RAM, and the training will begin automatically (the same thing when you use tensorflow, but in this case you need to create the function that saves in the RAM by yourself).
For me, I tried both the first and second approaches; the second worked best for me, and I’ll explain why. As I previously stated, when we use this affine transforms, we can get some shapes that do not exist in reality, which can affect the training, so you should create the synthetic data separately, verify it, and then use it for training.
However, I will demonstrate how to do both, the first and second.
Coding part
After we’ve gone over the theory, let’s get started on coding these transforms. The first thing we need to do is create a dictionary to help us work with data and labels; I won’t go into detail here because you can find an explanation in this previous article. Here’s the code for making the dictionary.
  data_dir = 'Path to your data'

  train_images = sorted(glob(os.path.join(data_dir, 'TrainData', '*.nii.gz')))
  train_labels = sorted(glob(os.path.join(data_dir, 'TrainLabels', '*.nii.gz')))

  val_images = sorted(glob(os.path.join(data_dir, 'ValData', '*.nii.gz')))
  val_labels = sorted(glob(os.path.join(data_dir, 'ValLabels', '*.nii.gz')))

  train_files = [{"image": image_name, 'label': label_name} for image_name, label_name in zip(train_images, train_labels)]
  val_files = [{"image": image_name, 'label': label_name} for image_name, label_name in zip(val_images, val_labels)]
As I previously stated, I will demonstrate how to do data augmentation using the first and second approaches.
Data augmentation during the training
If you use the augmentation during training, you will combine the transforms with the preprocessing part, so that each patient is both preprocessed and transformed at the same time.
Here are the transforms we’ll be employing:
- Flipd → For flipping when working with dictionary
- Rotated → To apply rotations to a dictionary
- Zoomd → To apply a zoom
- RandGaussianNoised → To apply a gaussian noise to the dictionary
- Finally, there is RandAffined → Actually, this function can perform multiple transformations at the same time; we’ll use it to perform translations, but you can also use it to perform rotation if you don’t want to use the Rotated function.
Here is the code for using the preprocessing and transformation functions to generate synthetic data:
  generat_transforms = Compose(
      [
          LoadImaged(keys=["image", "label"]),
          AddChanneld(keys=["image", "label"]),
          Spacingd(keys=["image", "label"], pixdim=(1.5, 1.5, 2.0), mode=("bilinear", "nearest")),
          Orientationd(keys=["image", "label"], axcodes="RAS"),
          ScaleIntensityRanged(keys=["image"], a_min=-200, a_max=200,b_min=0.0, b_max=1.0, clip=True,),
          RandAffined(keys=['image', 'label'], prob=0.5, translate_range=10),
          RandRotated(keys=['image', 'label'], prob=0.5, range_x=10.0),
          RandGaussianNoised(keys='image', prob=0.5),
          ToTensord(keys=["image", "label"]),
      ]
  )
Data augmentation before the training
This section is similar to the previous one, but after applying the transformations, we need to add a function that saves the torch tensor to a nifti file. We will use the method discussed in this article to accomplish this.
It is now up to you whether you generate the data only and save it, or if you do the preprocessing and augmentation and then save all of them so that you do not need to do any transformations during the training phase. But I’ll show you both, and you can pick which one you prefer.
With preprocess
If you want to do the preprocessing and data augmentation at the same time, you can use the code from the previous method, but we will add another code to save the volumes.
Code to preprocess + augmentation:
  generat_transforms = Compose(
      [
          LoadImaged(keys=["image", "label"]),
          AddChanneld(keys=["image", "label"]),
          Spacingd(keys=["image", "label"], pixdim=(1.5, 1.5, 2.0), mode=("bilinear", "nearest")),
          Orientationd(keys=["image", "label"], axcodes="RAS"),
          ScaleIntensityRanged(keys=["image"], a_min=-200, a_max=200,b_min=0.0, b_max=1.0, clip=True,),
          RandAffined(keys=['image', 'label'], prob=0.5, translate_range=10),
          RandRotated(keys=['image', 'label'], prob=0.5, range_x=10.0),
          RandGaussianNoised(keys='image', prob=0.5),
          ToTensord(keys=["image", "label"]),
      ]
  )
Without preprocess
Code to augmentation without preprocessing:
  generat_transforms = Compose(
      [
          LoadImaged(keys=["image", "label"]),
          AddChanneld(keys=["image", "label"]),

          RandAffined(keys=['image', 'label'], prob=0.5, translate_range=10),
          RandRotated(keys=['image', 'label'], prob=0.5, range_x=10.0),
          RandGaussianNoised(keys='image', prob=0.5),
          ToTensord(keys=["image", "label"]),
      ]
  )
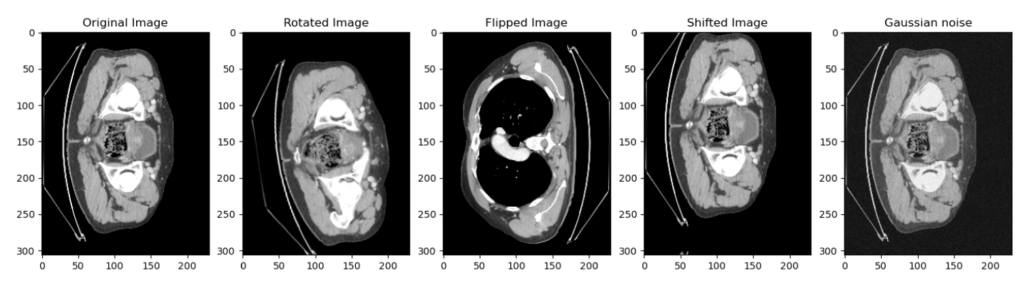
Here is the same slice but with different transforms that we were talking about:
Then we use this function to convert the torch tensor into a numpy array, which is then converted into nifti, you can find the explanation in this article.
  def save_nifti(in_image, in_label, out, index = 0):
      # Convert the torch tensors into numpy array
      volume = np.array(in_image.detach().cpu()[0, :, :, :], dtype=np.float32)
      lab = np.array(in_label.detach().cpu()[0, :, :, :], dtype=np.float32)

      # Convert the numpy array into nifti file
      volume = nib.Nifti1Image(volume, np.eye(4))
      lab = nib.Nifti1Image(lab, np.eye(4))

      # Create the path to save the images and labels
      path_out_images = os.path.join(out, 'Images')
      path_out_labels = os.path.join(out, 'Labels')

      # Make directory if not existing
      if not os.path.exists(path_out_images):
          os.mkdir(path_out_images)
      if not os.path.exists(path_out_labels):
          os.mkdir(path_out_labels)

      path_data = os.path.join(out, 'Images')
      path_label = os.path.join(out, 'Labels')
      nib.save(volume, os.path.join(path_data, f'patient_generated_{index}.nii.gz'))
      nib.save(lab, os.path.join(path_label, f'patient_generated_{index}.nii.gz'))

      print(f'patient_generated_{index} is saved', end='\r')
Now we must create a loop that will apply the various transformations with the number of runs that we specify; this number of runs will be multiplied by the amount of data. This is the loop I used:
  output_path = 'D:/3_Stage/ALL_THE_DATA/generated_data'
  number_runs = 10
  for i in range(number_runs):
      name_folder = 'generated_data_' + str(i)
      os.mkdir(os.path.join(output_path, name_folder))
      output = os.path.join(output_path, name_folder)
      check_ds = Dataset(data=train_files, transform=generat_transforms)
      check_loader = DataLoader(check_ds, batch_size=1)
      check_data = first(check_loader)
      for index, patient in enumerate(check_loader):
          save_nifti(patient['image'], patient['label'], output, index)
      print(f'step {i} done')
Displaying the synthetic patient
Let’s look at one patient before and after the transformation. This is the code that will be used to create the dataloader:
  original_ds = Dataset(data=train_files, transform=original_transforms)
  original_loader = DataLoader(original_ds, batch_size=1)
  original_patient = first(original_loader)

  generat_ds = Dataset(data=train_files, transform=generat_transforms)
  generat_loader = DataLoader(generat_ds, batch_size=1)
  generat_patient = first(generat_loader)
And this is the code to show the images:
  number_slice = 30
  plt.figure("display", (12, 6))
  plt.subplot(1, 2, 1)
  plt.title(f"Original patient slice {number_slice}")
  plt.imshow(original_patient["image"][0, 0, :, :, number_slice], cmap="gray")
  plt.subplot(1, 2, 2)
  plt.title(f"Generated patient slice {number_slice}")
  plt.imshow(generat_patient["image"][0, 0, :, :, number_slice], cmap="gray")
Here are the results:
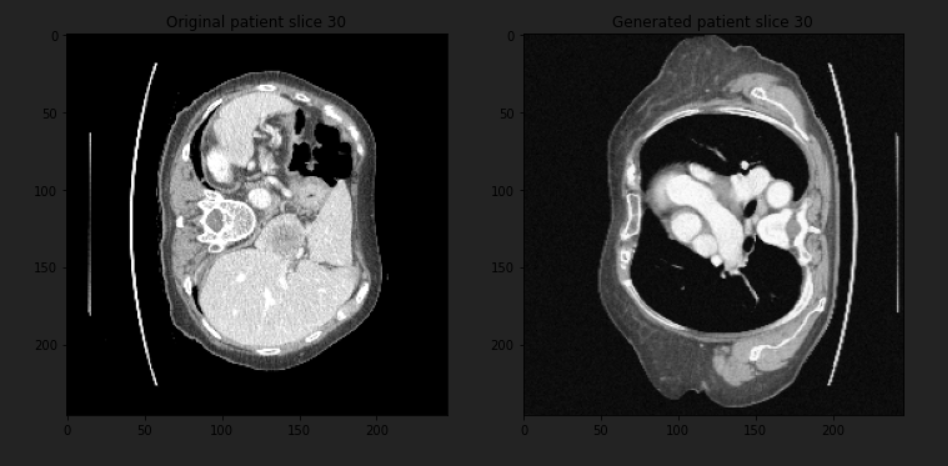
You can see that we have two different parts of the body for the same slice of the same patient, and this was just a simple transformation, so you can add more to get more complex things.
Note: If you use the second method and save the generated data, go back and check it because you will find some patients with a random shape that does not match a normal body and must be deleted from your dataset.
You can get the whole code here.