Training a machine learning model is all about teaching an algorithm to see patterns in data. You feed it high-quality, labeled examples, and it learns to adjust its own internal logic to make the right call. In a high-stakes field like medical imaging, how well you handle this training process directly dictates whether your model is a clinical asset or a liability.
Building Your Foundation with High-Quality Data
Let's get one thing straight: the success of any machine learning model training effort is built on data, not just fancy algorithms. You can have the most sophisticated model in the world, but it's completely useless if you feed it a weak, messy, or biased dataset.
Nowhere is this more true than in medical imaging. The stakes are just too high. Think of your data as the concrete foundation for a skyscraper. If that foundation is cracked or uneven, the whole structure is compromised, no matter how brilliant the architecture.
The market reflects this reality. The global demand for AI training datasets is exploding, projected to hit $11.7 billion by 2032. This isn't just a random statistic; it's a clear signal that sourcing and preparing top-tier data is a massive undertaking and the single most critical investment in AI development.
Sourcing and Securing Your Data
Getting your hands on the right data is the first major hurdle. For medical imaging projects, this means gathering a wide variety of scans. You need images from different patient demographics, from machines made by different manufacturers, and from a mix of clinical environments. If you train a model exclusively on scans from one brand of MRI machine, don't be surprised when it fails miserably in a hospital that uses another.
A model's real-world performance is a direct reflection of the diversity in its training data. Without it, you’re not building a robust diagnostic tool; you’re building a system with hidden, dangerous blind spots.
Beyond just finding diverse data, you have to lock it down. A solid foundation requires vigilant security, especially with the rising risks of AI data breaches that can ruin the integrity of your entire dataset.
The Art of High-Quality Annotation
Once you have the raw images, you need to label them—a process we call annotation. This is how you teach the model what to look for. For instance, a radiologist might meticulously trace the exact outline of a tumor on a series of MRI slices. This isn't just "labeling"; it's a highly skilled task that requires precision.
Creating good annotation guidelines is a team sport, demanding close collaboration between data scientists and clinical experts. Your instructions have to be crystal clear to make sure every image is labeled the same way.
Here’s what I’ve learned to focus on:
- Choose the right tool. Don't try to use a simple 2D image labeler for a complex 3D tumor segmentation task. You need specialized software that can handle volumetric data.
- Define clear instructions. What counts as part of the tumor? What about the inflamed tissue around it? Any ambiguity here creates noisy data that will only confuse your model.
- Iterate and refine. Your first draft of the guidelines will have gaps. That’s a guarantee. Build in a feedback loop where your annotators can flag confusing cases and you can update the rules for everyone.
Getting Your Data Ready for Prime Time

Here's a hard-earned lesson: you can't just dump raw medical images into a model and expect miracles. Treating your data as "plug-and-play" is one of the fastest routes to a failed project. Before any machine learning model training begins, you have to get your hands dirty with preprocessing and data augmentation.
First, let's talk about consistency. Medical images are notoriously inconsistent. You’ll get scans from different machines, at different hospitals, with different calibrations. This creates huge variations in things like pixel intensity. That's where image normalization comes in—it’s non-negotiable. By standardizing the pixel values across every image, you ensure your model is learning from actual anatomy, not the quirks of a specific GE or Siemens scanner.
Your model also needs all its inputs to be the same size. A CT scan slice and a digital pathology slide have vastly different native resolutions. So, resizing every image to a uniform dimension, like 512×512 pixels, is a mandatory step before anything can be fed into the network.
Why Data Augmentation is Your Secret Weapon
Once your dataset is clean and standardized, the next big challenge is overfitting. This is where your model gets lazy and just memorizes the training images instead of learning how to generalize to new ones it's never seen. Data augmentation is your best defense against this.
Think of it as giving your model a richer education. You're not just showing it a picture; you're showing it that same picture from slightly different perspectives, under different lighting, and at different angles. This forces it to learn the real features that matter for a diagnosis.
For medical imaging, some of the most effective augmentation techniques I've relied on are:
- Minor Rotations: Small, realistic rotations of +/- 10 degrees are fantastic for simulating the slight shifts in patient positioning that happen constantly in the real world.
- Horizontal Flipping: A simple but powerful trick. For anatomy that's largely symmetrical, a horizontal flip effectively doubles your dataset with a perfectly valid new example.
- Brightness & Contrast Jitter: Tweaking the brightness and contrast slightly mimics the different exposure settings you’d find on imaging equipment. This makes your model much more tolerant of these real-world variations.
By creating these new, synthetic examples, you're not just padding your dataset. You're building a more resilient model that learns to ignore the noise and focus exclusively on the diagnostic patterns that count.
The 80-10-10 Split: Your Blueprint for Honest Evaluation
With your preprocessed and augmented data in hand, there’s one final, critical step: splitting it up. The gold standard here, and something I stick to religiously, is the 80-10-10 split. It’s the bedrock of trustworthy model evaluation.
Here’s how you carve up your dataset:
- Training Set (80%): This is the bulk of your data. The model will learn all its patterns and relationships from this set.
- Validation Set (10%): This slice of data is used during the training process to tune things like the learning rate and make decisions about your model's structure. Think of it as a series of practice quizzes.
- Test Set (10%): This is the final exam. You lock this data away and don't touch it until all training and tuning are completely finished. It provides the ultimate, unbiased verdict on how your model will perform out in the wild.
A word of advice: treat your test set like it’s sacred. If you peek at it or use it to tune your model, you’re only fooling yourself. A truly robust model is one that passes this final, unseen test.
Selecting the Right Model Architecture
Choosing your model’s architecture is one of the most critical decisions you'll make in the entire machine learning model training journey. This isn't just a technical detail; it’s the blueprint that defines what your model can learn, how much computational power it needs, and ultimately, how well it can perform a specific clinical job. There's no magic bullet here.
The first, most important question you need to ask is: what's the clinical problem I'm trying to solve? Are you building a system to classify an image, like determining if a skin lesion is benign or malignant? Or are you trying to segment a specific area, like drawing a precise boundary around a tumor on an MRI? That single question will immediately point you in the right direction.
Matching Architecture to the Clinical Task
If your goal is classification—assigning a single label to an image—then architectures like ResNet and EfficientNet are the workhorses of the field. I've found ResNet (Residual Network) to be incredibly reliable. Its "skip connections" are a brilliant solution to the problem of training very deep networks, allowing it to pick up on subtle, complex features in things like chest X-rays or pathology slides.
EfficientNet, on the other hand, is all about optimization. It smartly balances the model's depth, width, and image resolution to squeeze out maximum accuracy from fewer parameters. This is a huge win when you’re working with limited GPU resources or need a faster model.
For segmentation tasks, where you need to create a detailed, pixel-by-pixel map, the conversation almost always starts and ends with U-Net. Its iconic encoder-decoder "U" shape, enhanced with skip connections, is fantastic at understanding both the big picture (context) and the tiny details (localization). This is why it has become the go-to for tasks like outlining organs on CT scans or segmenting brain tumors with incredible precision.
A common mistake I see is trying to force the wrong architecture onto a problem. Let the clinical need dictate your choice. A segmentation model is the wrong tool for a classification task, and vice-versa. Always work backward from your desired clinical output.
To help you visualize where this fits in the bigger picture, the following chart shows how model selection is just the starting point, leading into the crucial phases of validation and tuning.
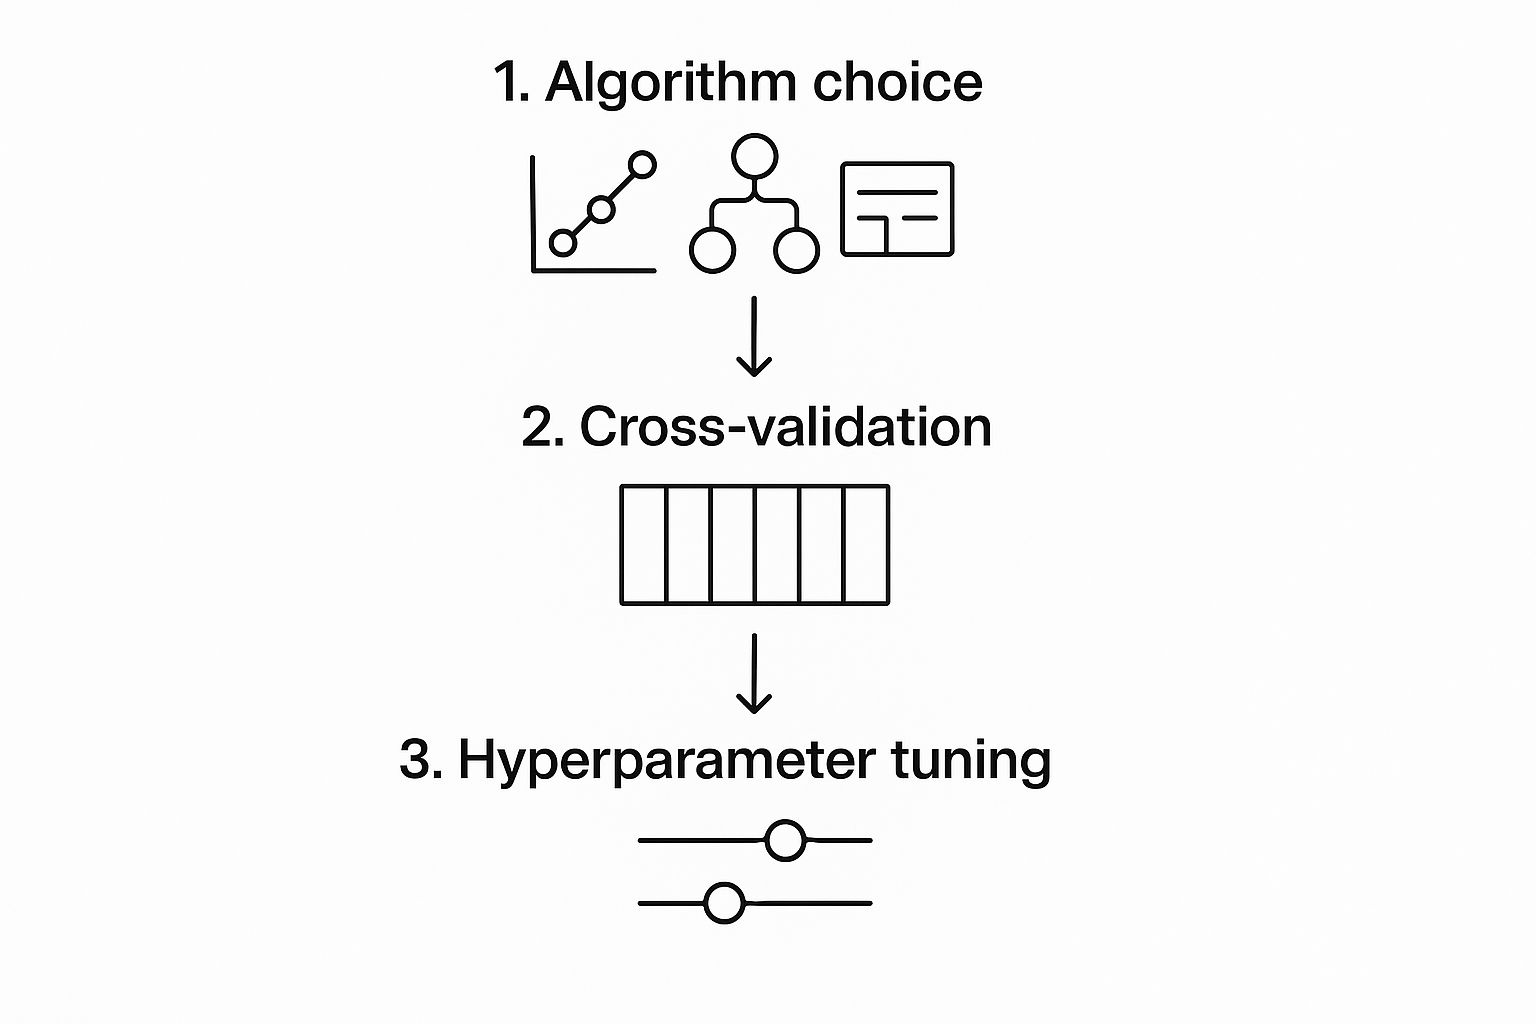
As you can see, choosing the right algorithm kicks off a cycle of refinement. You need to rigorously test and tweak the model to make sure it’s not just accurate, but genuinely reliable for clinical use.
The table below breaks down these common architectures and their typical roles in medical imaging.
Model Architecture Selection for Medical Imaging
| Architecture | Primary Use Case | Key Advantage | Example Application |
|---|---|---|---|
| ResNet | Image Classification | Deep feature extraction with skip connections to prevent performance loss. | Identifying pneumonia in chest X-rays; classifying diabetic retinopathy. |
| EfficientNet | Image Classification | High accuracy with fewer parameters through balanced scaling. | Classifying skin lesions from dermoscopy images efficiently. |
| U-Net | Image Segmentation | Precise localization and context awareness via an encoder-decoder structure. | Segmenting tumors in MRIs; outlining organs in CT scans. |
| VGGNet | Classification/Feature Extraction | Simple, uniform architecture that is easy to understand and implement. | Used as a baseline model or for feature extraction in simpler tasks. |
Choosing from this list often comes down to the complexity of your problem and your available resources. Simpler models like VGGNet can be a great starting point, while U-Net and EfficientNet are designed for more demanding, specialized tasks.
Transfer Learning Versus Training From Scratch
Once you have an architecture in mind, you face another major fork in the road: should you train your model from the ground up or use transfer learning?
Training from scratch is a monumental undertaking. It requires an enormous, meticulously labeled dataset and an eye-watering amount of computational power. Frankly, for most medical imaging projects, it’s just not practical.
This is where transfer learning comes in as a much smarter, more efficient approach. You take a powerful model that has already been pre-trained on a massive image dataset like ImageNet and then fine-tune it using your specific medical images. The beauty of this is that the model already has a fundamental understanding of visual patterns—edges, textures, shapes, and colors.
In my experience, transfer learning is almost always the better choice. It drastically cuts down on the data you need and the time it takes to train, often leading to a more robust and accurate model in the end. You're not reinventing the wheel; you're just teaching a very well-built wheel a new, highly specialized skill. This lets you pour your valuable time and resources into what matters most: curating a high-quality, perfectly annotated dataset for your specific clinical problem.
Tuning Your Model for Optimal Performance

Getting your initial model trained is just the beginning. The real art of machine learning, especially in a high-stakes field like medical imaging, lies in the iterative process of fine-tuning. This is where you roll up your sleeves and start adjusting your model's hyperparameters, transforming it from a decent proof-of-concept into a tool that could deliver real clinical value.
Think of it like tuning a high-performance engine. You wouldn’t just assemble the parts and expect it to win a race. You have to make small, deliberate adjustments to crucial settings like the learning rate, batch size, and the number of epochs. These knobs and dials control how the model learns, and getting them just right is what separates a mediocre model from a truly great one.
Mastering Key Hyperparameters
If there’s one hyperparameter to obsess over, it’s the learning rate. This value dictates the size of the steps your model takes as it descends toward the optimal solution. Set it too high, and the model will overshoot the mark, bouncing around wildly without ever settling. Go too low, and training will crawl along at a snail's pace, or worse, get stuck in a rut far from the best solution.
You'll find yourself constantly tweaking a few key settings:
- Learning Rate: A common starting point is
0.001, but you'll need to experiment. In my experience, using a learning rate scheduler—which automatically reduces the rate as training progresses—is one of the most effective tricks in the book. - Batch Size: This is how many images your model looks at in a single batch. A larger batch size can speed things up and stabilize training, but it's a memory hog. For medical images, I've found that starting with a batch size of 16 or 32 is often a sweet spot between speed and GPU memory constraints.
- Epochs: An epoch represents one complete pass through your entire training dataset. Too few, and your model is under-trained. Too many, and you run headfirst into overfitting, where the model just memorizes the training data. This is where a technique called early stopping becomes your best friend.
Choosing the Right Optimizers and Loss Functions
Your optimizer is the specific algorithm that updates your model's weights based on what it's learning. The Adam optimizer has become the go-to for a reason; it's robust and works incredibly well out of the box for a huge range of problems. That said, don't discount the classics. For certain tasks, I've seen SGD (Stochastic Gradient Descent) with momentum outperform Adam, though it usually requires more hands-on tuning of the learning rate.
The loss function is equally vital. It’s the formula that calculates how "wrong" your model's predictions are. For a classification problem, like flagging an image as malignant or benign, cross-entropy loss is the standard. But for something like a segmentation task where you’re outlining a tumor, a more specialized function like Dice loss is often a better choice. It’s fantastic at handling the class imbalance you see when a tiny tumor is just a small part of a massive CT scan.
My Advice: Don’t just accept the defaults. The difference between a good model and a great one can be as simple as swapping out your loss function. Switching from standard cross-entropy to a focal loss, for example, can dramatically improve how your model handles rare or difficult-to-classify cases.
This iterative tuning process doesn't come cheap. The financial cost of training has exploded, becoming a major consideration in AI development. For perspective, the estimated training bill for a massive model like Google's Gemini can range from $30 million to a staggering $191 million, and that’s before you even factor in salaries. These numbers, driven by immense hardware and energy needs, underscore why efficient tuning and smart techniques like early stopping aren't just best practices—they're economic necessities. You can read more about these extensive AI training costs in recent industry analyses.
From Validation to Real-World Clinical Deployment

A model that performs well during training is a great start, but its journey is far from over. The real test comes when you unleash it on your held-out test set—data it has never seen before. This final validation step gives you an unfiltered look at how it will actually perform in the wild.
In a medical setting, relying on raw accuracy alone can be dangerously misleading. A model that's 99% accurate at spotting a rare disease might sound amazing, but what if it’s just guessing "no disease" every time? You have to dig deeper and look at metrics that truly matter to clinicians and patients.
Measuring What Truly Matters
To get a real sense of your model's clinical utility, you need to analyze metrics that reflect diagnostic reality. For a classification task, like identifying tumors in scans, these are the essentials:
- Sensitivity (Recall): How good is the model at finding what it's supposed to find? Of all the patients who actually have the disease, how many did the model correctly flag?
- Specificity: This is the other side of the coin. How good is the model at identifying healthy patients? Of all the people without the disease, how many did the model correctly clear?
- F1-Score: This gives you a balanced look at precision (how many positive predictions were correct) and recall, which is particularly useful when dealing with imbalanced data where the condition is rare.
When building a diagnostic AI tool, high sensitivity is often the top priority. Missing a real case (a false negative) can have far more severe consequences than flagging a healthy patient for a second look (a false positive).
Preparing for Clinical Integration
Once your model has proven its mettle on the test set, the focus shifts to deployment. The goal here is to make your model accessible and genuinely useful within existing clinical workflows. This means moving it from a research environment to a production-ready one—a significant leap that requires its own discipline.
This transition from lab to clinic is where a solid operational framework becomes essential. It’s a space where MLOps and DevOps principles are key, and truly understanding DevOps team roles and responsibilities can make all the difference.
A common first step is containerization using a tool like Docker. This process bundles your model, its dependencies, and all its code into a neat, self-contained package that can run reliably on any system. From there, you can expose the model's predictive power through an API (Application Programming Interface). This allows hospital information systems or imaging devices to send data and get a prediction back seamlessly.
But the work doesn't stop once the model is live. You have to monitor it constantly. We watch for something called performance drift, which is when a model’s accuracy slowly degrades as it encounters new data patterns in the real world.
The computational power needed for this entire machine learning model training and deployment lifecycle is staggering. Between 2010 and May 2024, the amount of compute used for top-tier models increased roughly 4 to 5 times each year. This incredible growth highlights just how complex and demanding modern AI has become.
Common Questions About Medical AI Model Training
As teams start to work with medical AI, a few key questions always pop up. The usual machine learning playbook doesn't quite fit here. Medical data is notoriously tricky, and the stakes are incredibly high when you're talking about clinical use. Let's tackle some of the most common concerns that come up during the machine learning model training journey.
Getting a handle on these issues early on is crucial for planning your project, using your resources wisely, and setting expectations that are actually achievable.
How Much Data Do I Really Need?
This is the million-dollar question in machine learning, and in medicine, the answer is especially nuanced. There's no magic number. How much data you'll need boils down to the complexity of your problem and the type of model you're building.
For a relatively simple classification task, like telling a chest X-ray with pneumonia from one without, you might get great results with just a few hundred well-labeled images, especially if you use transfer learning. It gives you a fantastic head start.
But if you're aiming for something far more complex—say, training a 3D segmentation model to precisely map out a brain tumor across dozens of MRI slices—you're going to need a much larger dataset. We're talking thousands of high-quality, fully annotated scans.
My advice? Start with what you can get your hands on. Use the data augmentation techniques we covered earlier to stretch your dataset further and make it more robust. Then, have a solid plan in place to ethically source more data as the project grows.
What Is the Biggest Roadblock in Healthcare Model Training?
Data. It's almost always the data. Getting enough of it is just the first hurdle; the real challenge lies in its quality, diversity, and the accuracy of its labels.
Here’s where projects usually get stuck:
- Finding Unbiased Datasets: It’s extremely difficult and often expensive to acquire data that reflects the real world—covering a wide range of patient demographics, disease variations, and co-existing conditions.
- Annotation Quality: Labeling medical images isn't something just anyone can do. It requires clinical experts, and even they can disagree. Maintaining consistent, high-quality annotations is a massive operational lift.
- Navigating Privacy Rules: Regulations like HIPAA in the United States add serious legal and technical hurdles to everything you do with data, from how you get it to how you store and use it.
In my experience, project timelines are rarely dictated by model development. Instead, 90% of the effort and delays come from overcoming the challenges of sourcing, cleaning, and annotating high-quality, representative medical data.
This is why transfer learning is practically a necessity for most medical imaging projects. When you fine-tune a model pre-trained on a huge dataset like ImageNet, you drastically cut down on how much data and computing power you need. It not only speeds things up but often gives you a better model right out of the gate, since it already knows how to recognize basic features like edges, textures, and shapes.
Ready to accelerate your medical imaging AI projects? PYCAD specializes in the entire AI pipeline, from expert data annotation and robust model training to seamless clinical deployment. We turn your data into powerful, reliable diagnostic tools. Learn how we can help you build your next medical AI solution.