
A smoothing Gaussian filter isn't just another blur tool; it's a sophisticated technique that intelligently reduces noise and fine-tunes image detail. It works by applying a weighted average, but with a clever twist: it uses a Gaussian function—that classic bell curve—to give more importance to the pixels closest to the center. This helps soften an image while doing a much better job of preserving important edges.
Seeing Through the Noise with Gaussian Smoothing

Picture yourself trying to read a message written on a foggy window. The letters are there, but condensation and random droplets create visual static that makes it hard to see clearly. A smoothing Gaussian filter is like gently wiping away that fog. It doesn't magically sharpen the letters, but it makes the whole message smoother and easier to understand.
This technique is a true cornerstone of digital image processing. It elegantly blurs an image to dial down high-frequency noise—the kind of digital static or grain that can ruin a picture. It’s not just a blur; it's a targeted softening that helps quiet the distractions so the real image can shine through.
The Power of Weighted Averaging
So, what makes it so special? Unlike a simple box blur that treats every pixel in a neighborhood equally, the Gaussian filter has a more refined approach. It calculates a new value for each pixel by looking at its neighbors and applying a weighted average, where the weights are determined by that bell-curve distribution.
The core idea is simple yet powerful: pixels that are closer to the center of the filter's "window" have a greater impact on the final result, while those farther away contribute less. This preserves the integrity of significant edges and structures far more effectively than a uniform blur.
This simple concept has paved the way for incredible advancements in countless fields, from sharpening images of distant galaxies to cleaning up medical scans for a more accurate diagnosis.
To put it all together, let's break down the key pieces of this filter.
Core Components of the Gaussian Filter
This table offers a quick look at the fundamental elements that make a Gaussian filter work and how they influence the final image.
| Component | Role and Impact |
|---|---|
| The Kernel | A small matrix of weights used to calculate the new value for each pixel. It's the filter's operational "window." |
| Gaussian Function | The mathematical formula (the bell curve) that determines the weights within the kernel, ensuring central pixels have the most influence. |
| Standard Deviation (Sigma) | This parameter controls the spread of the bell curve. A larger sigma creates more blur; a smaller one results in less blur. |
| Convolution | The mathematical process of sliding the kernel over the image and applying the weighted average to every single pixel. |
Understanding these components is the first step to mastering how to apply this filter to get the exact results you're looking for.
Why This Matters in Advanced Imaging
The true power of the Gaussian filter shines when you see it as the first, critical step in a much larger workflow. By cleaning up the initial image data, it helps more complex algorithms do their job better.
- Improved Edge Detection: Noise can trick algorithms into seeing "edges" that aren't really there. Smoothing wipes away these false positives, leading to a much more accurate outline of real objects.
- Enhanced Feature Extraction: By toning down irrelevant details, the filter helps machine learning models focus on the truly important features within an image.
- Reliable Segmentation: Cleaner images allow for more precise segmentation, which is the process of breaking an image down into its meaningful parts or objects.
At PYCAD, this is a principle we live by. We build custom web DICOM viewers and integrate them into medical imaging web platforms where pristine image quality is absolutely essential. Smoothing techniques like the Gaussian filter are fundamental for preparing medical scans for an accurate diagnosis or for training an AI model. You can see some of our work on our portfolio page.
While the Gaussian filter is a classic, the world of image processing is always moving forward. Today, specialized AI Denoiser tools offer even more advanced ways to tackle noise. Still, understanding this foundational method is key to appreciating how we transform noisy data into actionable clarity.
Understanding How Gaussian Filters Work
At its heart, the magic of a smoothing Gaussian filter comes from an elegant bit of math—the Gaussian function. You've probably seen it before as the classic "bell curve" from a statistics class. This curve is the secret sauce for creating a blur that looks natural and intelligent, not harsh or blocky. It gives us a way to average out pixels while giving more importance to the ones right in the middle.
Think about a single pixel in your image. To smooth it, the filter looks at a small neighborhood of pixels all around it. But instead of treating every neighbor equally, it assigns a "weight" to each one. The closer a pixel is to the center, the more "say" it gets in the final result. The central pixel gets the highest weight, its immediate neighbors get a little less, and the pixels at the very edge of the neighborhood get the least.
This whole process means the new value of our central pixel is influenced most by its original self and its closest friends. The result? A soft, graceful blur that cuts down on noise while doing a surprisingly good job of preserving important details, like edges.
The Kernel: A Window of Influence
This small grid of weights is what we call a kernel, or sometimes a convolution matrix. Picture it as a tiny window that slides over every single pixel of your image. At each stop, it does its weighted average calculation and creates a new, smoother pixel for the final output image.
The real beauty of this method is its subtlety. Because the weights fall off gently from the center, you don't get any sharp, sudden changes. This helps avoid the artificial, blocky look that simpler methods, like a box filter, can create.
This entire operation is a cornerstone of digital signal processing. The Gaussian filter isn't just a neat trick; it's a fundamental technique with roots going back to the work of Carl Friedrich Gauss in the early 19th century. Its mathematical elegance is even connected to the central limit theorem, which explains why a Gaussian shape naturally emerges from repeated processes.
From Theory to Practical Application
Getting a handle on this core idea is so important because it’s one of the first steps in almost any serious image analysis workflow. Getting rid of noise is a non-negotiable part of image preprocessing, a topic we dive into much deeper in our full guide. When you start with a clean, smooth image, everything that comes after—from object detection to medical analysis—works better and more accurately.
Here at PYCAD, we build custom web DICOM viewers and integrate them into medical imaging web platforms. For these systems to provide reliable insights for doctors and researchers, the image data has to be crystal clear. Techniques like Gaussian smoothing are absolutely vital for prepping medical scans, whether they're being looked at by a human radiologist or an AI algorithm. This foundational step of cleaning up the noise truly makes all the difference. You can see examples of our work on our portfolio page.
Mastering Your Kernel Size and Sigma
The real magic of a smoothing Gaussian filter isn't just in knowing how to apply it, but in tuning its parameters with a clear purpose. Think of the filter as a paintbrush; its two key controls, kernel size and sigma, determine the softness and spread of your strokes. Getting this balance right is what elevates you from simply blurring an image to strategically sculpting its features with surgical precision.
A tiny adjustment to these values can completely change the outcome. You're not just slapping on a generic effect—you're making a conscious choice about which details to preserve and which to gently fade into the background. This level of control is precisely why the Gaussian filter remains a cornerstone of professional image processing.
This infographic gives you a great visual of the process, showing how the filter takes a raw image and uses a kernel to produce a much smoother version.
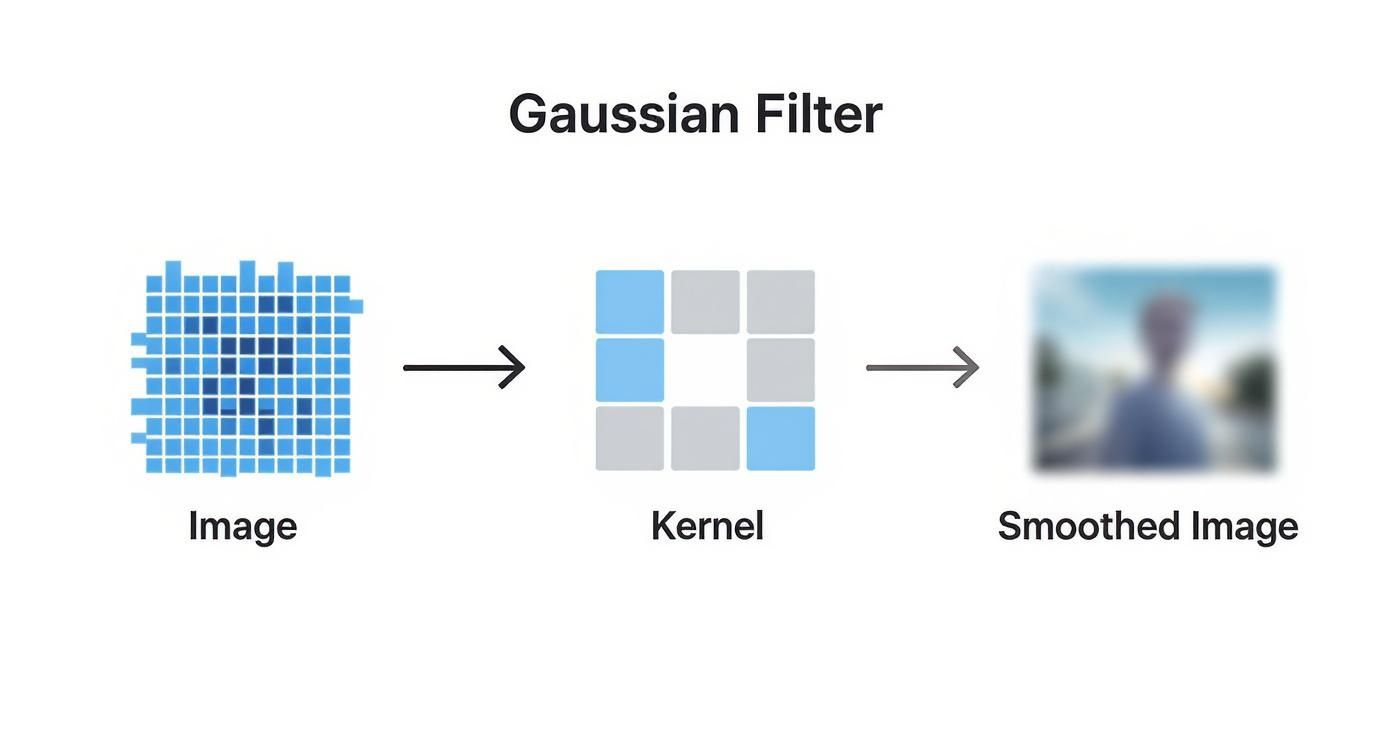
As you can see, the kernel acts like a weighted lens, averaging out the pixels it covers to create a cleaner, more refined result.
The Role of Sigma: The Spread of Influence
Sigma, which is just the standard deviation, is really the soul of the filter. It dictates the shape of the bell curve that assigns weights to the pixels inside your kernel.
- Low Sigma: A smaller sigma value creates a tall, skinny curve. This means the center pixel gets most of the attention, with its neighbors having very little influence. The result is a very subtle smoothing effect, perfect for cleaning up minor noise in a high-quality image where you can't afford to lose any detail.
- High Sigma: A larger sigma value produces a short, wide curve. This spreads the influence out across a much larger group of pixels, leading to a much stronger blur. This is your go-to when you need to knock down significant noise or blend textures before running an analysis like feature detection.
The sigma value is your main dial for controlling the trade-off between noise reduction and detail preservation. The goal is to find that sweet spot where you've smoothed out the distractions without erasing the important stuff.
The Significance of Kernel Size
The kernel size sets the physical dimensions of the filter's window as it slides across the image—think 3×3, 5×5, or 7×7 pixels. While sigma drives the intensity of the blur, the kernel size defines the area over which that blur is applied.
You need a kernel that's big enough to contain the meaningful part of the Gaussian curve you defined with sigma. If the kernel is too small, you'll end up cutting off the curve, which distorts the effect. A good rule of thumb is to set the kernel size to be around three times the sigma value in each direction from the center.
Finding the Perfect Balance
Choosing the right sigma and kernel size is less of a science and more of an art, guided entirely by what you're trying to achieve. Are you cleaning up a grainy medical scan to spot a tiny anomaly, or are you prepping a satellite photo for an object detection algorithm? Each job demands a different touch.
To help you get a feel for this, let's look at how different settings play out.
Impact of Sigma and Kernel Size on Image Smoothing
| Parameter Setting | Visual Effect | Ideal Use Case |
| :— | :— |
| Low Sigma (e.g., 0.8), Small Kernel (e.g., 3×3) | Very subtle smoothing. Only the finest noise is reduced, and edges remain sharp. | Cleaning high-resolution images with minimal grain; preserving fine textures. |
| Medium Sigma (e.g., 1.5), Medium Kernel (e.g., 5×5) | A balanced blur that noticeably reduces noise while keeping major features intact. | General-purpose noise reduction; preparing images for edge detection. |
| High Sigma (e.g., 3.0), Large Kernel (e.g., 11×11) | A strong, pronounced blur that blends features and removes significant noise. | Preprocessing for scale-space analysis; removing distracting background textures. |
Ultimately, experimentation is key. Start with a moderate setting and adjust until the image has just the right amount of clarity for your specific task.
At PYCAD, we make these kinds of decisions every day. We build custom web DICOM viewers and integrate them into medical imaging web platforms, where getting the parameters just right is absolutely critical. A filter that’s too strong might hide a crucial diagnostic clue, but one that’s too weak could leave in noise that throws off an AI model.
You can see some of the sophisticated imaging solutions we've developed on our portfolio page. In the end, it’s this mastery of the parameters that turns a simple Gaussian filter into a powerful instrument for discovery.
Bringing Gaussian Smoothing to Life with Code
Knowing the theory is one thing, but there's a certain magic to seeing an image transform right before your eyes with just a few lines of code. This is where the real learning happens—when you can tweak the parameters yourself and instantly see the impact. Let’s dive in and turn those abstract concepts into working code.
We'll be using Python, the go-to language for so many data scientists and imaging experts. Thanks to its incredible libraries, complex operations like image convolution become surprisingly simple. You get to focus on the results, not on getting bogged down in complex math.
A Practical Example with OpenCV
If you're working with images in Python, you've probably heard of OpenCV. It’s an absolute powerhouse for computer vision, and applying a Gaussian filter with it is refreshingly straightforward. The cv2.GaussianBlur() function does all the heavy lifting for you.
Here’s the basic game plan:
- Import Your Tools: You'll need
opencv-pythonfor the filtering magic andnumpyto handle your image as a numerical array. - Load Your Image: Read an image from your computer. For noise reduction, it often helps to convert it to grayscale first to simplify things.
- Apply the Filter: This is the key step. You'll call
cv2.GaussianBlur(), passing in your image, a kernel size (like(5, 5)), and the sigma value. A neat trick: if you set sigma to 0, OpenCV intelligently calculates the best value based on your kernel size. - See the Difference: Display the original and the smoothed images next to each other. The change is often dramatic!
This hands-on approach is the absolute best way to build intuition. Play around with the kernel size and sigma values. You'll quickly get a feel for that delicate balance between smoothing out noise and preserving critical details.
Implementing with SciPy
Another fantastic tool for this is SciPy, a cornerstone of scientific computing in Python. The scipy.ndimage.gaussian_filter function gives you another powerful way to get the same job done, just with a slightly different approach.
Instead of defining a kernel size, you just tell it the sigma you want. Many experts find this more direct, as sigma is the true measure of how much smoothing you’re applying.
This kind of flexibility is exactly why Python dominates the world of image analysis. If you're curious about what other tools are out there, take a look at our guide on the best Python libraries for medical imaging, where we explore more essential packages.
At PYCAD, we live and breathe this stuff. We build custom web DICOM viewers and integrate these very techniques into medical imaging web platforms. Our solutions depend on clean, efficient code to provide the diagnostic clarity that healthcare professionals rely on. Mastering these fundamentals is your first step toward building applications with that same kind of impact. Check out our work on our portfolio page.
Enhancing Clarity in Medical Imaging

When it comes to medical diagnostics, there is simply no room for error. A single noisy scan can hide the very details a doctor needs to see, which could mean delaying a diagnosis or, worse, altering it entirely. This is where the smoothing Gaussian filter steps in, transforming from a simple image processing tool into something far more profound: an essential instrument for saving lives.
Imagine an MRI or CT scan. These technologies are marvels, capturing immense detail inside the human body. But they aren't perfect. Random noise—from slight patient movements, the machine's own limitations, or signal interference—can creep in. This noise often looks like a fine grain or static, making it tough for even a trained eye to tell the difference between healthy tissue and a potential problem.
Applying a Gaussian filter is like gently bringing a lens into perfect focus. It doesn't erase important details; instead, it smooths away the random, meaningless fluctuations, letting the true anatomical structures shine through with greater clarity.
From Raw Data to Diagnostic Insight
The real magic happens when this smoothing becomes the first critical step in a longer chain of analysis. By starting with a cleaner, more reliable image, the filter empowers all the processes that follow—processes that are at the heart of modern medicine.
- Improved Tumor and Lesion Detection: Noise can create false edges or mask the subtle textures of a growing tumor. By smoothing the image, we quiet those distractions, allowing radiologists and AI models alike to spot suspicious areas with far more confidence.
- Accurate Tissue Analysis: Think about planning radiation therapy. Doctors must draw a precise line around the target area. A smoothed image provides cleaner, more defined boundaries, ensuring treatment is focused right where it needs to be, sparing healthy tissue.
- Reliable Volumetric Measurements: To track if a tumor is shrinking or an organ is changing, we need to measure its volume. A Gaussian filter creates a more uniform image, which leads to measurements that are not only more accurate but also more consistent over time.
This isn't just about making a picture look prettier. This preprocessing step is a foundational part of a comprehensive approach to medical image processing. In fact, ongoing advancements in areas like medical photonics research depend on powerful smoothing algorithms to push the boundaries of diagnostic accuracy.
Engineering Clarity in Healthcare Technology
The goal in medical imaging isn't just to see an image, but to see through it to the truth it holds. A well-applied Gaussian filter removes the veil of noise, allowing that truth to come forward with greater clarity and confidence.
At PYCAD, we live and breathe this mission. We specialize in building custom web DICOM viewers and integrating them into medical imaging web platforms where this level of precision is absolutely critical.
Whether it’s for a radiologist making a life-changing diagnosis or an AI learning to detect disease earlier than ever before, the journey to insight always begins with a clean, clear image. Applying a smoothing Gaussian filter is that essential first step, and it’s a cornerstone of the powerful, life-saving solutions we create. You can explore some of these solutions on our portfolio page.
Applications Beyond Medical Science
The power of a Gaussian filter to cut through the noise isn't just for medical scans. It turns out that finding a clear signal in a messy world is a challenge we face everywhere, from the frenetic pace of financial markets to the quiet depths of outer space. This simple but elegant mathematical tool has become a secret weapon for innovators in all sorts of fields.
At PYCAD, we live and breathe this principle. While our day-to-day is focused on building custom web DICOM viewers and integrating them into medical imaging web platforms, we're constantly inspired by how this core idea applies universally. The same logic that helps a radiologist spot a tumor can help an analyst pinpoint a market trend. You can see how we apply this focus on clarity in our own work on our portfolio page.
Uncovering Trends in Financial Markets
Think about the stock market. It’s a classic example of a system overflowing with noise. Prices jump and fall every second, reacting to news, rumors, and countless other chaotic factors. If you’re an analyst trying to see the big picture, all this daily static can completely hide the long-term trends that actually matter for smart investments.
This is where the Gaussian filter comes in. By applying it to historical price data, analysts can effectively smooth out all those sharp, short-term jitters. The filter dials down the impact of random daily spikes and dips, revealing the underlying, more meaningful path of a stock's performance. It transforms a jagged, chaotic line graph into a clear story about where the market is truly heading.
Mapping the Cosmos
The filter's influence stretches even further—light-years away, in fact. It’s helping us decode the secrets of the universe itself. When astrophysicists study the cosmic microwave background (CMB), they’re essentially looking at the faint, leftover heat from the Big Bang. This ancient light is our baby picture of the universe, but it’s filled with tiny temperature variations that hold the keys to how galaxies first formed.
For cosmologists, Gaussian filters are like a special pair of glasses. They smooth the CMB data, allowing scientists to see the large-scale patterns and structures of the early universe while filtering out instrumental noise and other distractions.
In astrophysics, these filters are absolutely essential for making sense of it all. A landmark 1999 study, for instance, used Gaussian smoothing to understand how peaks in these cosmic fields clumped together over time—a process that explains how the very first galaxies began to form over billions of years. To dive deeper into this incredible research, you can read the full research on galaxy formation.
Got Questions? We’ve Got Answers.
Diving into Gaussian smoothing can bring up a lot of "what ifs" and "hows." It's completely normal. Let's tackle some of the most common questions people have, clearing things up so you can use this filter with confidence.
What’s the Real Difference Between a Gaussian and an Average Filter?
Think of an average filter (or box filter) as a pure democracy—every single pixel in the window gets an equal vote. While simple, this approach can sometimes create unnatural, blocky-looking blurs because it doesn't consider a pixel's position.
A Gaussian filter, on the other hand, is more of a weighted system. It understands that the pixels closest to the center are the most important. It gives them a much bigger say in the final outcome, with influence gracefully tapering off for pixels farther away, just like a bell curve. This results in a much smoother, more natural blur that’s far better at preserving the important edges and structures in your image.
The bottom line? A Gaussian filter delivers a smarter, gentler blur. It’s designed to soften the noise without completely bulldozing the image's essential details, which is absolutely vital for any kind of serious analysis.
How Does Sigma Change the Smoothing Effect?
The sigma value is your main dial for controlling the blur intensity. It’s the standard deviation of the Gaussian function, and it essentially determines how wide or narrow the "bell" of the bell curve is.
- A small sigma gives you a tall, skinny curve. This means the filter’s influence is tightly packed around the center pixel, leading to a very light and subtle smoothing effect.
- A large sigma creates a short, wide curve. The influence is spread out across a much larger group of neighboring pixels, which results in a much stronger, more pronounced blur.
Finding the perfect sigma is always a balancing act. You're constantly trading off between how much noise you need to eliminate and how much of that precious fine-grained detail you’re willing to let go of.
So, When Is the Right Time to Use a Gaussian Filter?
The short answer is: almost any time you need to clean up random noise before doing something more important. It’s a go-to preprocessing step for a reason.
It’s especially powerful before running tasks that are easily thrown off by noise, like edge detection, feature extraction, or image segmentation. Because it does such a fantastic job of smoothing things out while protecting the underlying structure, it has become an essential tool in computer vision, particularly in high-stakes fields like medical imaging.
At PYCAD, we live and breathe these foundational techniques. It’s how we build custom web DICOM viewers and integrate them into medical imaging web platforms where every detail matters. If you want to see what this level of precision looks like in action, check out the advanced solutions on our portfolio page.