
At its heart, reading a DICOM file is a two-part job. First, you need a specialized library—pydicom in Python is the go-to—to crack open the file and parse all the metadata inside. Once you've got the raw pixel data, you'll use a second library, like Matplotlib or Pillow, to actually turn that data into an image you can see. This approach cleanly separates accessing the clinical information from just rendering the picture.
Planning a DICOM viewer build?
Use PYCAD's DICOM viewer development checklist to scope viewer features, DICOM infrastructure, performance, and compliance requirements before development starts.
Your Toolkit for Reading DICOM Files
Before you write a single line of code, you need to get your tools in order. A DICOM file isn't just a picture; it's a sophisticated data container. I like to think of it as a digital file folder that holds both the image itself and a rich, detailed record of patient and equipment information.
This structure wasn't an accident—it was born out of necessity. The DICOM standard's story begins in the 1980s, when the American College of Radiology (ACR) and the National Electrical Manufacturers Association (NEMA) joined forces. They had to solve a massive problem: medical imaging devices all spoke different languages. While early versions made progress, it was DICOM 3.0, released in 1993, that finally created the universal format that has become the bedrock for medical imaging worldwide.
The Essential Python Libraries
To get started, you'll need a handful of core Python libraries. These are the workhorses for nearly any project involving DICOM data, from simple viewers to complex AI pipelines.
Here’s a quick rundown of the essential libraries you'll be using.
Essential Python Libraries for DICOM Processing
| Library | Primary Use | Why It's Important |
|---|---|---|
| Pydicom | Reading, writing, and modifying DICOM files | It's the key that unlocks the DICOM file, giving you direct access to all metadata tags like patient info, acquisition parameters, and more. |
| NumPy | Numerical data manipulation | This library represents the pixel data as a powerful numerical array, which is absolutely critical for any kind of analysis or image processing. |
| Matplotlib / Pillow | Image visualization and manipulation | Once you have the pixel data in a NumPy array, these libraries let you see it. Matplotlib is great for plotting, while Pillow is ideal for basic image handling. |
This combination gives you a solid and flexible foundation for almost anything you need to do.
My Core Workflow: I always start by using
pydicomto open the digital folder (the.dcmfile) and read its contents (the metadata). Then, I grab the pixel data and usematplotlibto display the actual image. It’s a simple but incredibly effective process.
While these individual tools are fantastic, some larger projects might call for more integrated solutions. For instance, comprehensive Software Development Kits (SDKs) can provide a wider range of features for managing massive data workflows that go beyond just reading files. But with these core libraries installed, you have a clear and direct path from a raw .dcm file to a medical image you can see and analyze.
Setting Up Your Python Workspace for DICOM
Before you can even think about parsing DICOM metadata or pixel data, you need to get your house in order. Jumping straight into the code without a proper setup is a classic rookie mistake that almost always leads to a mess of conflicting package versions down the line.
Think of it like preparing a sterile field for a medical procedure. Creating an isolated Python virtual environment is a non-negotiable first step for any serious project. This gives you a clean, self-contained workspace with its own Python interpreter and libraries, completely separate from your global system setup. My go-to for this is Python's built-in venv module—it’s simple, effective, and gets the job done without extra fuss.
Creating and Activating Your Environment
First, pop open your terminal or command prompt. Navigate to the directory where you want your project to live and then run this command:
python -m venv dicom_env
This little command creates a new folder called dicom_env which will house everything for our project. But creating it isn't enough; you have to activate it to start using it. The command is slightly different depending on your operating system:
- On Windows:
dicom_envScriptsactivate - On macOS or Linux:
source dicom_env/bin/activate
You'll know it worked when you see (dicom_env) appear at the beginning of your command prompt line. This is your visual confirmation that you're now working inside your new, isolated environment. From this point on, any library you install will stay neatly tucked away in here.
Installing the Essential Libraries
With your virtual environment active and ready, it's time to bring in the tools for the job. The absolute cornerstone for working with DICOM in Python is the pydicom library. But pydicom doesn't work in a vacuum. You'll also need NumPy for efficiently handling the numerical pixel data, which is often a massive array of numbers. It's also a good idea to grab Pillow for its powerful and straightforward image manipulation capabilities.
You can install all three at once with a single line using pip, the Python package manager.
pip install pydicom numpy pillow
This command pulls down the latest stable versions and installs them right into your dicom_env. That's it. This simple, clean foundation is all you need to start reading and manipulating DICOM files.
A Pro Tip from Experience: Immediately lock down your project's dependencies by creating a
requirements.txtfile. Just runpip freeze > requirements.txt. This file saves a list of the exact library versions you're using. Trust me, when you need to share your project or set it up on a new machine, this little file is an absolute lifesaver.
To make sure everything is good to go, you can do a quick sanity check. While still in your activated environment, type python to open the Python interpreter. Then, try to import the libraries you just installed:
import pydicom import numpy import PIL
print("Success! All libraries are installed and ready to go.")
If you see that success message without any ImportError exceptions, your environment is perfectly configured. Now, we can finally get to the fun part: digging into some actual DICOM files.
Accessing and Interpreting DICOM Metadata

Alright, with our environment set up, it's time for the interesting part: actually reading a DICOM file. The pixels get all the attention, but the real story starts in the metadata, often called the DICOM header. This is where you find the essential context—the patient ID, study details, when the scan was taken, and countless other technical parameters.
Getting to this information is surprisingly straightforward with pydicom. Let's dive right in.
Reading Your First DICOM File
The workhorse function you'll get to know well is pydicom.dcmread(). You simply pass it the path to your DICOM file, and it hands you back a FileDataset object. I like to think of this object as a powerful, searchable dictionary that holds all the header information.
Here’s a quick example of how to load a file and take a look inside.
import pydicom
Point this to one of your DICOM files
file_path = 'path/to/your/image.dcm'
This line does the magic, reading the file into a dataset object
dicom_dataset = pydicom.dcmread(file_path)
Let's print the whole thing to see what we're working with
print(dicom_dataset)
When you run this, you'll see a complete dump of the metadata header. It can be a lot to take in at first, but it gives you a fantastic overview of every single piece of information tucked away in that file. This is your first real step toward programmatically understanding medical images.
Extracting Specific Data Points
Printing the entire header is great for exploration, but in any real-world project, you'll need to cherry-pick specific pieces of information. This is where DICOM tags are crucial. Every metadata element, from PatientID to Modality, is identified by a unique tag—a pair of hexadecimal numbers that acts as its address.
The good news is that pydicom lets you access these elements using friendly keywords instead of memorizing the tags.
- Patient's Name (0010,0010):
dicom_dataset.PatientName - Study Description (0008,1030):
dicom_dataset.StudyDescription - Acquisition Date (0008,0022):
dicom_dataset.AcquisitionDate
So, if you wanted to grab just the patient's ID and the study date, your script would look something like this:
patient_id = dicom_dataset.PatientID study_date = dicom_dataset.StudyDate
print(f"Patient ID: {patient_id}") print(f"Study Date: {study_date}")
This kind of targeted extraction is the bread and butter of medical imaging work. It's how you organize massive datasets for research, de-identify patient information to protect privacy, or feed structured data into an AI model. While DICOM requires specialized libraries, the general concept of embedded data is common; you can see a similar principle at play with a general-purpose online image metadata extractor.
A quick tip from experience: The DICOM header is more than just a list of data. It's the blueprint for the image. It tells you everything you need to know before you even process a single pixel. Getting comfortable navigating the header is a non-negotiable skill if you're serious about this field.
Remember, a single medical study can generate hundreds or even thousands of individual DICOM files. This is why we work in controlled environments—to manage dependencies and ensure our scripts can handle the volume. Each of these files starts with a specific 128-byte preamble followed by a 4-byte "DICM" prefix, a signature that identifies it as a DICOM file.
Getting to the Pixels: How to Extract and Display the Image

Alright, we've navigated the header metadata. Now for the exciting part—the image itself. This is where we turn that abstract collection of tags and values into a visual, interpretable medical scan. The magic happens when we access the raw pixel data, and thankfully, pydicom makes this surprisingly straightforward.
Once you've loaded a DICOM file, the pixel data is available through a simple attribute: .pixel_array. Think of this as your direct gateway to the image. It takes the raw byte stream from the file and instantly converts it into a NumPy array, which is a grid of numbers perfect for visualization or feeding into a machine learning model.
Let's see this in action.
import pydicom import matplotlib.pyplot as plt
Let's load our DICOM file again
file_path = 'path/to/your/image.dcm' dicom_dataset = pydicom.dcmread(file_path)
This is the key step: accessing the pixel data
pixel_data = dicom_dataset.pixel_array
Let's confirm what we have
print(f"The image has {pixel_data.shape[0]} rows and {pixel_data.shape[1]} columns.")
And now, we display it
plt.imshow(pixel_data, cmap=plt.cm.bone)
plt.show()
When you run that code, you'll get a visual of your medical image. I’m using matplotlib here because it’s a go-to tool for scientific plotting and works beautifully for this. The cmap=plt.cm.bone part is a nice touch; it applies a grayscale colormap common in medical imaging, which often makes anatomical details a bit clearer.
Fixing Contrast: A Quick Primer on Windowing
Chances are, your first image might look washed out or way too dark. Don't worry, that's completely normal. Medical images, especially from CT scans, capture a massive range of intensity values—far more than your computer monitor can actually show. The solution is a technique called windowing.
Windowing is all about choosing a specific range of pixel values to focus on. It's controlled by two simple parameters:
- Window Center (WC): The middle value of the intensity range you want to highlight.
- Window Width (WW): The total span of values around that center point.
These values are almost always stored right in the DICOM metadata. For example, a CT scan looking at soft tissue might have a WC of 40 and a WW of 400. This setting tells the viewer to concentrate all the display contrast on the subtle differences within that range, clipping everything outside of it to pure black or white.
You can usually pull these directly from the dataset you already loaded:
window_center = dicom_dataset.WindowCenter window_width = dicom_dataset.WindowWidth
A Note on Clinical Accuracy: Applying the right windowing isn't just about making the image look good; it's essential for clinical diagnosis. A radiologist constantly adjusts these values to spot specific issues, like telling the difference between a tiny blood clot and the surrounding brain tissue. As you get comfortable with DICOM files, always make a habit of checking for these tags.
If the tags aren't there, you might have to experiment with your own values. But understanding this process is what separates a basic image viewer from a true medical imaging tool. It's how you transform a raw grid of numbers into a diagnostically useful picture.
Preparing DICOM Data for AI and Machine Learning
Working with a single DICOM file is a great start, but the real magic for AI happens when you scale up to an entire dataset. This is where your programming skills truly shine. To train any kind of medical imaging model, you need a large, consistent stream of data. Your job is to build a pipeline that takes a messy folder of raw DICOM files and turns it into a perfectly organized, model-ready dataset.
The core of this process is automation. Instead of opening each file by hand, you'll write a Python function that loops through a directory, reads every single DICOM file it finds, and pulls out the essential metadata and pixel data we discussed earlier.
Building Your Data Processing Pipeline
So, where do you put all this information? My go-to tool for this is a Pandas DataFrame. Think of it as a powerful, code-based spreadsheet. Each row can represent one DICOM slice, while the columns store your valuable data—things like PatientID, SliceLocation, and, of course, the pixel array itself.
This approach gives you a bird's-eye view of your entire dataset in a single, structured object. From this point, sorting, filtering, and analyzing your images becomes incredibly straightforward, long before you even think about feeding them into a model.
The image below lays out some of the crucial data integrity checks you’ll want to build into your pipeline.
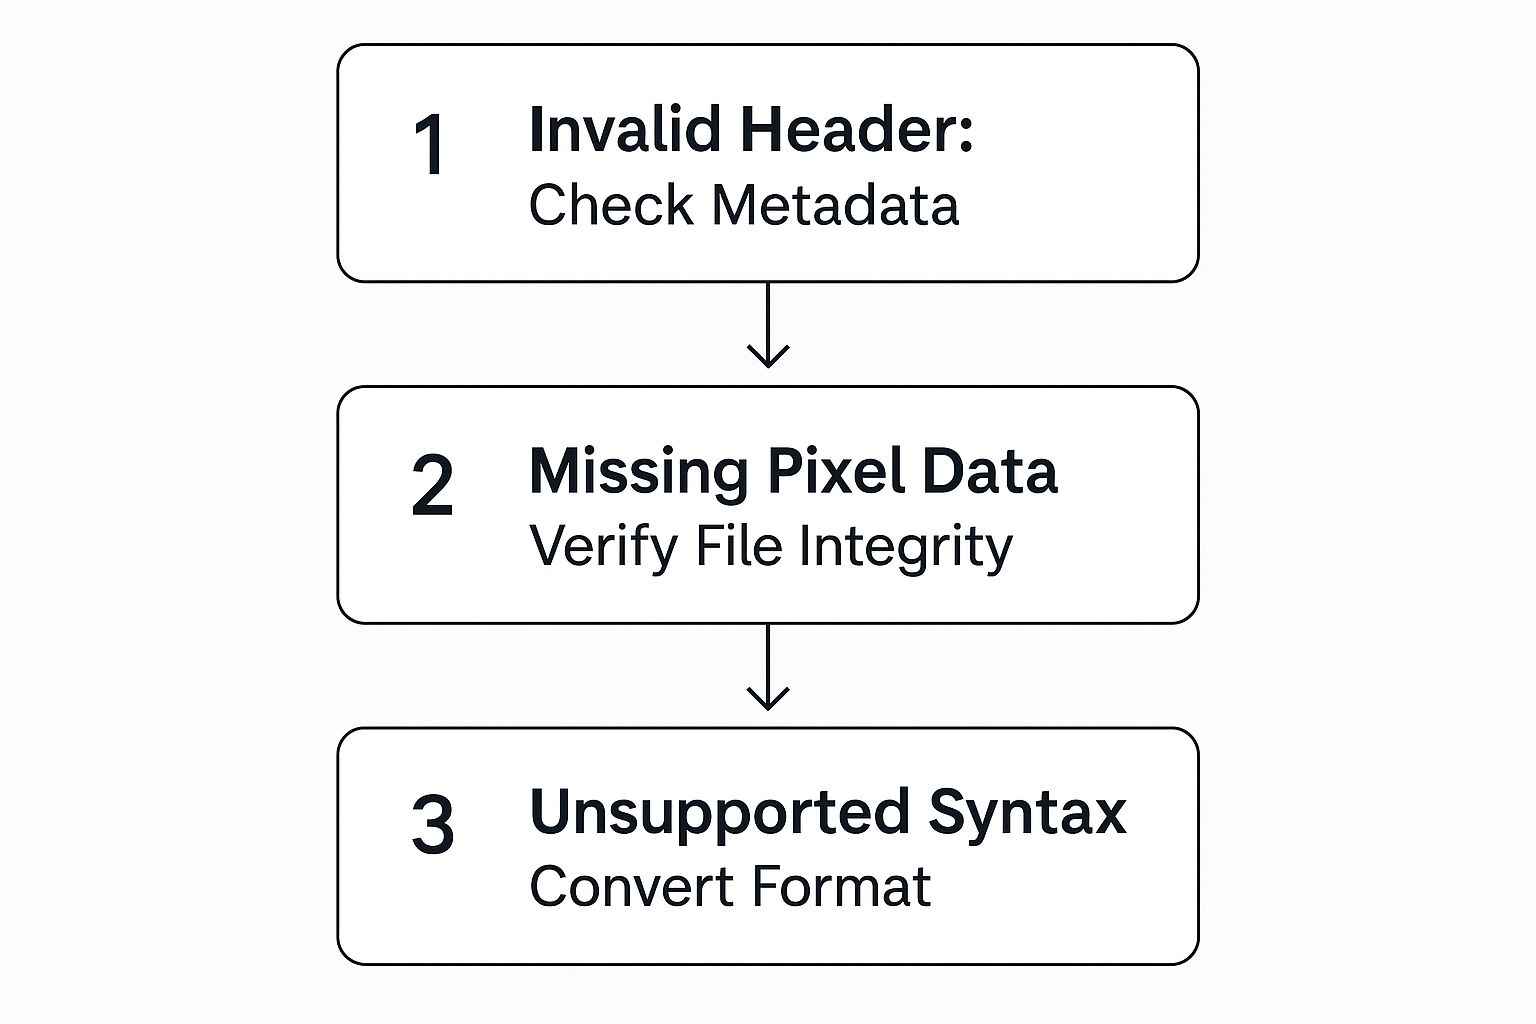
As you can see, it’s not just about reading the files. You have to validate them to make sure the headers, pixel data, and file syntax are all correct before they earn a spot in your final dataset.
Preprocessing for Model Consistency
With your data neatly organized, it's time for preprocessing. This is non-negotiable. AI models, especially deep learning networks, are picky eaters. They thrive on data that is perfectly uniform in both size and value range.
I always focus on two fundamental preprocessing steps:
- Image Resizing: In any real-world dataset, images will come in various dimensions. You need to standardize them all to a consistent size, like 256×256 or 512×512 pixels, to create uniform input tensors for your model.
- Pixel Normalization: DICOM pixel values can have a huge dynamic range. By normalizing these values, usually to a scale of 0 to 1, you help the model train faster and avoid potential instability issues.
This need for standardization isn't new; it's been a cornerstone of medical imaging for decades. The adoption of DICOM 3.0 in 1996 was a massive leap forward, creating the interoperability that allows devices from different manufacturers to communicate. Today, this standard is used in over 90% of radiology devices in major markets, and it's what makes the very AI data pipelines we're building possible.
When you combine automated iteration, smart data organization, and meticulous preprocessing, you create a powerful, repeatable blueprint. This pipeline is the essential bridge connecting raw medical data to the clean, structured tensors that fuel modern AI diagnostics.
If you're looking to sharpen your programming skills for these kinds of applications, tackling some general Coding with AI challenges is a great way to build your confidence. Mastering these data preparation fundamentals is what separates a proof-of-concept from a truly effective medical AI solution.
Answering Your Questions About Reading DICOM Files
Diving into DICOM files for the first time? It's natural to have questions pop up as you go. Honestly, everyone hits a few snags when they're starting out. Let’s walk through some of the most common issues I see and get you some clear, practical answers.
So, What’s the Real Difference Between DICOM and Something Like a JPG?
This is probably the most fundamental question, and it gets to the heart of why medical imaging is a unique field. While we all know formats like JPG or PNG, they are built for one thing: storing pixel data. That's it. They're great for photos on a website, but they're completely insufficient for clinical use.
A DICOM file is so much more than just an image. It’s a comprehensive package that bundles the high-fidelity image data with a huge amount of critical metadata right in the header. We're talking about everything from the patient's ID and the date of the scan to the precise settings of the MRI or CT machine that took the image. This attached information is absolutely non-negotiable for making a proper diagnosis.
Think of it this way: a radiologist can't make a diagnosis from a simple JPG because it's stripped of all context. The DICOM format ensures that the entire story—patient history, acquisition details, and more—travels with the image, making it a self-contained medical record.
Why Does Pydicom Keep Saying I Have a 'Not a DICOM File' Error?
Ah, the classic FileMetaInformationMissingError. If you're working with pydicom, seeing this or a similar "not a DICOM file" message is practically a rite of passage. Don't worry, it's almost never a problem with your code.
The pydicom library is very particular. It expects a file to follow the strict DICOM standard, which includes a 128-byte preamble followed by the letters "DICM". If that signature is missing or the file structure is off, pydicom will refuse to parse it.
When this error pops up, here’s your troubleshooting checklist:
- Is the file path correct? Before you do anything else, check for a simple typo. It happens more often than you'd think.
- Is the file itself valid? Try opening the file in a dedicated DICOM viewer like Horos or RadiAnt. If a specialized tool can't open it, the file is likely corrupted or wasn't exported correctly from the source.
- Do you have read permissions? Make sure your script actually has the system-level permissions to access the file in that directory.
Basically, this error is your cue to stop debugging your script and start investigating the source file itself.
How Do I Actually Work With a Full 3D Scan?
This is a great question. A single medical scan, like a CT or MRI, isn't just one image; it's a whole series of 2D slices that form a 3D volume. Each slice is its own DICOM file. To analyze the full scan, you need to read that entire stack of files and assemble them in the correct order.
The first step is to read all the DICOM files from the patient's study directory. As you load each file, the crucial part is sorting them correctly. The most reliable method is to use the Image Position (Patient) tag (0020,0032). This tag gives you the exact spatial coordinates (X, Y, Z) of each slice, allowing you to arrange them perfectly.
Once your slices are sorted, you can extract the 2D pixel array from each one and stack them together into a single 3D NumPy array. This final array represents the complete volumetric data, ready for 3D visualization or to be fed into an AI model for analysis.
At PYCAD, we live and breathe this stuff. Our expertise is in taking these complex DICOM datasets and building powerful AI-driven workflows around them. We have deep, hands-on experience in medical imaging and computer vision, from wrangling raw files to deploying sophisticated diagnostic models. Find out more about how we can help you accelerate your medical imaging projects.
Keep Reading
Related Articles
Explore the full DICOM HubAll services, tools, and guides on this topic — in one place.
Visit Hub →