
Ribs and clavicles cross almost every square centimetre of lung on a frontal chest film, and a small nodule sitting behind the fourth rib is easy to miss. Dual-energy subtraction fixes this by taking two exposures at different tube voltages and separating bone from soft tissue, but it needs a dual-energy detector, adds dose, and smears when the patient breathes between shots. Many sites do not have one. Yifei Sun, Fenglei Fan, Junhao Jia, Wenming Deng, Hongxia Xu, Changmiao Wang and Ruiquan Ge (Zhejiang University, Hangzhou Dianzi University, City University of Hong Kong, the Cancer Hospital and Shenzhen Hospital of the Chinese Academy of Medical Sciences, and the Shenzhen Research Institute of Big Data) posted arXiv:2610.19466 on 14 October 2026. Their model, DeBoneDiT, takes one ordinary chest X-ray and generates the soft-tissue image a dual-energy unit would have produced. Code and trained weights are public under Apache-2.0 at diaoquesang/DeBoneDiT, and the team released a paired dual-energy dataset, SZCH-X-Rays, under CC BY-NC 4.0.
Why a viewer team should care
Bone suppression changes what the reader sees without asking them to trust a score. In a viewer it is a second image of the same exposure that the reader flips to when something behind a rib looks off. The paper cites clinical work showing bone-suppressed films raise radiologists’ sensitivity for lung lesions, and the same cleaner image is a better input for detection models downstream. If you build a web viewer, a teleradiology worklist or a screening platform, this is a derived series you can generate once on ingest and hang next to the original.
What goes in and what comes out
Input is a single posteroanterior chest radiograph. The released code reads an 8-bit grayscale PNG with OpenCV and resizes it to 1024 x 1024. Output is a 1024 x 1024 8-bit soft-tissue image with the ribs, clavicles and most of the spine faded out and the lung texture kept. The training pairs came from 14-bit DICOM files that the authors converted to PNG, so plan your own windowing and bit-depth conversion before inference. On an NVIDIA A800 the authors measured 3.4 seconds per image with 50 sampling steps and a 72.8 million parameter network (Table 2). For comparison, the previous diffusion models in their table take 8.7 seconds (GL-LCM), 85.9 seconds (BS-LDM) and 110.5 seconds (BS-Diff).
How it works
DeBoneDiT runs in two stages. The first is an autoencoder that compresses a 1024 x 1024 radiograph into a 4 x 256 x 256 latent grid and decodes it back. Standard latent diffusion autoencoders are trained to reproduce pixels, and they tend to blur exactly the overlapping edges where bone meets lung. The authors add a loss computed on features from a frozen Depth Anything V2 encoder, a monocular depth model trained on natural photos. Those features respond strongly around bony structures (Fig. 4 of the paper), so penalizing their mismatch pushes the autoencoder to keep rib and vessel edges distinct.
The second stage does the translation in that latent space. Most diffusion models start from random noise and denoise toward the target. DeBoneDiT starts from the latent of the input X-ray and walks toward the soft-tissue latent along a Brownian bridge, a diffusion path pinned at both ends. The start point already holds the patient’s anatomy, so the model mostly has to learn what to remove. At every one of the 50 steps the network, a Diffusion Transformer with 12 blocks, also receives the original X-ray latent as an extra input channel. The authors call this source condition injection. In their ablation, the bridge without it gives blurrier lung texture and suppresses less bone (Table 4).
What the numbers say
On the 75 test pairs of SZCH-X-Rays, DeBoneDiT reaches a perceptual distance (LPIPS) of 0.078 against the dual-energy soft-tissue image, where the next best method, GL-LCM, scores 0.093, and a PSNR of 29.6 dB, about 0.7 dB above the runner-up (Table 1). It also wins on the older JSRT set. The authors then ran the frozen SZCH-trained model on a public pneumonia, COVID-19 and normal X-ray collection without fine-tuning and trained five off-the-shelf classifiers on the outputs. Every classifier scored higher on bone-suppressed images than on the originals (Table 5). That collection pools images from several public sources, so part of the gain could come from the generator normalizing source-specific appearance. Read it as a sign the images keep diagnostic texture. It does not replace a reader study.
The figure
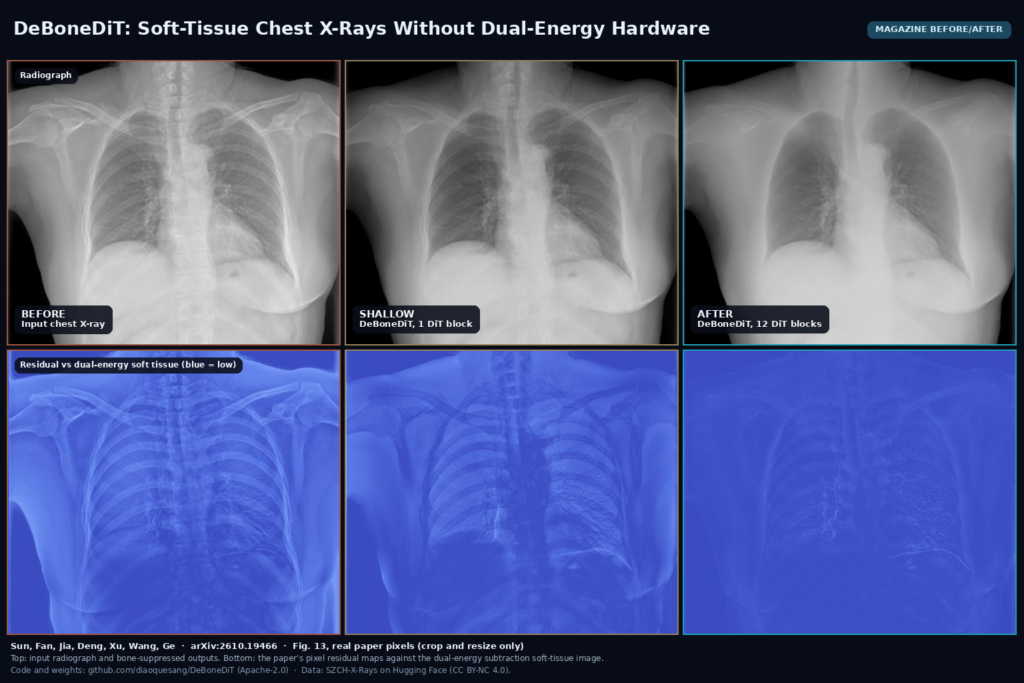
The featured image uses Fig. 13 of the paper. The top row shows the input radiograph, the output of a one-block version of the network, and the output of the full 12-block model. The bottom row shows the paper’s residual maps against the dual-energy soft-tissue image, where blue means close to the reference. On the input, the residual is the whole rib cage. The shallow model fades the ribs but leaves their outlines in the residual. The full model’s residual is almost flat, with some leftover structure in the lower lung fields and along the heart border.
Limits
The authors list three. When a lesion is fully hidden behind dense bone, the model has to guess what lies behind it, and a generative model can invent texture or drop a faint nodule. The depth features come from a model trained on everyday photos, which has never seen a radiograph. And all SZCH-X-Rays data come from one hospital and one scanner, a GE Discovery XR656, with no external or prospective validation.
A few more matter for deployment. Training and test pairs were posteroanterior only, and the authors excluded films with motion, severe pleural effusion or pneumothorax because the dual-energy reference degrades on them. Portable AP films from the ICU, which are where effusions and lines live, are outside what was tested. Output is 1024 pixels square in 8 bits, while the source detector records about 2000 pixels at 0.194 mm in 14 bits, so treat it as a reduced-resolution reading aid that sits next to the original. Only the 75-pair test set of SZCH-X-Rays is downloadable today; the training and validation splits are promised after the paper is accepted. JSRT soft-tissue targets are themselves synthetic, and Fig. 6 shows the model avoiding some of their artifacts, which also means JSRT scores measure agreement with another algorithm.
Code, weights and license
The GitHub repository holds training and evaluation scripts for both stages, a Brownian bridge scheduler, the vendored Depth Anything V2 code and the metrics. Checkpoints for both datasets, autoencoder and diffusion network, sit on Hugging Face together with the Depth Anything V2 weights. The code is Apache-2.0, which allows commercial use. The data license is stricter. SZCH-X-Rays is CC BY-NC 4.0, so the released weights trained on it carry that non-commercial question with them. If you want this in a product, retrain on data you have rights to, or get the authors’ written permission. Two practical notes: the evaluation script loads whole pickled PyTorch modules with torch.load, so load them only from the official repository and inside a sandbox, and its model paths are placeholders you fill in yourself. The guidance weight is set to 1.5 for SZCH-X-Rays and 1.0 for JSRT.
How we would wire it into a viewer
We would run it as an ingest job outside the viewer. When a frontal chest study arrives, check that the view position is PA, read the pixel data with the right photometric interpretation (MONOCHROME1 films need inverting), apply the stored window, and convert to the 8-bit 1024 input. Run DeBoneDiT on a GPU worker and write the result back as a new derived series with ImageType DERIVED\SECONDARY, a series description such as “Bone suppressed (AI, DeBoneDiT)” and a reference to the source image, so it never replaces the original exposure. In the viewer, hang it next to the source with linked zoom and pan, or as a toggle on the same viewport, and label it clearly. Skip AP, lateral and pediatric films until you have validated them on your own data. For background, see what a DICOM viewer does, our DICOM standards guide and our earlier post on anatomical overlays on clinical X-rays.
Sources
- Sun, Y., Fan, F., Jia, J., Deng, W., Xu, H., Wang, C., Ge, R. DeBoneDiT: Depth-Driven Conditional Bridge Diffusion Transformers for Bone Suppression in Chest X-Ray Images. arXiv:2610.19466, 2026. https://arxiv.org/abs/2610.19466. PDF: https://arxiv.org/pdf/2610.19466.
- Code (Apache-2.0): https://github.com/diaoquesang/DeBoneDiT. Checkpoints: https://huggingface.co/diaoquesang/DeBoneDiT.
- Dataset: SZCH-X-Rays (CC BY-NC 4.0, test set released), https://huggingface.co/datasets/diaoquesang/SZCH-X-Rays. JSRT bone shadow suppression pairs: https://www.kaggle.com/datasets/hmchuong/xray-bone-shadow-supression.
- Featured image: Fig. 13 of arXiv:2610.19466, real paper pixels, cropped and resized only.