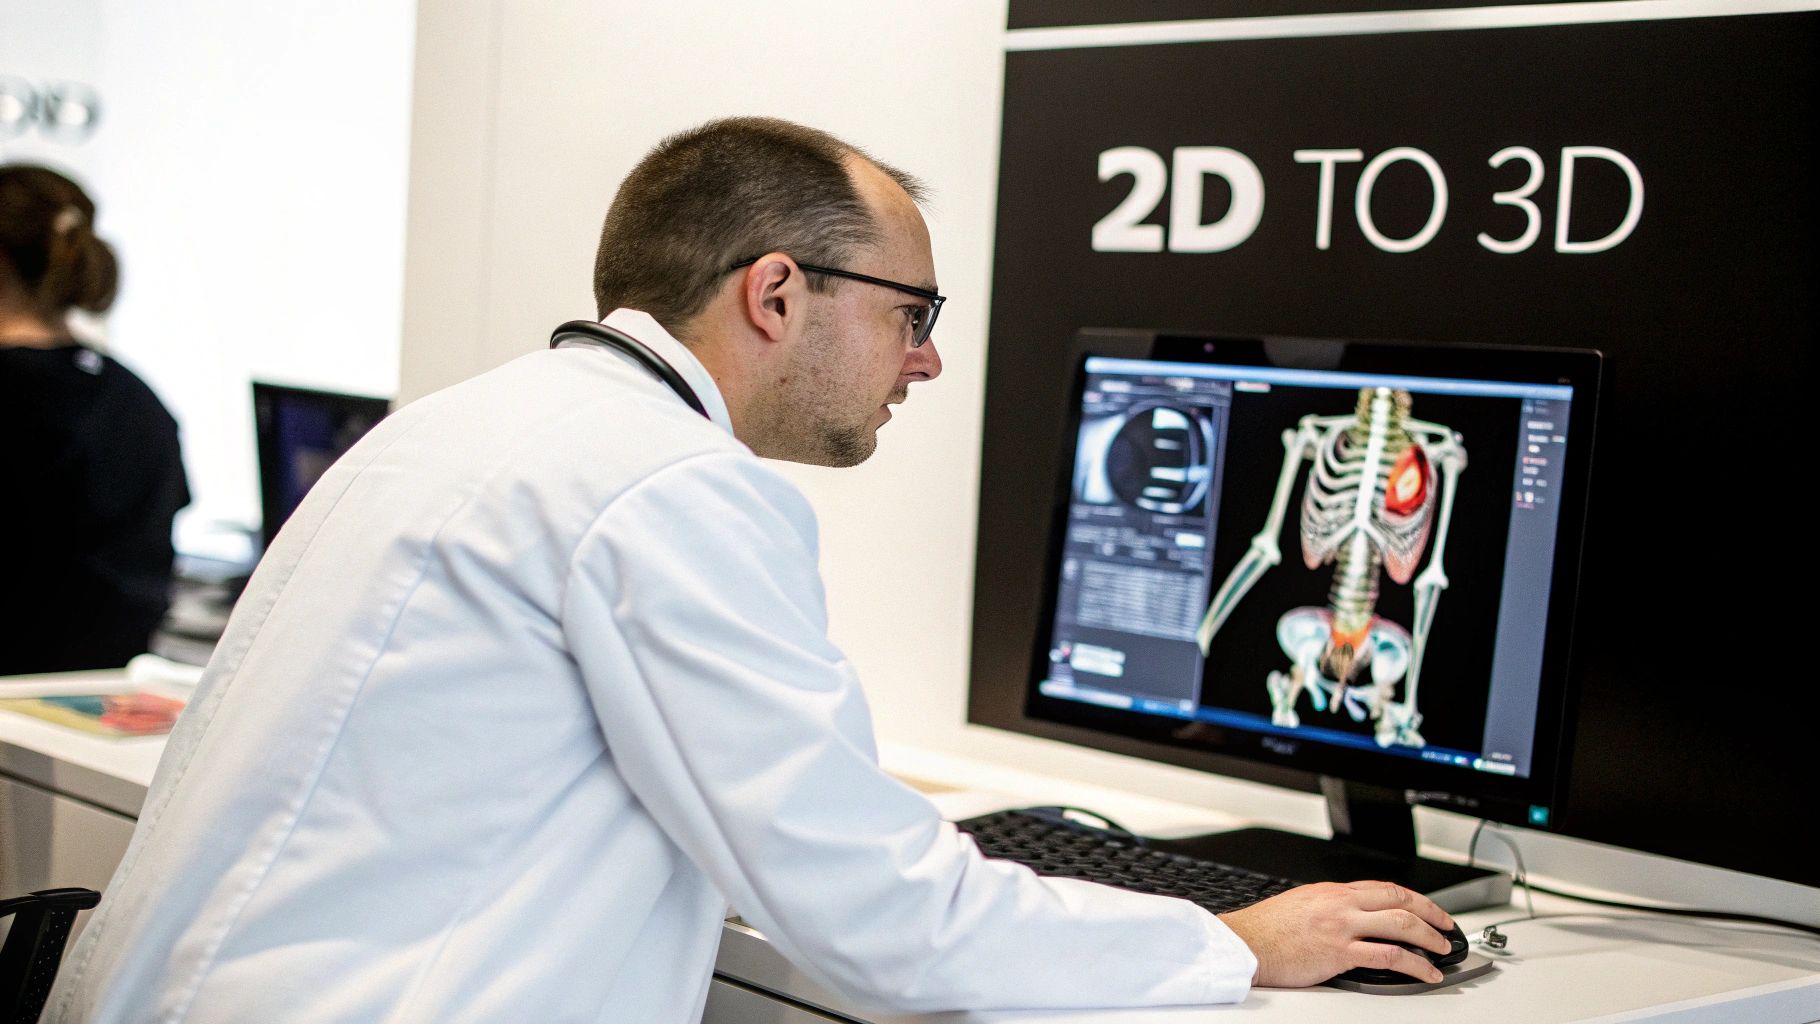
It's truly remarkable when you think about it—taking a series of flat, grayscale medical scans and transforming them into a living, breathing 3D model that a surgeon can hold, turn, and explore from every conceivable angle. This isn't a futuristic concept anymore; it's happening right now.
The secret lies in a process called 3D reconstruction. At its heart, the idea is to take multiple 2D images, each a slightly different slice of the whole, and let intelligent software stitch them together to build a complete picture of depth and shape. This is how we bring the Z-axis to life, opening up entirely new possibilities in diagnostics and patient care.
From Flat Scans to Dynamic 3D Models
Picture a ream of paper where each sheet represents a single CT scan slice. By itself, one sheet gives you a very limited view. But when you stack them all in perfect alignment, the full three-dimensional object emerges. This is the essence of how we build 3D models from medical scans.
For a long time, the go-to methods for this were techniques like photogrammetry and structure from motion (SfM). These approaches work by finding common points across a series of images to calculate their exact position in 3D space, meticulously constructing a geometric map of the anatomy.
The Leap to AI-Powered Reconstruction
Now, artificial intelligence is changing the game entirely. Deep learning, in particular, has supercharged this whole process. AI algorithms can now perform these reconstructions with incredible speed and precision, even when dealing with the complex data from MRIs and CT scans. What once took a room full of computers is now more accessible than ever.
The progress has been breathtaking. Back in the early 2000s, researchers were limited to small datasets and specialized hardware, sometimes taking days just to process a few hundred images. A massive leap forward happened in 2010 when a research team reconstructed a detailed model of Rome from three million images on a single PC. Just a few years earlier, this would have required a supercomputer for a fraction of that data—only 100,000 images. You can dive deeper into these algorithmic milestones on YouTube.
This newfound accessibility means clinics and research labs can visualize patient anatomy in ways they only dreamed of before. It’s paving the way for better surgical planning, sharper diagnoses, and truly personalized treatments.
Why This Matters in Modern Healthcare
The ability to create interactive models directly from standard medical scans isn't just a technical achievement; it's a paradigm shift in how medical professionals handle complex cases.
- Surgical Planning: Imagine a surgeon being able to virtually "walk through" a patient's heart or brain before ever making an incision, spotting potential roadblocks and mapping out their strategy with incredible precision.
- Patient Education: It's one thing to describe a condition, but it's another to show a patient a clear, interactive 3D model of their own anatomy. This empowers them to understand their health and participate in their care.
- Advanced Diagnostics: By rotating and examining an organ in three dimensions, a radiologist can catch subtle abnormalities that might otherwise be hidden in a sequence of flat images.
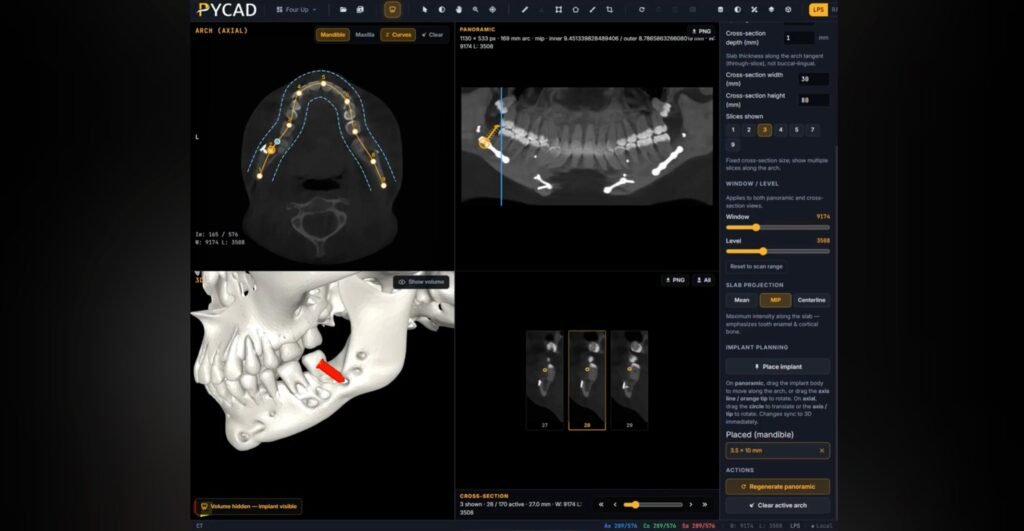
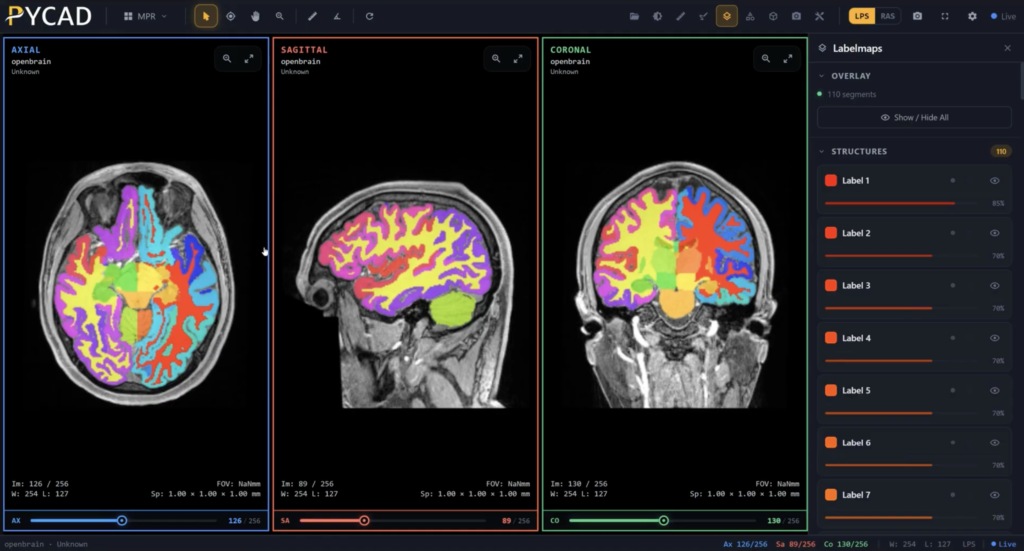
This is exactly where we at PYCAD live and breathe. We specialize in building custom web DICOM viewers and integrating them into medical imaging platforms, turning that raw scan data into powerful, interactive 3D visualizations. You can explore some of our projects in our portfolio.
Now, let's walk through how this incredible transformation actually happens.
Laying the Groundwork: Preparing Your Image Data

The journey to an incredible 3D model doesn't kick off with complex algorithms. It starts with the raw material: your 2D images. Think of it like a sculptor choosing a piece of marble. The quality of that initial block dictates the masterpiece that can be carved from it. Your 2D medical images are that block of marble.
Every pixel, every slice, and every tiny detail is a piece of the puzzle. Our goal is to hand the AI a dataset so clean and consistent that it can see the underlying anatomy without a shred of confusion. The old saying "garbage in, garbage out" isn't just a cliché here—it's the absolute truth of 3D reconstruction.
Starting Strong: The Rules of Image Acquisition
Before a single line of code runs, we have to look at how the images were captured in the first place. For medical scans like CT or MRI, this acquisition phase is everything. The success of your final model really boils down to getting a few key things right from the start.
To truly bring your 2D images to life in 3D, your dataset needs these three ingredients:
- Plenty of Overlap: Each image slice needs to share a good amount of information with the one before and after it. This is how the AI connects the dots and understands the spatial relationship between different parts of the body.
- High Resolution: More pixels mean more detail. A high-resolution image gives the AI more information to work with, which directly translates into a more precise and intricate 3D model that can capture even the most subtle anatomical features.
- Consistent Slice Thickness: Imagine trying to build something with blocks of different sizes. It would be a mess, right? The same goes for image slices. Uniformity is crucial for a smooth, distortion-free reconstruction.
When you nail these elements, you're essentially drawing a perfect map for the algorithm to follow. This alone can dramatically boost the accuracy and visual quality of your final 3D model.
Preprocessing: Getting Your Data Ready for Prime Time
With your raw images in hand, it’s time to get them ready for the AI. This is called preprocessing, and it’s non-negotiable. You’re essentially cleaning and sharpening your data to remove any imperfections that could throw the algorithm off course. For a deeper look at the methods, you can learn more about what image preprocessing is and why it's so important for AI.
This stage involves a few critical steps:
- Noise Reduction: Medical scans can be "noisy," with grainy specks that obscure the real data. We use filters to clean this up, allowing the AI to focus on what matters—the anatomy.
- Contrast Enhancement: Often, the brightness difference between various tissues is very slight. By enhancing the contrast, we make these boundaries pop, helping the algorithm clearly define organs, tumors, or other structures.
- Image Registration: This is all about alignment. If a patient moved even a little during a scan, the slices won't line up perfectly. Registration algorithms fix this, ensuring a seamless stack of images.
By taking the time to meticulously prepare your data, you're not just hoping for a good result—you're guiding the AI directly to it. A well-prepared dataset can slash reconstruction errors by over 40% in certain scenarios, saving you a massive amount of cleanup work later on.
This is a world we live and breathe at PYCAD. We specialize in building custom web DICOM viewers and integrating them into medical imaging platforms where data integrity is the top priority. Much of our work, which you can see in our portfolio, begins with this exact process—ensuring the foundational data is flawless, ready to become the insightful 3D models that healthcare professionals depend on.
Choosing Your 3D Reconstruction Toolkit
Alright, you’ve got your meticulously prepared dataset. Now for the exciting part—picking the right tools to breathe life into those 2D images and craft a 3D model. This decision is crucial. The toolkit you select will define your entire workflow, from the accuracy of the final model to how quickly you get to see it. It’s less about finding one "best" tool and more about finding the perfect match for what you’re trying to achieve.
The world of 3D reconstruction is incredibly diverse. On one side, you have the battle-tested, powerful open-source libraries that have been the foundation of medical imaging for decades. On the other, you’ll find modern, AI-driven frameworks that are completely redefining what's possible in terms of detail and realism.
Traditional vs AI-Powered Approaches
The foundational toolkits, like the Visualization Toolkit (VTK) and the Insight Toolkit (ITK), are legends in this space for a reason. They’re celebrated for their robustness and the sheer level of control they offer. With these libraries, you have a firm grip on every single step of the process, from initial segmentation to final mesh generation. This makes them perfect for applications where absolute precision and verifiability are non-negotiable.
But there's a new wave of tools, and they're powered by AI. Frameworks using advanced techniques like Neural Radiance Fields (NeRFs) do more than just stitch images together—they learn a continuous, volumetric representation of the subject. The result? They can generate breathtakingly detailed and photorealistic models, capturing subtle textures and lighting in ways traditional methods simply can't. If you’re exploring what’s out there, digging into a review of the top AI tools available to developers can offer some great perspective.
Key Takeaway: The choice often boils down to a trade-off between control and automation. Traditional methods give you unparalleled precision, while AI offers incredible speed and the ability to create stunningly lifelike visualizations.
The progress here has been nothing short of staggering. The accuracy of 3D reconstruction has skyrocketed thanks to huge leaps in computer vision. Back in the early 2000s, structure from motion (SfM) was a slow, painstaking process. Fast-forward to 2015, and advancements in feature matching made it possible to build incredibly detailed models with far fewer images. Research now shows that with 1,000 images, modern deep learning approaches can achieve 95% reconstruction accuracy for complex scenes—a massive jump from the 70% accuracy of earlier methods.
To help you navigate these options, I've put together a table breaking down the most common methods.
Comparison of 2D to 3D Conversion Methods
This table offers a snapshot of different reconstruction techniques, helping you see where each method shines and what it demands from you and your data.
| Method | Core Principle | Best For | Pros | Cons |
|---|---|---|---|---|
| Volumetric Rendering | Renders 2D projections directly from 3D voxel data (e.g., CT/MRI stacks). | Direct visualization of raw scan data without intermediate steps. | Fast for direct visualization; retains all original data; excellent for soft tissue. | Not a true "model"; computationally intensive; can be difficult to segment specific structures. |
| Surface Rendering (e.g., Marching Cubes) | Creates a polygon mesh by identifying surfaces of constant value (isurfaces) in voxel data. | Solid, well-defined structures like bones, organs, and tumors. | Produces clean, manifold meshes; widely supported (VTK/ITK); great for 3D printing. | Can lose fine details; requires clear segmentation (thresholding); struggles with fuzzy boundaries. |
| Neural Radiance Fields (NeRFs) | AI model learns a continuous 5D function representing a scene's color and density from images. | Creating photorealistic, high-fidelity visualizations, especially for education or simulation. | Incredibly realistic lighting and textures; captures complex, semi-transparent details. | Requires multiple viewing angles; computationally expensive to train; metric accuracy can be a challenge. |
| Photogrammetry (SfM) | Reconstructs 3D geometry by finding corresponding points across multiple 2D images. | Reconstructing external surfaces from standard photos or videos (e.g., a patient's face). | Works with standard cameras; can be highly accurate with enough images; mature technology. | Struggles with textureless or reflective surfaces; requires significant image overlap and good lighting. |
Ultimately, the "best" method is the one that aligns with your project's goals, whether that's surgical precision or creating an impactful educational tool.
Making the Right Choice for Your Project
So, how do you make the final call? Think through these key questions:
- What’s the subject? Are you reconstructing a solid bone structure or delicate, complex soft tissue? VTK and ITK are fantastic for the former, while NeRFs might be the only way to capture the subtle nuance of the latter.
- What's your team's skillset? The classic open-source libraries demand some serious programming chops. AI frameworks, while complex under the hood, can sometimes offer a more automated workflow once you get them set up.
- What’s the end goal? If you need a metrically perfect model for surgical planning, traditional, verifiable methods are usually the way to go. But if your mission is a high-fidelity visualization for patient education, AI-powered realism is hard to beat. You can explore our guide on 3-D visualization programs to see how different software is built for different purposes.
Here at PYCAD, we know there’s no single magic bullet. We often find ourselves building custom web DICOM viewers by mixing and matching these very technologies. Our real strength is in deeply understanding a specific clinical challenge and then architecting a solution that solves it, whether that means leaning on the proven precision of ITK or the stunning visual power of AI. Our portfolio showcases some of these custom solutions.
How AI Powers the 3D Reconstruction Process
Once your data is clean and your toolkit is in place, the real magic begins. The process of turning 2D images into a 3D model with AI isn't just a single button press. It’s more like a beautifully choreographed performance, where each stage builds on the last to bring a stack of flat images to life.
Let's ground this in a real-world scenario. Imagine we're tasked with reconstructing a patient's beating heart from a series of MRI slices. Our goal isn't just a pretty picture; it's a model so precise a cardiac surgeon can use it to plan a complex valve replacement. We're building a functional, digital twin of a vital organ.
Feature Extraction: The AI's Vision
First, the AI must perform feature extraction. It meticulously scans every single 2D slice, identifying key anatomical landmarks. Think of it as an expert anatomist with superhuman speed, instantly recognizing the distinct shapes of the aorta, the texture of the myocardial wall, and the precise location of the heart valves across hundreds of images.
The AI isn't just finding edges; it's learning the context. It understands that a particular curve on slice 57 corresponds to another curve on slice 58. This ability to consistently identify and match features across a dataset is the foundation for everything that follows. Without it, the final model would be a jumbled mess.
Geometric Estimation: Building the Scaffold
With the key landmarks identified, the process moves on to geometric estimation. Here, the algorithm acts like a master architect, calculating the precise spatial relationships between all those features. It's constantly asking, "If this point on the ventricle is here in one slice, where is it in the next?"
By answering this question thousands of times per second, the AI constructs a rough but geometrically sound point cloud or wireframe. This isn't the final, smooth model yet. It's the underlying skeleton—the structural scaffold that defines the heart's true shape and volume. It’s the raw, mathematical truth of the anatomy, pieced together from countless data points.
This process has become incredibly fast. Recent work by computer scientists has produced algorithms that can build high-quality 3D scenes almost instantly. For example, researchers modeled Rome's Trevi Fountain from roughly 1,900 camera frames with incredible speed, all thanks to deep learning and parallel processing. As this technology, projected to grow at a CAGR of 20%, matures, it promises real-time model generation for countless applications. You can learn more about these groundbreaking 3D reconstruction findings and what they mean for the future.
This geometric phase is where raw data begins to take a recognizable form. It’s the moment the collection of 2D images transcends its flatness and starts to truly occupy three-dimensional space.
Surface Generation: Adding the Skin
Finally, we arrive at surface generation. The raw, skeletal mesh from the previous step is now ready to be fleshed out. The algorithm uses sophisticated techniques, like the popular Marching Cubes method, to create a continuous, smooth surface that connects all the dots.
It fills in the gaps, smooths out jagged edges, and transforms the raw data into a visually coherent and polished 3D object. This is the stage where the model becomes something a human can intuitively understand and interact with. The result is a lifelike digital representation of the patient's heart, ready for exploration.
The infographic below illustrates the high-level workflow, showing how you move from foundational toolkits to implementing custom, AI-driven solutions.
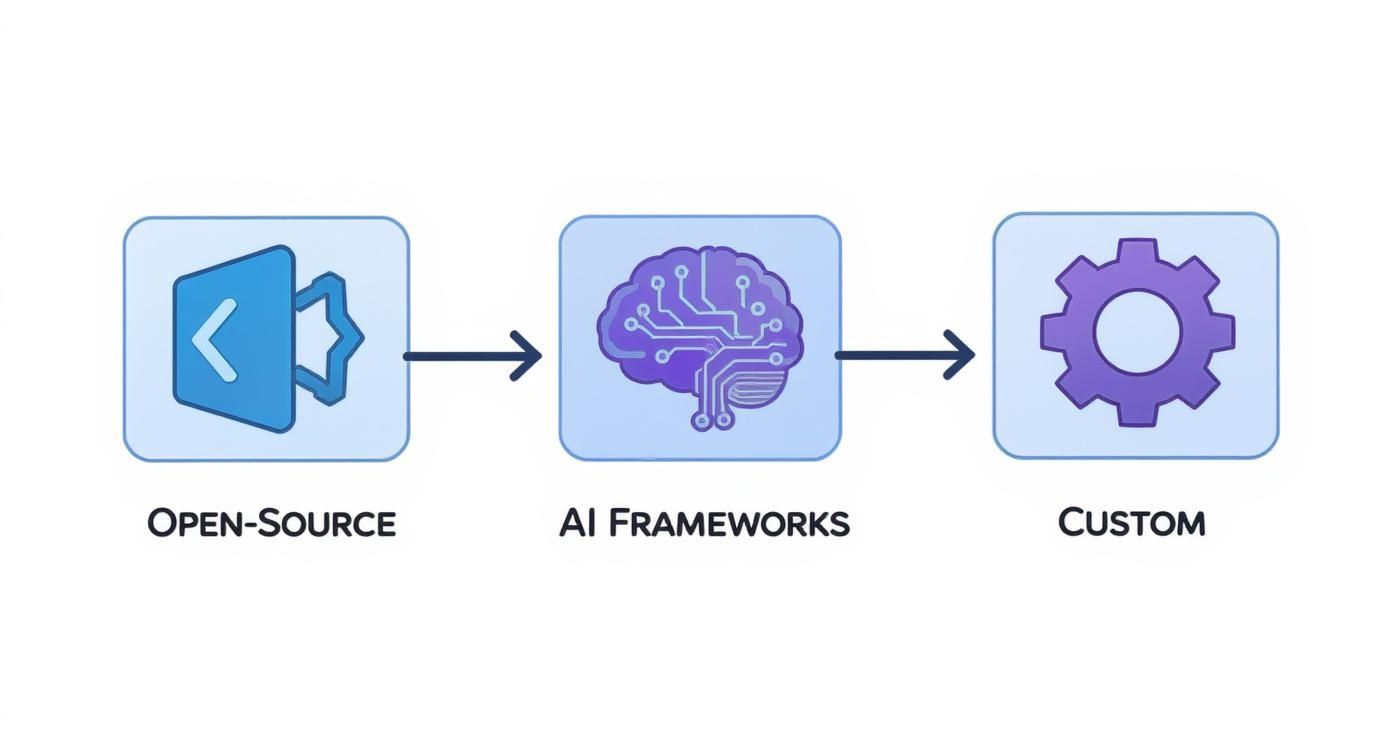
This visual shows that the path from 2D images to a 3D model involves choosing between established open-source libraries, modern AI frameworks, or a bespoke combination of both to get the best results.
At PYCAD, this final step is where our work truly comes alive. We specialize in building custom web DICOM viewers that not only display these incredible models but also integrate them seamlessly into medical imaging web platforms. This gives doctors the power to analyze, manipulate, and collaborate using these powerful visualizations. You can see examples of how we bring these models to life in our portfolio.
Bringing Your 3D Model into the Real World
You’ve done the hard work of converting those flat, 2D images into a three-dimensional structure. It’s an incredible moment, but the journey isn't over. A raw 3D reconstruction is a lot like a diamond in the rough—full of potential but needing a master's touch to truly shine.
This is where post-processing comes in. It’s the final, crucial step that takes your model from a raw data set to a polished, functional asset ready for the real world. Think of it as the bridge between pure science and practical application, whether you’re planning a complex surgery, 3D printing a custom implant, or creating an interactive educational tool.
Polishing Your Digital Creation
Your first AI-generated model will almost certainly have some rough spots. These are just digital artifacts left over from the reconstruction, and smoothing them out is part of the craft. I've found a few techniques to be absolutely essential in this phase.
- Mesh Simplification: A model with too much detail can be a performance nightmare, bogging down software and making real-time interaction impossible. The trick is to intelligently reduce the polygon count—a process called mesh simplification—without losing any of the critical anatomical features.
- Smoothing Algorithms: These are your best friends for getting rid of those jagged edges or "stair-stepping" effects that often appear in models built from 2D slices. A good smoothing algorithm makes the surface look natural and organic.
- Hole Filling: It's common for the reconstruction process to leave tiny gaps in the model's surface. Hole-filling tools patch these up to create a "watertight" mesh, which is an absolute must-have for 3D printing and running accurate simulations.
This isn’t just about aesthetics. A clean, optimized mesh is what separates a pretty but useless file from a powerful clinical instrument. It's about making the model work better.
To take the realism a step further, you can apply detailed surface textures. This can be a time-consuming process, but tools like an AI Texture Generator can give you a massive head start.
From Model File to Clinical Workflow
Once your model is polished and ready, how do you get it into the hands of the surgeons, researchers, or students who need it?
The first and most direct route is exporting it to a common format. The STL (Stereolithography) format has long been the gold standard, especially for anything related to 3D printing. If you haven't worked with it before, our guide on how to open an STL file will get you up to speed quickly.
But let's be honest, the future of healthcare isn't about emailing static files back and forth. It’s about creating dynamic, interactive experiences within existing clinical environments. This is where seamless platform integration becomes the real game-changer.
This is exactly what we live and breathe at PYCAD. We don't just help you build models; we build the ecosystem for them to thrive in. We specialize in developing custom web DICOM viewers and embedding them directly into medical imaging platforms. This means a physician can pull up a patient's scans and interact with a stunning 3D model, all in one secure, intuitive workflow. It’s how you turn a data file into a diagnostic powerhouse. See what these integrated solutions look like in our portfolio.
You’ve got questions about turning 2D images into 3D models, and that’s a good thing. It means you're digging into the details that separate a decent model from an exceptional one. Let's tackle some of the most common questions I hear from people just getting started.
Getting these fundamentals right is what turns a powerful idea into a practical, real-world tool.
How Many Images Do I Actually Need?
One of the first things people wonder is, "What's the minimum number of images?" Honestly, there's no single magic number. It all comes down to what you're trying to build.
If you're working with medical scans, the gold standard is a complete series of thin, contiguous slices from a CT or MRI. For something like photogrammetry, where you're capturing an object from all sides, you could be looking at anywhere from 20 to several hundred images. The key here is significant overlap—think 60-80%—so the software can stitch everything together accurately.
It’s less about hitting a specific count and more about achieving total, comprehensive coverage of your subject.
Can You Really Make a 3D Model from Just One Picture?
This question comes up all the time. The short answer is yes, but it’s a big "yes, but…"
There are AI models out there for Single-Image 3D Reconstruction, and they can do some impressive things. But you have to understand what they're actually doing: they're estimating. The AI is making an educated guess about depth and shape based on the millions of images it was trained on.
While this is amazing for artistic concepts or quick visualizations, it's not giving you true, metrically accurate geometry. For precise medical or engineering work where every millimeter matters, it’s just not the right tool for the job.
The biggest hurdles in medical 2D to 3D conversion almost always come down to data quality. Soft, semi-transparent tissues are notoriously tricky for algorithms to define, and even tiny motion artifacts—like a patient breathing during a scan—can throw off the entire model.
This is why accurate segmentation is so critical. Isolating the exact organ or structure from all the surrounding data is a massive challenge. It often takes a combination of sophisticated algorithms and a discerning human eye to ensure the final 3D model is a true and reliable representation of the patient's anatomy.
At PYCAD, we live and breathe these challenges every day. We specialize in building custom web DICOM viewers and integrating them into medical imaging platforms, transforming complex 2D scans into clear, interactive 3D models.
Want to see what this looks like in practice? Take a look at our portfolio to see our work in action.