
Abstract
One of the most significant aspects of the liver segmentation process is this part of the series. We will discuss the following topics:
- How to find and download the dataset.
- How to prepare the data after downloading it (before the preprocess).
- What are the packages that you need to install and how to install them?
- How to do the preprocessing using Monai and PyTorch in the 3D volumes.
This article will be the longest, but I’ll attempt to break it down into manageable chunks so you don’t get lost.
Download and Prepare the Data
Data Download
Because we’ll be segmenting the liver for 3D volumes in this course, we’ll require 3D data (preferably nifti files). I say nifti files because we’ll use Monai to conduct this work in the preprocessing section, and Monai doesn’t support other file formats. But don’t panic, there are always solutions to any issue that arises. Using python or third-party tools, almost all medical imaging files may be converted to nifties. The majority of the time, dicom files are used to represent a patient; I’m sure you know the difference between a dicom and a nifti file! If you don’t, read this blog post to acquire a better understanding (the nifti file is simply a series of dicoms with a small distance between them).
Let’s start with how to get the data if you don’t already have it, and then we’ll go over how to deal with them.
For the time being, I only know of two websites that can supply a big number of medical imaging datasets (if you know more, please let us know in the comments so that the interest prevails).
- Kaggle: this is one of the many enormous databases where data, codes, and challenges can be found…
- Decathlon dataset: this database specializes in medical imaging, therefore you’ll be able to locate nifti volumes for a variety of jobs that you can test out for yourself (in our tutorial we will use this website to download the liver volumes).
So you may start by getting the liver dataset from Decathlon, or you can search for your specific dataset if you want to do anything else.
Convert the Data Into Nifti
As I mentioned in the previous paragraphs, you may use different datasets than the ones I’ll be using in this lesson, and they may not be nifti files, therefore you’ll need to convert them.
Let’s start with the most basic file type that can be converted to nifti: dicom files.
I’ve already created a blog post about how to accomplish this, which you can find here. However, I will give you a brief description of the code so that you may use it without having to read the other blog article.
After reading the blog post about the differences between dicom and nifti files, I believe you now have a better understanding of what we need to do to create the nifties. All we have to do now is place each dicom series in one array, which will be used as frame data in the new nifti file. Don’t worry, I’m only talking about the procedure that is handled by the dicom2nifti library; all you have to do is call it and it will take care of the rest.
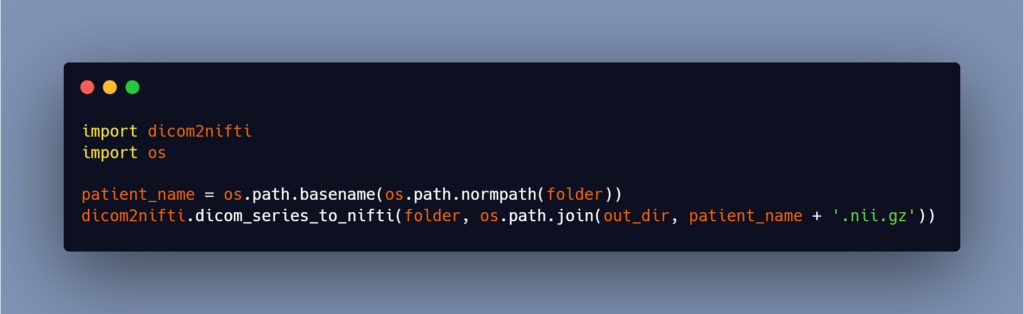
You can start by installing the package using pip:
pip install dicom2nifti
Now you may call the function ‘dicom_series_to_nifti’ directly, passing in the path to your folder containing the dicom series for one patient as the first argument, and the path to the output file + the name of the output file and the extension as the second argument (ex: patient1.nii) and if you want your file to be compressed, add the.gz extension at the end of the name (ex: patient1.nii.gz).
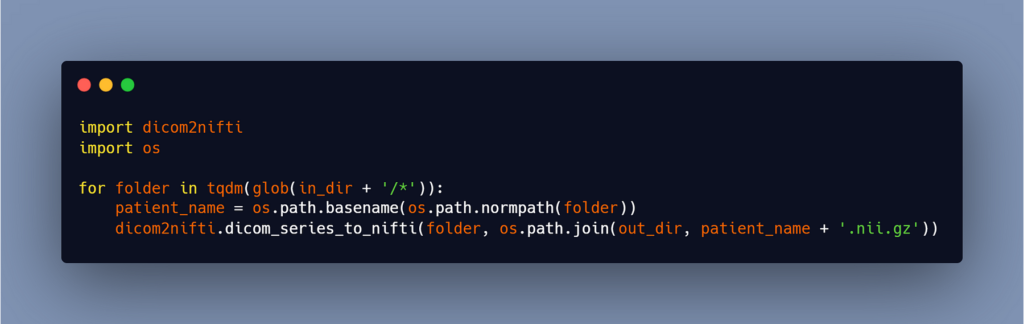
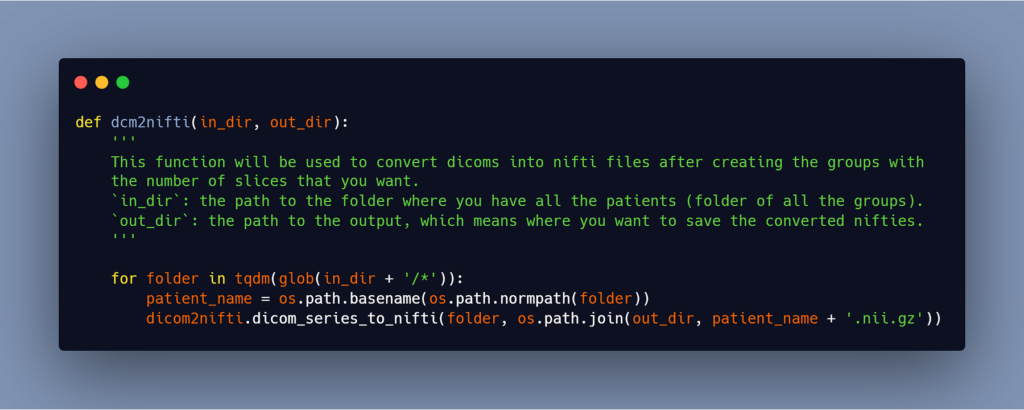
This code is for one patient only, so if you have multiple patients, then you can use this code:
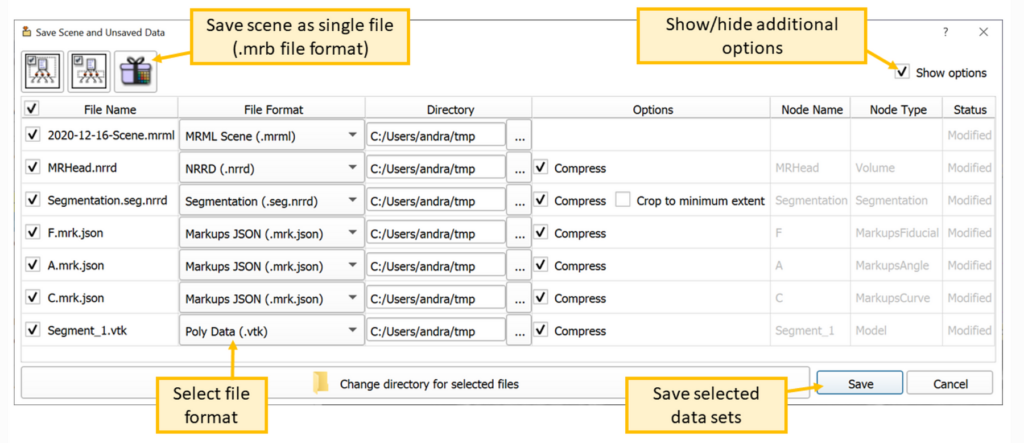
That was how to convert dicom files to nifti, however if you have a different sort of data, you might not be able to locate conversion scripts for Python, in which case you’ll need third-party tools like MatLab or 3D slicer…
The files can be supported by the 3D slicer are:

Plus the dicom files of course.
So, if your files are on the list of those that can be converted with the 3D slicer, you can use it without a script; otherwise, you’ll have to Google for the appropriate software to convert them.
Creating Groups of 65 Slices (if needed)
Let’s move on to the next stage, which is to divide the slices into 65 groups (or any number of slices you want). You might wonder why we need to take this step. When you obtain a public dataset or even if you have your own data, you will almost always notice that the number of slices for each patient differs. And if you don’t deal with this discrepancy before heading to the training, it could become an issue.
Keep in mind that we’ll be doing 3D segmentation, so your input volumes should all be the same size. Of course, you’ll never receive a dataset that includes the exact number of slices for all the patients.
You don’t need to establish the groups yourself if all of your patients have a similar number of slices. Because we’ll execute a resize in the preprocessing section, all of the inputs will have the same amount of slices. However, if you have a patient with 300 slices and reduce it to 100 or 60 slices, you will lose a significant number of slices that may carry vital information about the body.
You may argue that, so let’s set the number of slices in the inputs to 300. Good question, but I don’t think you should do that.
- The training will be very slow and your GPU/CPU memory may not handle that size of inputs.
- If you enlarge a patient with a number of slices equal to 60 into 300 slices, you will lose all of the information (you will create slices that do not exist).
As a result, you’ll need to make small groups of slices that each represent a small portion of a patient, and then combine them to acquire the entire volume.
To do this part you need to follow these steps:
#1- Convert all your nifti files into dicoms
If you already have dicom files, you don’t need to convert them to nifti right away; otherwise, you’ll need to convert them to dicom to establish tiny groups.
Unfortunately, there is no special python script that can perform this conversion. I made a blog post about how to convert from nifti to dicom using Python, which you can see here. The problem with my method is that it gives all dicom series the same index, which means all the slices will have the same place in the body and you won’t be able to convert them back to nifties.
So you can perform this conversion with the software 3D slicer; I know it takes time, but I couldn’t find anything better (if anyone knows of a better solution, please provide a link in the comments, thank you:)).
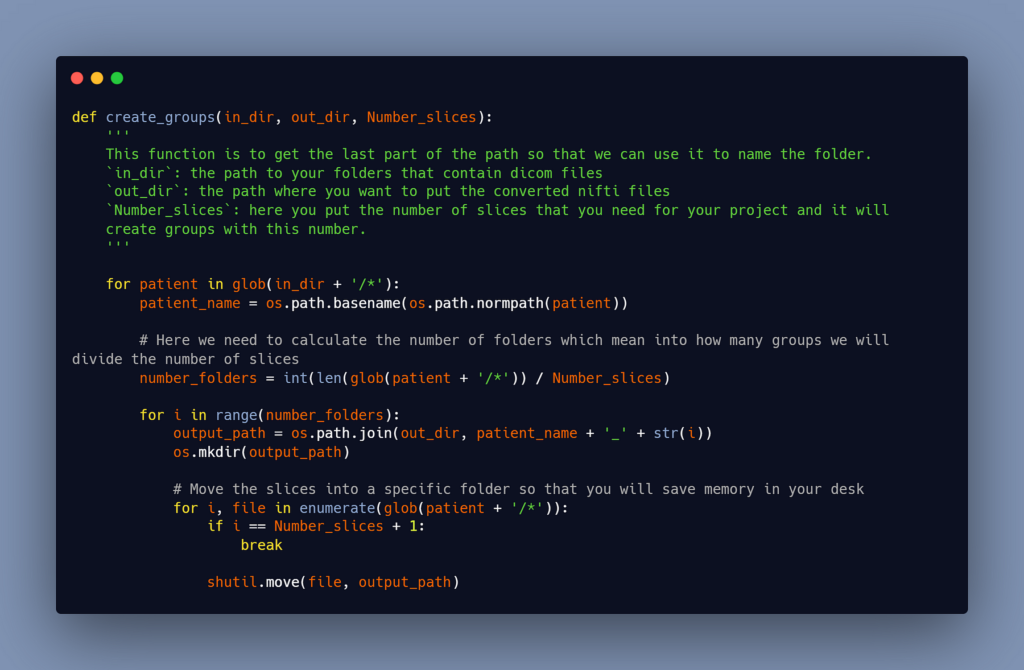
#2- Move every 65 slices into a folder
You can start putting a specified number of slices in a folder that represents a small portion of the body after you have all the patients in dicom format; for me, I chose 65 (it was a random choice), but you can choose whatever you want; try not to pass the 100 slices by a sub_patient.
You can use this python script that I have written to do this part of data preparation:
#3- Reconvert the groups of 65 slices into nifti files
You’ll get 65 slices in each folder after running the script above (as you can change the number of slices in the argument of the function). Now we must transform these 65-slice groups into nifti files in order to use them in the training.
We’ll utilize the identical scripts that I mentioned earlier.
#4- Delete the empty volumes
You’ll obtain certain nifti groups with no slice representing the liver after converting/creating the new nifti files. These empty slices will cause a problem during training (they will not cause an error, but they will decrease the accuracy of your model). To erase them, you must first understand them. To do this, I created a script that locates empty groups, after which you can either delete them manually or add a few lines of code to delete them.

Dividing the data into train/test folders
Now that everything is in place, all you have to do is divide your data into train and test folders so we can begin the preprocessing.
If you wish to utilize my code, you should name your files the same way I do so that running the scripts is simple.
‘TrainVolumes’: the folder having the images/volumes/CT scans for the training.
‘TrainSegmentation’: the folder having the labels/segmentation for the training.
‘TestVolumes’: the folder having the images/volumes/CT scans for the testing.
‘TestSegmentation’: the folder having the labels/segmentation for the testing.
Installing Monai, PyTorch, Cuda, and Cudnn
We’ll need to install a few packages to complete this project, starting with Monai, which is the core package. You’ll also need to install other packages to run the code on the GPU. I believe that doing this project on a CPU will be unfeasible because the training will take an eternity to complete.
So to install Monai, you can just use the pip package by running this line in your terminal.
pip install monai
Note: For me, virtual environments are preferable since whatever package I install for a given project is installed in the virtual environment, which means that if I don’t need that package after the project, I can simply uninstall it with the virtual environment. If you prefer to use a virtual environment, you can construct a conda environment or a regular Python virtual environment.
Installing Cuda
Cuda may be installed simply by downloading the appropriate version from the Nvidia website and installing it like any other piece of software.
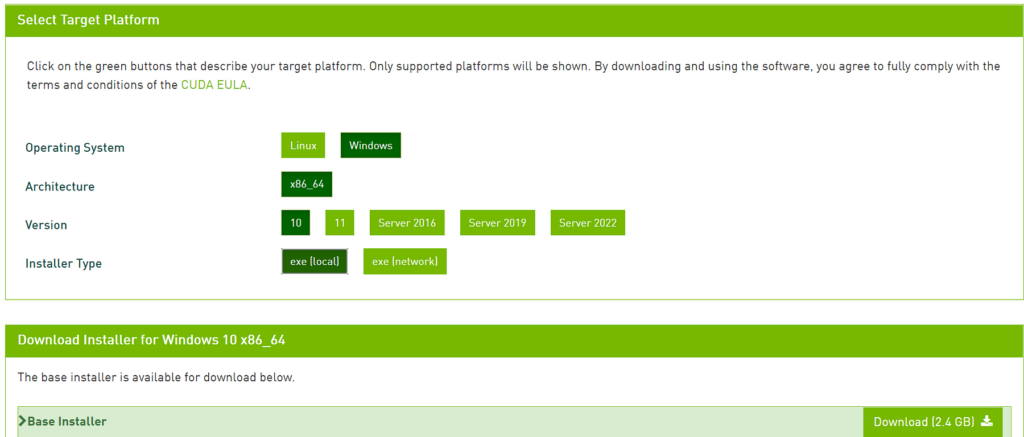
Simply select your preferences and click the “Download” button. After the download is complete, open the file and follow the on-screen instructions.
Installing Cudnn
Cudnn is not something that can be installed; nevertheless, you must first download the file (make sure that it is for the right Cuda version that you have installed).
After downloading it, copy the files from the lib, include, and bin folders and paste them in the Cuda installation folder’s lib, bin, and include folders.
Then, in your system environment paths, add several directories from the cuda folder.
These are the path that you need to add to your system environment paths

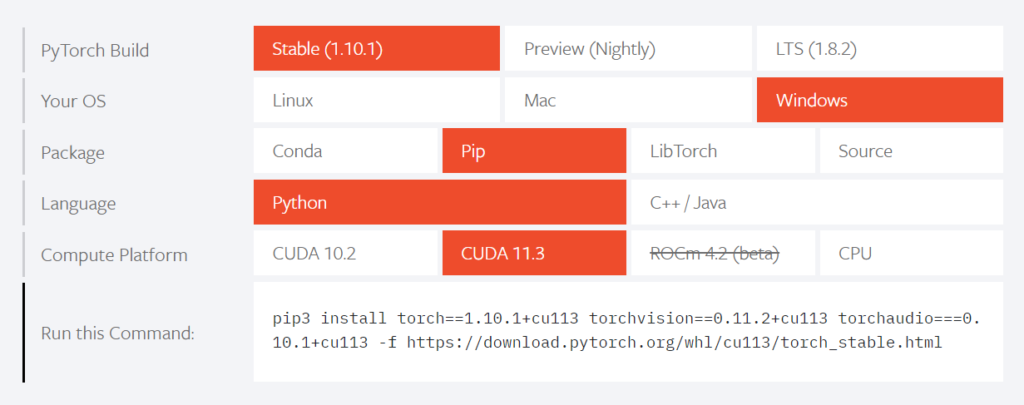
Installing PyTorch
To get PyTorch, go to their website and select the version that corresponds to your Cuda version.
The Preprocess
I wrote a blog article about how to do the preprocess using Monai, which you can find here, as well as another blog post about how to do the data augmentation using Monai, which you can find here.
So far, I’ll simply show you the function that I used in this tutorial; however, all of the information may be found in the preprocess blog.
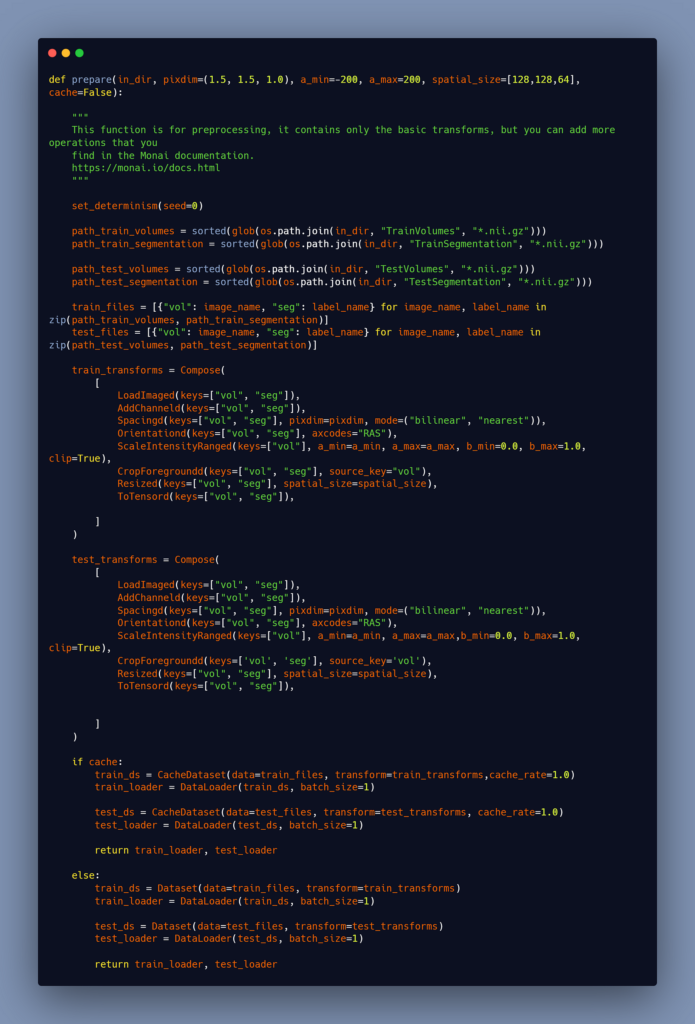
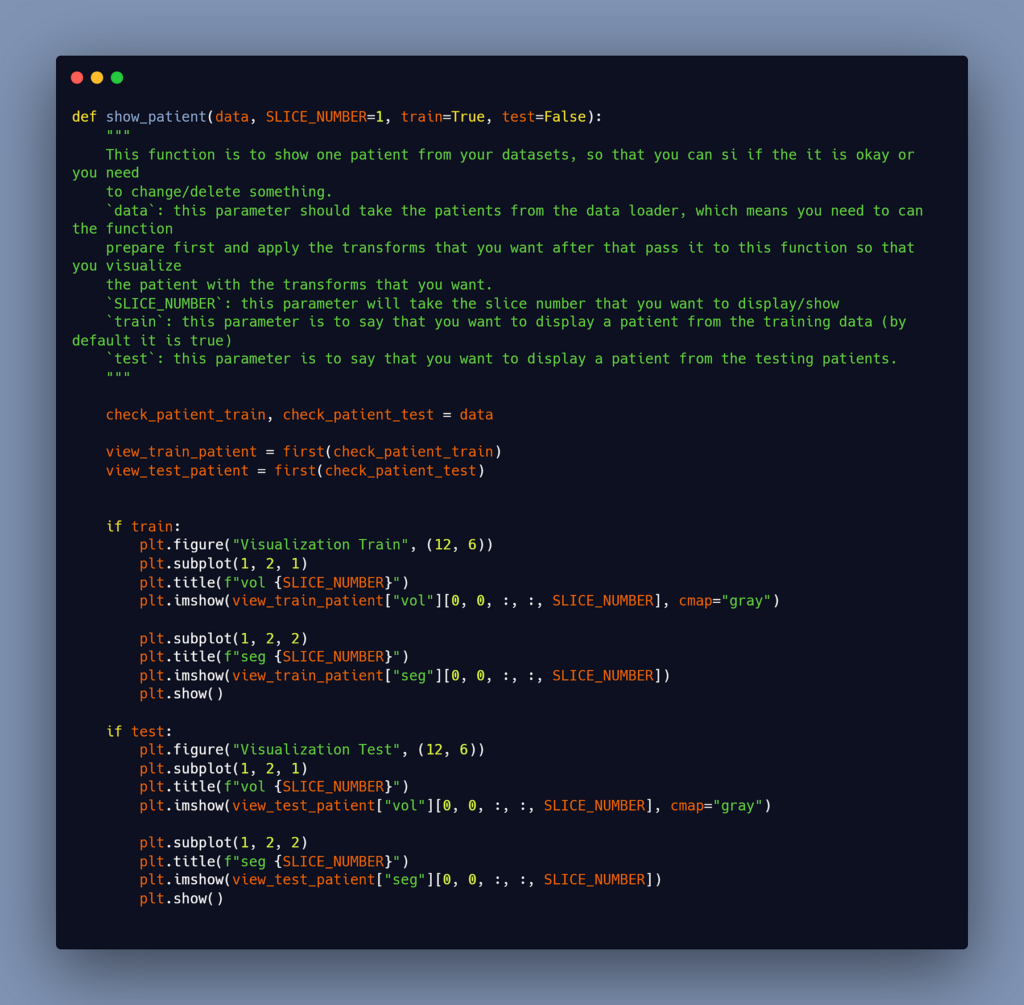
Of course, you may need to exhibit one of the patients after you’ve completed the preprocessing for two reasons. The first is to see if the data was properly loaded, and the second is to visualize your data after the preprocess because you may not be able to use the same preprocess for all tasks, thus you may need to use values other than mine.
This function can be used to view patients from both the training and testing datasets.
That’s all there is to it when it comes to data preparation and preprocessing for this tutorial.
The frequent problems/errors that you may encounter when utilizing Monai will be discussed in the upcoming blog post.