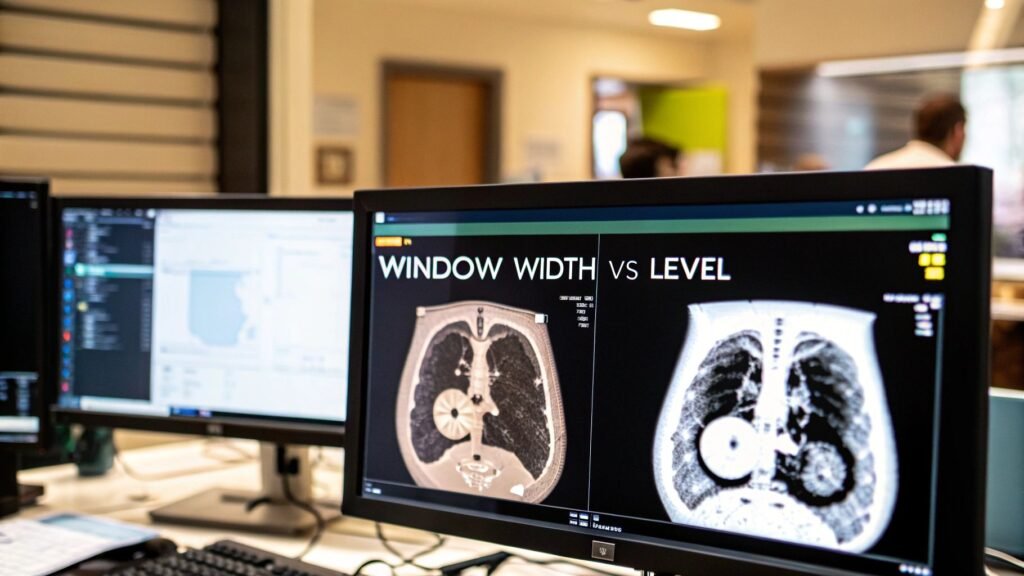
When you're trying to differentiate window width vs window level, the distinction is actually quite intuitive. Window Width is all about contrast—it determines the total spectrum of tissue densities you'll see on the screen. Window Level, on the other hand, controls the brightness by picking the exact center of that spectrum.
A simple way to think about it is this: width decides how many shades of gray are visible, while level decides which specific shade is the midpoint.
The Art of Seeing Inside the Human Body
Finding the perfect balance between these two settings is where the real artistry of modern radiology comes alive. It’s what elevates a standard grayscale image from a simple picture into a high-powered diagnostic instrument, capable of exposing subtle pathologies that might otherwise be missed.
This isn't just a technical exercise of tweaking brightness and contrast. It's about sculpting the raw data to tell a clear, concise clinical story. Every small adjustment directly influences diagnostic confidence and, in the end, patient outcomes.
The path from raw scan data to a definitive diagnosis is incredibly important. If you want to dive deeper into how this initial information is gathered, our guide on the https://pycad.co/acquisition-of-images/ provides a great overview. That first step is the foundation for all the precise windowing adjustments that follow.
Window Width vs Window Level At a Glance
To really get a feel for how these parameters work, it helps to see them side-by-side. One setting is almost meaningless without the other; their synergy is what creates a diagnostically useful image.
This table breaks down their core roles.
| Parameter | Primary Function | Visual Impact | Primary Use Case |
|---|---|---|---|
| Window Width | Controls the range of displayed tissue densities. | Adjusts the contrast of the image. | Distinguishing between tissues with similar densities (e.g., gray vs. white matter). |
| Window Level | Sets the central point of the tissue density range. | Adjusts the brightness of the image. | Focusing on a specific tissue type (e.g., setting the level to bone density for fractures). |
This powerful interplay lets a radiologist filter out the noise and zero in on the details that are truly critical for a specific diagnosis. For example, you might use a wide window for a general survey of the anatomy, but you’ll need a narrow window to pick up on subtle variations in soft tissue.
The core principle of visualizing internal structures is also critical in other modalities, which is why it's so important for understanding other vital imaging techniques like the heart echocardiogram.
At its heart, windowing is a process of targeted storytelling. You are telling the software which part of the body’s story you want to see, and with what level of dramatic detail.
This philosophy—user-centric control and diagnostic clarity—is exactly what inspires our work. Here at PYCAD, we at PYCAD, build custom web DICOM viewers and integrate them into medical imaging web platforms, making sure clinicians have the most intuitive and precise tools possible.
Our mission is to empower medical pioneers by creating interfaces where these critical adjustments feel like a natural extension of their own diagnostic expertise. To see some of our projects, visit our portfolio page.
Decoding the Language of Pixels and Hounsfield Units
To truly appreciate the dance between window width and window level, you first have to understand the language of the image itself. Every single pixel in a CT scan isn't just a random shade of gray; it’s a precise numerical value that represents tissue density. This value is measured on the Hounsfield Unit (HU) scale, the standardized system that basically serves as the digital DNA of medical imaging.
This scale provides an elegant and logical map of the human body. It’s anchored by two fundamental constants: pure water, which is set as the baseline at 0 HU, and air, which sits at the very bottom at -1000 HU. From that foundation, every other tissue finds its place. Fat, for instance, is a bit less dense than water and usually measures around -100 HU. Soft tissues like muscle and organs fall into a positive range, while dense cortical bone shines brightly at the other end of the spectrum, often registering +1000 HU or even higher.
The Hounsfield Unit Scale Explained
Think of this massive range—from -1000 HU to over +1000 HU—as an enormous library of information packed into the image. Here's the catch: a standard computer monitor can only display about 256 shades of gray. If you tried to represent over 2000 different tissue densities with just 256 shades, you'd lose all the subtle but critical details. It would be impossible to tell things apart.
This is exactly where windowing comes in and saves the day. It’s like using a high-powered lens, allowing you to focus on a specific, narrow portion of that massive HU scale. For a deeper dive into this foundational concept, feel free to check out our comprehensive guide on Hounsfield Units.
This infographic gives you a clean visual breakdown of the benchmark HU values for key substances.

As you can see, the density gap between different tissues is immense. This visualization powerfully reinforces why a single, static display setting just won’t cut it for a thorough diagnosis.
Being able to manipulate these settings on the fly is a relatively modern advantage. The whole concept of windowing has come a long way, evolving from the rigid, fixed settings of early scanners to the incredibly flexible controls we have at our fingertips today. This flexibility allows for stunning precision. A brain scan, for example, might use a window width of 80 HU and a level of 40 HU specifically to highlight the tiny differences that could indicate an ischemic stroke. This progress has been a game-changer for diagnostic accuracy, empowering radiologists to perfectly tune the image to the specific tissue they’re examining.
Translating Settings into Diagnostic Clarity
So, how do these two settings actually turn a bunch of numbers into a clear, diagnostic picture?
It’s actually quite intuitive. The Window Level essentially sets the midpoint of your focus on the HU scale. If you’re hunting for a potential bleed in the brain (which is around +60 HU), you’d set your level right around that value.
Then, the Window Width determines the range of HU values around that central point that get displayed across the full grayscale spectrum. A narrow width creates high contrast, making it perfect for differentiating tissues with similar densities. A wider width, on the other hand, gives you a broader, more general overview of different structures at once.
Windowing is the elegant translation of raw quantitative data into qualitative diagnostic insight. It’s the bridge between the physics of the scanner and the mind of the clinician.
This translation isn't just a neat feature; it’s the very core of how clinicians interact with medical images. Here at PYCAD, we are obsessed with perfecting this interaction. We at PYCAD, build custom web DICOM viewers and integrate them into medical imaging web platforms, ensuring these vital tools are not only powerful but also incredibly intuitive to use. Our entire goal is to craft viewing experiences that feel like a seamless extension of the clinician's own thought process. Check out our work on our portfolio page.
A Comparative Guide to Window Width and Window Level
Once you move past the textbook definitions, you start to see the real art behind windowing. Window width and window level aren't just two separate sliders on a screen; they're partners in a delicate dance, working together to reveal the story hidden within a medical image.
Every small adjustment you make has a powerful, immediate effect on what you can see—and ultimately, what you can diagnose.
The magic truly begins when you master their relationship. A narrow Window Width is like a high-powered magnifying glass for contrast. It takes tissues with very similar densities and pulls them apart visually, making subtle differences pop. This is how you can clearly distinguish gray matter from white matter in the brain or spot a faint, lurking lesion in the liver.
On the other hand, adjusting the Window Level is like shining a spotlight on one actor on a dark stage. It centers the entire grayscale on the exact Hounsfield Unit value of the anatomy you care about, letting everything else fade into the background.
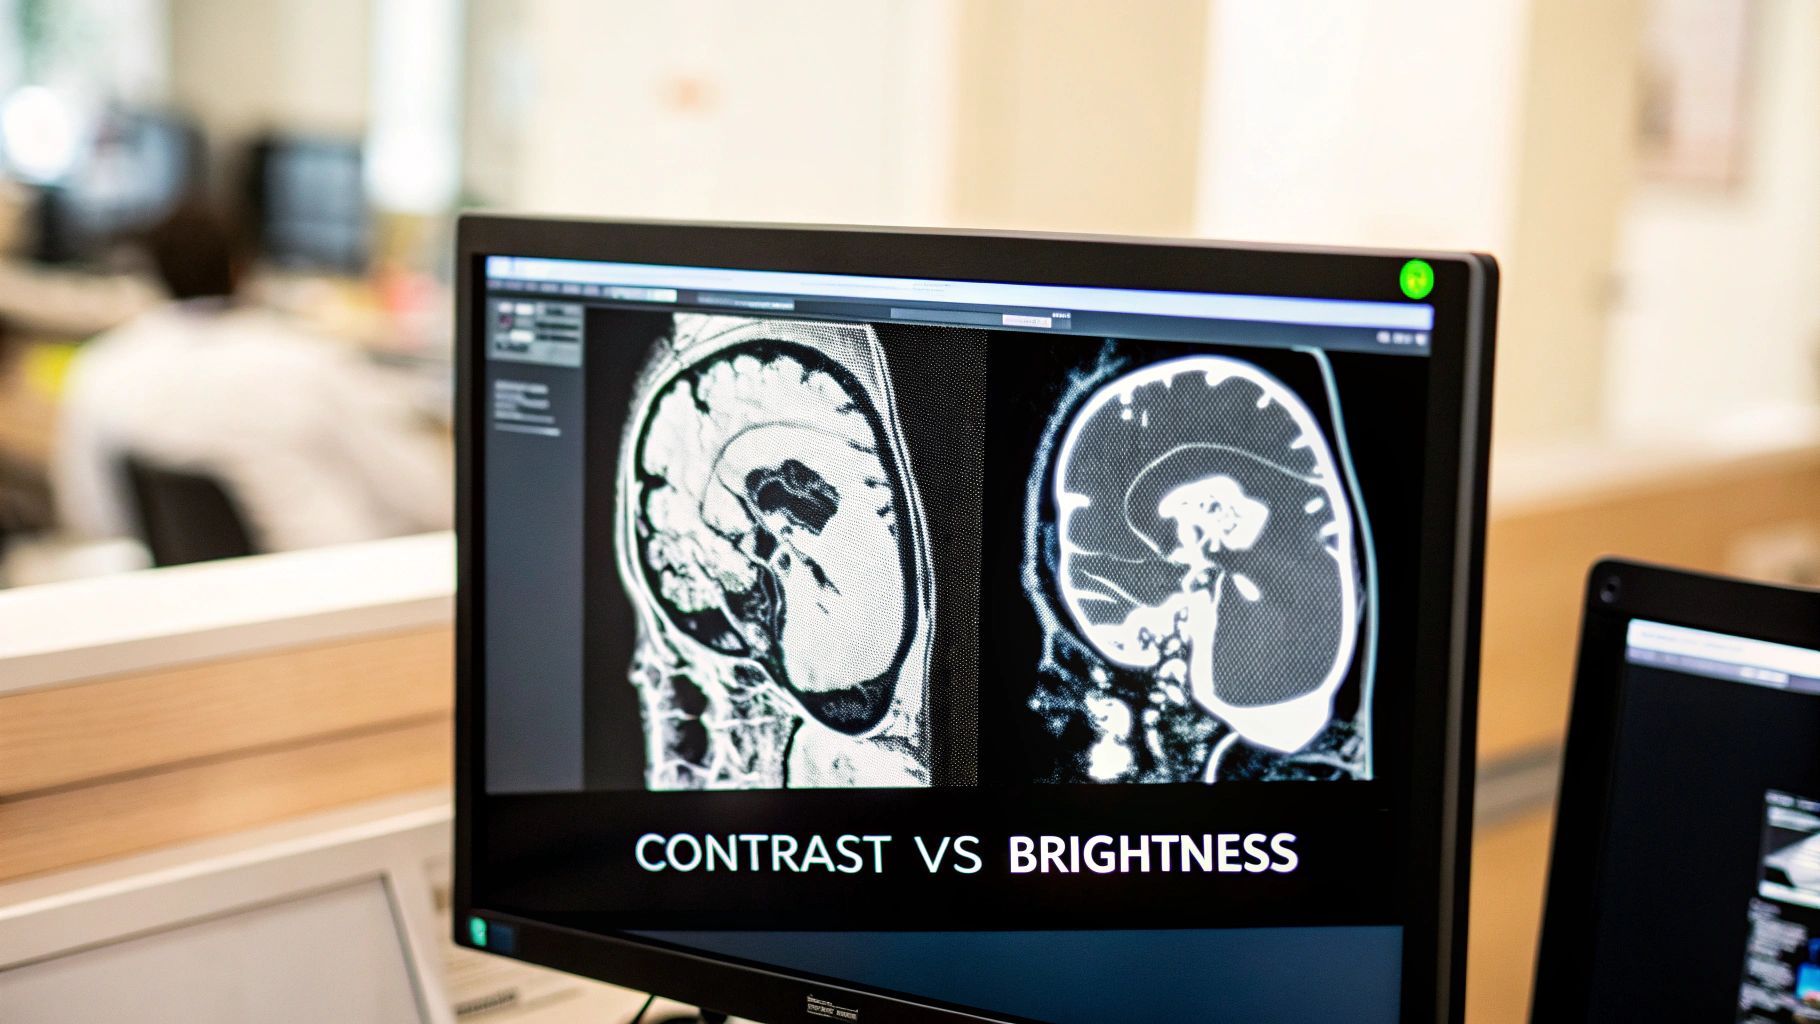
The Contrast and Brightness Dance
At its heart, the comparison of window width vs window level is a study in contrast versus brightness. You simply can't have one without the other. You can set the perfect brightness (Level), but if your contrast (Width) is off, the image becomes a useless, washed-out shade of gray.
Conversely, you might have razor-sharp contrast, but if it’s focused on the wrong tissue density, the pathology you’re hunting for will be completely invisible—lost in absolute black or stark white.
The art of windowing is not just about making an image look 'good.' It's about sculpting the data to answer a specific clinical question with the greatest possible clarity and confidence.
This philosophy of purpose-driven clarity is exactly what we build for at PYCAD. We at PYCAD, build custom web DICOM viewers and integrate them into medical imaging web platforms, always focusing on making these critical adjustments feel intuitive and precise. We want clinicians to be able to focus on the diagnosis, not on fighting with the interface. Take a look at our portfolio page to see how we put this into practice.
Common Pitfalls and How to Avoid Them
True mastery comes from knowing what not to do. A few common mistakes can easily obscure vital information and turn a diagnostic scan into a source of confusion.
- Setting the Width Too Wide: This happens all the time when someone wants a "general overview." A massive window width crams a huge range of HU values into the same limited grayscale. The result? Tissues with subtle but critical density differences all blend together into a low-contrast soup.
- Setting the Level Incorrectly: This is like tuning a radio to the wrong frequency. If you’re searching for a lung nodule (around -600 HU) but your level is set for bone (+400 HU), that nodule will be completely invisible. Your level must be centered on your target.
The best way to avoid these traps is to think before you click. Ask yourself: "What specific anatomy am I trying to see right now?" That single question will guide both your width and level, turning arbitrary tweaking into a focused, diagnostic strategy. For a deeper dive into standard presets, check out our article on CT scan window settings.
Clinical Impact Comparison
To bring this all home, let’s see how these settings directly influence diagnostic goals. The right combination of width and level is entirely dependent on the clinical question you're trying to answer.
This table breaks down how different clinical goals demand unique windowing strategies.
| Clinical Goal | Optimal Window Width Setting | Optimal Window Level Setting | Anatomical Example |
|---|---|---|---|
| Visualize Subtle Soft Tissue Differences | Narrow (e.g., 80 HU) to maximize contrast. | Centered on Tissue (e.g., 40 HU for the brain). | Differentiating gray and white matter in a brain CT. |
| Survey Tissues of Highly Varied Densities | Wide (e.g., 2000 HU) to include a broad range. | Centered on the Midpoint (e.g., 200 HU). | Viewing bone, air, and soft tissue in the chest. |
| Isolate Dense Structures for Evaluation | Moderate to Wide (e.g., 1500 HU) to show bone detail. | High (e.g., 300 HU) to focus specifically on bone. | Assessing for fine fractures in the skeletal system. |
| Examine Low-Density Lung Parenchyma | Wide (e.g., 1500 HU) to see lung markings and air. | Low (e.g., -600 HU) to center on the lung tissue. | Identifying pulmonary nodules or emphysema. |
As you can see, there’s no single “best” setting. The optimal window width vs window level configuration is dynamic, shifting with every diagnostic challenge. It’s this inspired interplay between the two that transforms a flat, gray image into a source of profound clinical insight. You're not just looking at a picture; you're seeing the unseen and bringing clarity to the complex.
Windowing in Action: Real-World Clinical Scenarios

Theory is one thing, but seeing the interplay between window width vs window level in a real clinical setting is where the magic truly happens. This is the moment a sea of grayscale pixels transforms into a life-saving insight, all thanks to the focused expertise of a clinician.
Let's step into the reading room and see how these settings become powerful diagnostic tools, turning abstract numbers into clear, actionable answers. Each scenario demands a unique approach—a specific lens to bring the truth into sharp focus.
This ability to seamlessly switch between diagnostic perspectives is the bedrock of modern imaging. It's exactly this challenge that inspires us at PYCAD. We at PYCAD, build custom web DICOM viewers and integrate them into medical imaging web platforms, all with the goal of making these critical workflows feel effortless and precise for specialists.
Unmasking a Pulmonary Embolism with the Lung Window
Picture this: a patient presents with sudden shortness of breath and chest pain. A CT scan is ordered immediately to rule out a pulmonary embolism—a dangerous blood clot lodged in the lung's arteries. In this high-stakes situation, the 'Lung Window' preset is the hero.
This preset uses a very wide Window Width (around 1500 HU) and a low Window Level (around -600 HU). This specific combination is nothing short of brilliant.
- The low level centers our view squarely on the very low density of air-filled lung tissue.
- The wide width, meanwhile, captures the entire spectrum—from the dark air in the lungs to the denser soft tissues of the blood vessels and, crucially, the clot itself.
With this setting, the intricate, delicate structures of the lung parenchyma become visible, while the pulmonary arteries stand out in stark contrast. The clot, being denser than the surrounding air, appears as a clear filling defect inside the vessel. It's like flipping on a black light to find something that was hiding in plain sight.
Diagnosing an Acute Stroke with the Brain Window
Now, imagine a patient rushed into the emergency room with symptoms of an acute stroke. Every second counts. A non-contrast head CT is the first step, but the challenge is spotting the subtle, early signs of an ischemic stroke, where brain tissue is being starved of blood.
This is where the 'Brain Window' shines. It uses a very narrow Window Width (around 80 HU) and a Window Level set to about +40 HU.
This precise setting is a masterclass in targeted contrast. It’s designed specifically to exaggerate the tiny density differences between the brain's gray and white matter, making the earliest signs of swelling or tissue death visible.
A wider window would just blur these critical tissues into a uniform gray mush, completely hiding the problem. The brain window provides the high-contrast view needed to make a diagnosis that can change the course of a patient's life.
Spotting a Hairline Fracture with the Bone Window
Finally, let's consider a patient with nagging wrist pain after a fall. An initial X-ray comes back inconclusive, so a CT is performed to hunt for a subtle fracture. To find a tiny crack in a dense structure like bone, we need a completely different strategy: the 'Bone Window'.
This preset dials in a wide Window Width (often 2000 HU or more) and a high Window Level (around +400 HU).
- The high level focuses the brightness squarely on the dense Hounsfield values of cortical bone.
- The wide width gives us incredible contrast within the bone itself, showing the fine detail between the dense outer cortex and the less dense inner marrow.
This combination makes the bone appear bright yet highly detailed, allowing a radiologist to trace its structure meticulously. A hairline fracture, which would be totally invisible on a soft tissue setting, is instantly revealed as a dark disruption in the bright, solid bone.
These scenarios highlight the incredible power of context in medical imaging. The best setting is never one-size-fits-all; it’s always a direct response to the clinical question at hand. This is the kind of purpose-built functionality we love to create. To see how we translate these clinical needs into powerful, intuitive tools, feel free to explore our work on our portfolio page.
Where We're Headed: AI and the Future of Medical Imaging
What if your imaging software could anticipate your diagnostic needs before you even touched the mouse? This is the next great leap for medical imaging, and the relationship between window width and window level is right at the heart of it. We're on the verge of an era where intelligent systems act as a trusted co-pilot for clinicians, completely rethinking the windowing process as we know it.
New AI models are being trained to instantly analyze the anatomy in a scan or a suspected pathology and suggest the perfect window settings on the fly. This isn't about replacing the radiologist's eye—far from it. Think of it as powerful decision support, augmenting your expertise, especially when you’re dealing with complex cases where the standard presets just don't cut it.
Your Diagnostic Co-Pilot
The real goal here is to bring consistency to image quality across the board and lighten the cognitive load on clinicians. This frees you up to do what you do best: interpret the image, not wrestle with the controls. It's a vision where technology improves the very act of diagnosis, leading to faster, more confident patient care. It’s all about creating that perfect partnership between human intuition and machine precision.
This isn’t just theory; pioneering research is already showing what’s possible. For instance, studies exploring the classification of brain CT images based on their window settings have been incredibly promising. One algorithm was able to classify images as "bone window" or "non-bone window" with a remarkable 90% accuracy. This kind of work highlights just how vital windowing is for spotting cranial issues and proves that smart algorithms can automate and sharpen this critical step. You can dive deeper into these findings in the published research on automated window setting classification.
AI-driven windowing isn't about taking control away from the expert. It’s about offering an intelligent, data-backed first draft of the perfect view, saving precious seconds and enhancing diagnostic confidence with every click.
This is the future that gets us excited. At PYCAD, we don't just solve today's problems; we're building for the possibilities of tomorrow. We at PYCAD, build custom web DICOM viewers and integrate them into medical imaging web platforms, always looking ahead to a time when clinicians and technology work in perfect sync. You can see some of our forward-thinking solutions on our portfolio page. We're all in on building the tools that will define the next generation of medical imaging—making diagnosis smarter, faster, and more precise than ever before.
Great Tools Don't Just Show Images—They Sharpen Your Expertise
When it comes to diagnostic imaging, the tools you use can either be a seamless extension of your expertise or a frustrating barrier. The entire window width vs window level discussion is a prime example of this; tiny adjustments can lead to massive breakthroughs in what you see. But you can only tap into that power when the viewing tool itself gets out of your way.
A truly great DICOM viewer has a real, measurable effect on how quickly and accurately you can make a diagnosis. When the software is intuitive, it just melts away, letting you focus entirely on the intricate details of the scan instead of fighting with clunky controls. This is where the magic happens—creating an environment where your skills can truly shine.
At PYCAD, this is precisely the world we're dedicated to building. We don’t just make software; we at PYCAD, build custom web DICOM viewers and integrate them into medical imaging web platforms, transforming powerful concepts into practical tools you can rely on every single day.
Moving Beyond Sliders to Truly Intuitive Control
What if your most-used window settings were just a single click away, saved as presets that instantly adapt to what you’re looking at? No more manually tweaking sliders for every single study. Imagine mouse controls so natural that dynamic windowing feels like second nature, letting you explore tissue densities on the fly without ever losing your train of thought.
This isn't about luxury features; it's about reducing your cognitive load and minimizing the risk of error. When you can glide effortlessly through an image, exploring different tissues with a simple gesture, you build a much richer, more complete picture of the patient’s condition in your mind.
The best DICOM viewer is the one you don't notice. It should be so perfectly tuned to your needs that it disappears, allowing your diagnostic skill to take center stage.
This philosophy is the bedrock of every project we take on. We’re convinced that by clearing away the technical hurdles, we help medical professionals perform at the peak of their abilities. And that, in turn, leads directly to better outcomes for patients.
Finding Efficiency at Scale with Single-Click Settings
The impact of a well-designed viewer goes far beyond a single image. Think about the time saved when you can apply your perfectly optimized windowing settings across an entire series of images in an instant. For a radiologist navigating a scan with hundreds of slices, this is nothing short of a revolution.
Instead of fiddling with the window width vs window level for each individual slice, you find the ideal view once and apply it to the entire set. This doesn’t just save an incredible amount of time; it creates a consistent, standardized view that makes it so much easier to track anomalies across different planes.
This is the standard of excellence we aim for. Our mission is to deliver tools that are so in sync with clinical workflows that they feel like they were custom-made for each user—because, in a way, they are. We work hand-in-hand with healthcare organizations to build platforms that don’t just meet their needs but anticipate what their top performers require to excel.
Here are the guiding principles behind our approach:
- Customizable Presets: We design systems where you can save and instantly access your go-to window settings for different anatomies or suspected conditions. This standardizes quality and gives you back precious time.
- Intuitive Controls: Our viewers are built for fluid, natural interaction, letting you make dynamic adjustments without breaking your concentration.
- Deep Workflow Integration: We don't just build standalone viewers. We integrate them flawlessly into the larger medical imaging web platforms, creating a smooth and efficient experience from start to finish.
Ultimately, the conversation about window width vs window level is all about gaining absolute clarity. We believe the tools you use to get there should be just as clear and focused. To see how we bring these ideas to life, feel free to take a look at the projects on our portfolio page.
Common Questions Answered
When you're navigating the world of medical imaging, the relationship between window width and window level can spark a lot of questions. Let's tackle some of the most frequent ones to help sharpen your skills and boost your diagnostic confidence.
What Happens If My Window Width Is Too Narrow?
Setting an overly narrow window width cranks up the contrast to the extreme, often giving you a stark, black-and-white image. This is a classic double-edged sword.
On one hand, a narrow window can be fantastic for distinguishing between tissues with very subtle density differences. On the other hand, it throws away a ton of information. Structures outside that small range get clipped to pure black or pure white, hiding important anatomical context and making the image look noisy and incomplete.
Can I Just Use My Go-To CT Window Settings on an MRI?
That's a definite no. The reason is that CT and MRI are built on entirely different physics and data scales. CT windowing is a precise science, tied directly to the universal Hounsfield Unit (HU) scale, which gives a standardized measure of how dense tissue is.
MRI signal intensity is a whole different ballgame. It's not standardized and depends on a complex interplay of factors like T1 and T2 relaxation times. Because there's no universal scale like HU, the idea of a one-size-fits-all "window" setting just doesn't translate from CT to MRI.
The secret to unlocking diagnostic clarity is simple: center your window level on the average Hounsfield Unit value of the exact tissue you need to scrutinize.
How Do I Pick the Right Window Level?
Choosing the best window level is all about knowing what you want to see. The golden rule is to set the level to the approximate HU value of the tissue you're investigating.
Think of it this way:
- To get a good look at brain matter, you'd center your view around +40 HU.
- If you need to examine bone, you'll need to slide that level way up to somewhere between +300 to +500 HU to bring the bone's density into sharp focus.
At PYCAD, we at PYCAD, build custom web DICOM viewers and integrate them into medical imaging web platforms. To see how we’re empowering clinicians, take a look at our portfolio of innovative solutions.